You may have attempted to follow this Technet guide to test out Remote EFS on WebDAV folder. And it turned out that the encrypted file is either corrupted or not encrypted at all!
In order for EFS to work on WebDAV, you'll need to enable Custom Properties on IIS7. Follow this guide and it works like a charm!
If you're implementing Credential Roaming for EFS certificates, do take care of sufficient storage on Domain Controllers. Roaming certificates and keys are stored on DCs and would be replicated. Refer to this Technet link for considerations.
Monday, July 23, 2012

Wednesday, July 18, 2012
How to share EFS encrypted file
It's pretty straightforward to encrypt a file on local drives. All you need to do is to right-click on the "Properties" -> "General" -> "Advanced" and check on "Encrypt contents to secure data". This is provided that you have enrolled with a EFS certificate in your user certificate store. Credential roaming works great if you are going to login to multiple machines.
To share the encrypted file with other users, you've to add their EFS certs to the file before they can access it. On the file that you intend to share, right-click on "Properties" -> "General" -> "Advanced" -> "Detail" -> "Add".
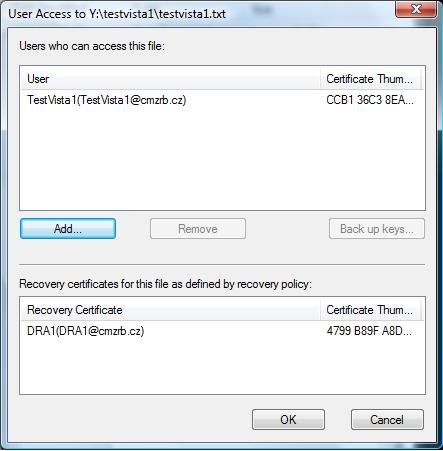
Click on "Find User".

Wednesday, June 20, 2012
Implementing NAP with 802.1x enforcement
In my earlier post, I've configured 802.1x with EAP-TLS. Now, I'm expanding the effort to Network Access Protection (NAP) with 802.1x enforcement. Machines that are validated compliant to the policy are able to access authorized network or VLAN. Otherwise, it would go into Guest VLAN for further remediation action. In NAP with 802.1x enforcement, clients would send Statement of Health (SoH) to the Windows NPS server for System Health Validation against the Health Policies on top of 802.1x authentication. The SoH would contain information pertaining to the Security Center of the Windows clients.
In this example, I would just configure the Health Policies to check the status of Windows Firewall. The Windows 7 client and the NPS (Windows Server 2008 R2) have been setup in a full AD environment with AD Certificate Services. All certificates have been issued and the network switch is configured with 802.1x settings.
On the NPS server, click on the "Configure NAP" to start the wizard. Follow the wizard instructions carefully. Go to the "Connection Request Policies" after the completion of wizard. Right-click on the NAP policy and click "Properties". Click on the "Settings" tab and edit on the "Microsoft Protected EAP (PEAP)". Read the below underlined description that you must configure the PEAP properties here.

Choose the correct server cert that is generated based on the "RAS and IAS Server" template as mentioned in my previous post. In addition, ensure that the below highlighted items are added and enabled. Edit on the "Smart Card or other certificate" to choose the correct cert and CA if you're using cert authentication.

On the client configuration, it would be more efficient to use Group Policy to configure and enable the NAP setting. On the computer configuration, create the "Wired Network (IEEE802.3) Policies" as shown below:

Ensure that the clients' PEAP authentication settings match the NPS server's. In addition, under the "Security Settings", edit the Startup of "Wired AutoConfig" and "Network Access Protection Agent" to "Automatic". Next, go to "Network Access Protection" to enable "EAP Quarantine Enforcement Client". You may also like to configure other optional settings like "User Interface Settings".
Once the GPO is created, link it to the client OUs and run "gpupdate" on the Windows 7 client. Check the status on the event viewer. If everything runs well, try disabling the Windows firewall and it will be enabled back automatically for compliant. For more details and troubleshooting, refer to this NAP with 802.1x enforcement step-by-step guide.
Once the GPO is created, link it to the client OUs and run "gpupdate" on the Windows 7 client. Check the status on the event viewer. If everything runs well, try disabling the Windows firewall and it will be enabled back automatically for compliant. For more details and troubleshooting, refer to this NAP with 802.1x enforcement step-by-step guide.
Tuesday, June 12, 2012
A certificate could not be found that can be use with this EAP when configuring 802.1x on NPS
I was running the default 802.1x wizard to configure a new RADIUS server on Windows Server 2008 R2. I had an error that prompt "A certificate could not be found that can be use with this Extensible Authentication Protocol" as shown below:

But when I run the cert manager, I saw a computer certificate! So what's wrong?! It's the template. Most of the time, we configure auto-enrollment for machines based on Computer template. This time, you'll need the "RAS and IAS Server" template. Rather than auto-enrollment, you may want to perform a manual cert enrollment for the NPS server. Hence, I duplicate a new NPS server template from the "RAS and IAS Server". And yes, you'll also need to register the NPS server on AD using "netsh ras add registeredserver" command. Ensure that the NPS server is a member of the "RAS and IAS Server" security group on the AD.
To further ensure that the NPS server is using the "correct" cert, click "edit" on the PEAP or EAP-TLS authentication method and verify the cert as follows:

To further ensure that the NPS server is using the "correct" cert, click "edit" on the PEAP or EAP-TLS authentication method and verify the cert as follows:

In summary (click for detailed step-by-step guide):
Saturday, June 9, 2012
Re-Learning the Basic of Relational Database - Normalization, Primary Key and Foreign Key
The last time that I worked on SQL-based relational database was more than 10 years back when I first started my first job as a C/C++ and Java programmer. It's time for me to revise that knowledge again. Recently, I've picked up a book called "Microsoft SQL Server 2012: A Beginner's Guide" by a German professor named Dusan Petkovic. I've started chapter 1 and it's all about the basic of relational database on Normalization process and various key concepts. How I wished the author could explain in a even more simpler language.
Normal Forms
Normalization is the process of efficiently organizing data in a database by reducing data redundancy while ensuring the integrity of data dependency. Normal forms are used in this process to describe the stages of normalization. In theory, it started from stage one (the lowest form of normalization, referred to as first normal form or 1NF) through five (fifth normal form or 5NF). In practical applications, you'll often see the first three NFs (1NF, 2NF, and 3NF) and the last two NFs (4NF and 5NF) are seldom used.
First Normal Form (1NF)
1NF means that the value of any column in a row must be single valued (i.e. atomic). Imagine a table with following fields: Employee No (emp_no) and Project No (project_no) where the relationship is one-to-many i.e. one employee may take up multiple projects. The table may look like this:
emp_no project_no
10102 (p1, p3)
The table is not in 1NF, as project_no contains more than 1 value. Once we've ensured the rule of atomic, the table will be in 1NF as follows:
emp_no project_no
10102 p1
10102 p3
Second Normal Form (2NF)
Primary key refers to the column of a table that is able to identify each row uniquely. In the earlier table, both emp_on and project_no form a composite primary key (i.e. having more than 1 column as primary key). Expanding the same example with more columns that entails which department the employees belong to, such as department id (dept_id), department name (dept_name) and department location (dept_loc). A table may look like this:
emp_no project_no dept_id dept_name dept_loc
10102 p1 d1 Sales L1
10102 p3 d1 Sales L1
25348 p1 d2 Marketing L2
Here, there is some redundancy on the dept_name and dept_loc. Not only the redundant info would take up more storage space, there is a chance of update error whenever the employee changes department or the department relocates. To be in 2NF, remove subsets of data that apply to multiple rows of a table and place them in separate tables. Create relationships between these new tables and their predecessors through the use of foreign keys (i.e. primary keys in other table). The resultant tables may look like this:
emp_no project_no
10102 p1
10102 p3
25348 p1
emp_no dept_id dept_name dept_loc
10102 d1 Sales L1
25348 d2 Marketing L2
In the newly separated table, the emp_no is both the primary key and foreign key (i.e. reference key to a primary key of another table). Note: a table with a one-column primary key is always in 2NF.
Third Normal Form (3NF)
To be in 3NF, the table must first satisfy the requirements of 1NF and 2NF. Next, there must be no functional dependencies between the non-key columns. In the earlier separated table, it is not in 3NF because the dept_name is dependent on the dept_id, which is another non-key. To be in 3NF, another new table is separated from it and the final resultant tables may look like this:
emp_no project_no
10102 p1
10102 p3
25348 p1
emp_no dept_id
10102 d1
25348 d2
dept_id dept_name dept_loc
d1 Sales L1
d2 Marketing L2
In the last table, dept_id becomes the primary key and all the three tables are now in 3NF.
Normal Forms
Normalization is the process of efficiently organizing data in a database by reducing data redundancy while ensuring the integrity of data dependency. Normal forms are used in this process to describe the stages of normalization. In theory, it started from stage one (the lowest form of normalization, referred to as first normal form or 1NF) through five (fifth normal form or 5NF). In practical applications, you'll often see the first three NFs (1NF, 2NF, and 3NF) and the last two NFs (4NF and 5NF) are seldom used.
First Normal Form (1NF)
1NF means that the value of any column in a row must be single valued (i.e. atomic). Imagine a table with following fields: Employee No (emp_no) and Project No (project_no) where the relationship is one-to-many i.e. one employee may take up multiple projects. The table may look like this:
emp_no project_no
10102 (p1, p3)
The table is not in 1NF, as project_no contains more than 1 value. Once we've ensured the rule of atomic, the table will be in 1NF as follows:
emp_no project_no
10102 p1
10102 p3
Second Normal Form (2NF)
Primary key refers to the column of a table that is able to identify each row uniquely. In the earlier table, both emp_on and project_no form a composite primary key (i.e. having more than 1 column as primary key). Expanding the same example with more columns that entails which department the employees belong to, such as department id (dept_id), department name (dept_name) and department location (dept_loc). A table may look like this:
emp_no project_no dept_id dept_name dept_loc
10102 p1 d1 Sales L1
10102 p3 d1 Sales L1
25348 p1 d2 Marketing L2
Here, there is some redundancy on the dept_name and dept_loc. Not only the redundant info would take up more storage space, there is a chance of update error whenever the employee changes department or the department relocates. To be in 2NF, remove subsets of data that apply to multiple rows of a table and place them in separate tables. Create relationships between these new tables and their predecessors through the use of foreign keys (i.e. primary keys in other table). The resultant tables may look like this:
emp_no project_no
10102 p1
10102 p3
25348 p1
emp_no dept_id dept_name dept_loc
10102 d1 Sales L1
25348 d2 Marketing L2
In the newly separated table, the emp_no is both the primary key and foreign key (i.e. reference key to a primary key of another table). Note: a table with a one-column primary key is always in 2NF.
Third Normal Form (3NF)
To be in 3NF, the table must first satisfy the requirements of 1NF and 2NF. Next, there must be no functional dependencies between the non-key columns. In the earlier separated table, it is not in 3NF because the dept_name is dependent on the dept_id, which is another non-key. To be in 3NF, another new table is separated from it and the final resultant tables may look like this:
emp_no project_no
10102 p1
10102 p3
25348 p1
emp_no dept_id
10102 d1
25348 d2
dept_id dept_name dept_loc
d1 Sales L1
d2 Marketing L2
In the last table, dept_id becomes the primary key and all the three tables are now in 3NF.
Sunday, June 3, 2012
BIOS upgrade using bootable USB to DOS
Recently, I bought a new Acer Aspire 5560G notebook. It came with Win7 home premium. I wanted to start installing the new MS SQL 2012 on some Virtual Machine. Since VMWare is no longer giving away free VMWare workstation, the natural choice is for me to install Windows Server 2008 R2 on it that comes with free Hyper-V.
Upon successful installation of the new OS, I noticed that rebooting and shutting down of this new notebook is not seamless. I've to press down the power button in order for it to shutdown completely. I thought it's the BIOS error and downloaded the latest BIOS update. Only then, I realised that the update can only be run on DOS mode. Hey, it's not Win98 and the newer MS OSes no longer come with DOS! (MS now has something called WinPE but it's still not DOS)
After searching the Internet high and low, I came across this good article that shared how to boot the machine into DOS using USB stick. It requires a free simple HP utility called "HP USB Disk Storage Format Tool". After formatting the USB stick with MS DOS system files, I copied the BIOS update DOS utilities.
Rebooting the notebook using the USB stick, I've finally managed to upgrade the BIOS firmware. It's still couldn't solve the shutting down problem but at least I know of this easy-to-use method to boot any machine into DOS mode quickly.
Thursday, May 10, 2012
Making Changes to MST Config with Care
Multiple Spanning Tree (MST) is great for VLAN spanning tree management and load-balancing. In concept, you can have multiple VLANs and group them up into 2 regions. Instead of managing every individual VLAN spanning tree, you would just need to manage the two MST regions regardless of the number of VLANs.
However, for two or more switches to be in the same MST region, they must have the identical MST name,
VLAN-to-instance mapping, and MST revision number. Any changes applied to existing MST configuration on one switch but not on others would cause network disruptions. To minimize such disruptions, learn to make MST changes but only commit them until all switches are 'standardized' in the new MST configuration.
This is how to enter MST configuration sub-mode on the switch:
switch# configure terminal
switch(config)# spanning-tree mst configuration
This shows how to leave MST-submode configuration on the switch without committing the
changes:
switch(config-mst)# abort
This shows how to commit the changes and leave MST configuration sub-mode on the switch:
switch(config-mst)# exit
For more information, download this Cisco "Configuring MST" doc.
Subscribe to:
Posts (Atom)