If your new Failover Cluster Manager console keep crashing on WS2012 and the error message is something like:
"A weak event was created and it lives on the wrong object, there is a high chance this will fail, please review and make changes on your code to prevent the issue.",
apply this hotfix (KB 2803748) on all your cluster nodes and/or the RSAT machines immediately.
Thursday, May 16, 2013

Wednesday, May 8, 2013
How to add custom attributes to AD User Objects
We have an application that requires to store some custom user attributes on the Active Directory. Let's say we need to add a custom attribute "Gender". How should we go about it? We need to first extend the existing User Class in the AD Schema. Please refer to this detailed step-by-step guide.
Here, I would just summarize the overall steps.
Step 1: Register AD schema tool by running "regsvr32 schmmgmt.dll" on the Domain Controller with "Schema Master" role. Add the AD Schema tool on the mmc console.
Step 2: In the AD Schema Console, right-click the Attributes folder, then select Create Attribute.
 Step 3: You may like to generate your own private enterprise OID (Unique X.500 Object ID) for this custom attribute on this link.
Step 4: From the Schema Console, click the Class folder. Scroll down to the User class, right-click it, and select Properties. On the user Properties dialog box, click the Attributes tab. Click Add, then choose the Gender attribute. Click OK twice, and you've successfully added the Gender attribute to the User class.
Now we have an extra gender attribute for every user object. How should we populate its values (i.e. Male or Female)? If you have an excel sheet, convert it to CSV and use Powershell script to populate it. Below is sample script.
$Users = import-csv users.csv
Foreach ($user in $Users)
{
$sAMAccountName = $user.sAMAccountName
$gender = $user.gender
$Property = @{gender=$gender}
Write-host "Setting the gender of $sAMAccountName"
Get-ADObject -Filter 'sAMAccountName -eq $sAMAccountName' | Set-ADObject -add $Property
Write-host "Done!"
}
Here, I would just summarize the overall steps.
Step 1: Register AD schema tool by running "regsvr32 schmmgmt.dll" on the Domain Controller with "Schema Master" role. Add the AD Schema tool on the mmc console.
Step 2: In the AD Schema Console, right-click the Attributes folder, then select Create Attribute.

Step 4: From the Schema Console, click the Class folder. Scroll down to the User class, right-click it, and select Properties. On the user Properties dialog box, click the Attributes tab. Click Add, then choose the Gender attribute. Click OK twice, and you've successfully added the Gender attribute to the User class.
Now we have an extra gender attribute for every user object. How should we populate its values (i.e. Male or Female)? If you have an excel sheet, convert it to CSV and use Powershell script to populate it. Below is sample script.
$Users = import-csv users.csv
Foreach ($user in $Users)
{
$sAMAccountName = $user.sAMAccountName
$gender = $user.gender
$Property = @{gender=$gender}
Write-host "Setting the gender of $sAMAccountName"
Get-ADObject -Filter 'sAMAccountName -eq $sAMAccountName' | Set-ADObject -add $Property
Write-host "Done!"
}
Tuesday, May 7, 2013
Windows Server 2012 Consistent Device Naming (CDN)
The new SCVMM 2012 SP1 supports bare-metal host deployment. I was wondering if the host has multiple network connections, how would the right address be assigned from the right IP pools? Even if you've pre-patched the cables, the NIC order would change randomly once you've sysprepped or installed a new OS on the server. It had been a pain for server administrators to identify which NICs are connected to which network segments or VLANs.
While I was creating my host profile on SCVMM 2012 console, I came across this page:

Look like if you know the CDN of each NIC, you can now pre-allocate the static IP address from the IP pool! CDN ensures that the NIC name and the printed name on the server chassis remain consistent. It's good news for every system administrator. Bad news is that CDN is only supported on WS2012 and you'll need the newest server hardware e.g. Dell's 12th generation hardware.
Without CDN, you would have to supply the individual MAC addresses of each interface and match them to the defined IP subnets as shown below.

The MAC address can be easily identified using "show mac address-table interface" command on the data center switches. Once the job started running, you should see the following screen on the bare-metal host:

Additional Resources:
While I was creating my host profile on SCVMM 2012 console, I came across this page:

Look like if you know the CDN of each NIC, you can now pre-allocate the static IP address from the IP pool! CDN ensures that the NIC name and the printed name on the server chassis remain consistent. It's good news for every system administrator. Bad news is that CDN is only supported on WS2012 and you'll need the newest server hardware e.g. Dell's 12th generation hardware.
Without CDN, you would have to supply the individual MAC addresses of each interface and match them to the defined IP subnets as shown below.
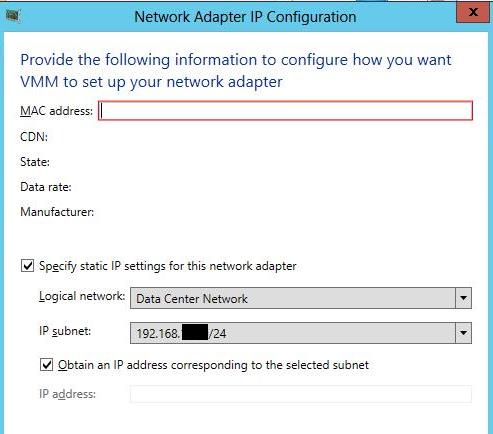
The MAC address can be easily identified using "show mac address-table interface" command on the data center switches. Once the job started running, you should see the following screen on the bare-metal host:

Additional Resources:
Monday, April 29, 2013
BMC - Out-of-Band Host Management on SCVMM 2012
Server Light-Out Management (LOM) enables you to manage a physical host remotely, such as Power On and Power Off. Now, you can also do so under SCVMM 2012 when you have defined the Baseboard Management Controller (BMC) settings under the managed host hardware setting. BMC is also required if you intend to use the new automatic Power Management feature in VMM. If certain hosts fall below certain load threshold (e.g. weekends), you can even allow VMM to power-off the host and power-on back when the demand is back.
Before enabling BMC, when you right-click on a host, you can't do anything to the host (i.e. grey-out), except restarting.

Once the host BMC setting is defined, you can power on and off the physical host under the SCVMM console.

System Prerequisites
According to Microsoft Technet, the host must have a BMC installed that supports one of the following out-of-band management protocols:
Example: Dell Remote Access Controller (DRAC)
Dell DRAC supports IPMI 2.0. By default, it's not enabled. Hence, you must first enable it and configure the appropriate OOB IP address on the BIOS setting by pressing during system start-up.

Once the VMM server has connectivity to the Dell DRAC, you can now proceed to configure BMC setting under the Hardware properties as shown below.

Try power off and power on the host!
Before enabling BMC, when you right-click on a host, you can't do anything to the host (i.e. grey-out), except restarting.
Once the host BMC setting is defined, you can power on and off the physical host under the SCVMM console.
System Prerequisites
According to Microsoft Technet, the host must have a BMC installed that supports one of the following out-of-band management protocols:
- Intelligent Platform Management Interface (IPMI) versions 1.5 or 2.0
- Data Center Management Interface (DCMI) version 1.0
- System Management Architecture for Server Hardware (SMASH) version 1.0 over WS-Management (WS-Man)
Example: Dell Remote Access Controller (DRAC)
Dell DRAC supports IPMI 2.0. By default, it's not enabled. Hence, you must first enable it and configure the appropriate OOB IP address on the BIOS setting by pressing

Once the VMM server has connectivity to the Dell DRAC, you can now proceed to configure BMC setting under the Hardware properties as shown below.

Try power off and power on the host!
Thursday, April 25, 2013
How to setup Windows iSCSI with MPIO on Dual Controller Storage Target
Let's say you've acquired an iSCSI storage target with dual controllers (e.g. Dell MD3xxx-i series). And you wish to configure Windows iSCSI initiator with MPIO to enable multi-path connection for High Availability and Load Balancing. How should you go about it?
iSCSI Port Configuration
Let's begin with the iSCSI storage controller setup. Typically, each controller should have four iSCSI ports. Hence, you should configure 4 different VLANs on your iSCSI switches. Each port on each controller should connect to a VLAN (also an IP subnet). Jumbo frame (e.g. MTU 9000) is also recommended. Assign a valid IP address to each port. The port configuration should look something like this:

Create new LUN and assign the preferred path to either Controller
Typically, each LUN can only be accessed via a target controller at any one time. The connections to the preferred controller should be active and the other controller should be standby. Assign the new LUN to either preferred controller and remember its iSCSI port addresses.
Enabling MPIO on Windows host
Typically, each LUN can only be accessed via a target controller at any one time. The connections to the preferred controller should be active and the other controller should be standby. Assign the new LUN to either preferred controller and remember its iSCSI port addresses.
Enabling MPIO on Windows host
Similarly, configure the four or more iSCSI network connections (enable Jumbo Frame) on the Windows host. Install the necessary provider software given by the storage vendor. Add new Windows MPIO feature by executing "Install-WindowsFeature Multipath-IO -IncludeManagementTools" on Powershell. Activate MPIO and restart the host by clicking on the red boxes as follows:

Windows iSCSI Initiator
Start the Windows initiator by executing the command "iscsicpl". On Discovery tab, configure the Target Portals connecting to the iSCSI target directly. Go back to the Targets tab and click the "Connect" button.

By default, only 1 session connection is made. Disconnect the session. We can add more iSCSI sessions on clicking on the Properties button as above. Always check the "Enable multi-path" box whenever you see it.

Each session identifier represent each session to each controller. As you can see, I've already added two sessions to both controllers. You may add more by clicking on the "Add session" button. Check the "Enable multi-path" box and "Advanced" button. Assign the "Target portal IP" to the preferred controller address.
Multiple Connected Session (MCS) Policy
If you have more than 1 iSCSI NIC on the server for each session, click on the "MCS" button to add additional connections to each session. To add more connections to each session, click on the "Add" button and select the appropriate iSCSI initiator and target addresses.
Multiple Connected Session (MCS) Policy
If you have more than 1 iSCSI NIC on the server for each session, click on the "MCS" button to add additional connections to each session. To add more connections to each session, click on the "Add" button and select the appropriate iSCSI initiator and target addresses.

You can also choose a load-balancing algorithm. By default, simple "Round Robin" is used to distribute the loads evenly among the multi-paths.
Verify Multi-Path for each connected LUN
Click on "Device" and then "MPIO" button. Verify that each connected LUN can be accessed by more than 1 session.

Verify Multi-Path for each connected LUN
Click on "Device" and then "MPIO" button. Verify that each connected LUN can be accessed by more than 1 session.

Conclusion
In summary, there are two levels of path redundancy defined. Firstly, the session to each controller. Secondly, within a session, you can also have multiple connections defined under the MCS Policy. You may define different load-balancing algorithms for each level. In this setup, I clicked on the Device MPIO and defined "Failover-Only" for session level (remember the LUN can only be accessed via one controller at a time). Under each session, I defined "Round Robin" for multiple connections under MCS Policy for load-balancing.
In summary, there are two levels of path redundancy defined. Firstly, the session to each controller. Secondly, within a session, you can also have multiple connections defined under the MCS Policy. You may define different load-balancing algorithms for each level. In this setup, I clicked on the Device MPIO and defined "Failover-Only" for session level (remember the LUN can only be accessed via one controller at a time). Under each session, I defined "Round Robin" for multiple connections under MCS Policy for load-balancing.
Thursday, April 18, 2013
Managing Dell MD Storage with SCVMM 2012
In the new SCVMM 2012, you can now centrally manage storage devices using SMI-S providers from various vendors. Till now, only a small handful of storage devices are supported in SCVMM 2012. Among Dell storage portfolios, only the expensive Compellent series are officially supported. There is actually a SMI-S provider (MD Storage Array vCenter Plug-in) for the cheaper Dell MD storage but it is meant for VMWare vCenter. Fortunately being open standard, you can use the same provider even for SCVMM 2012. Download either the x86 or x64 program. As this provider is a proxy type, install it on a Windows Server 2003 or 2008 (WS2012 is not supported) that is reachable by the VMM server. Run the executable to install. Ignore any vCenter settings, since we are using SCVMM here.
Post Installation of Dell MD SMI-S on Proxy Server- Create a local user account on the proxy server. Run "cimuser -a -u username -w password" (where username is the same local user account) using local Administrator credential (not just elevated prompt) to add it as a CIM user account. The command can be found under "C:\Program Files (x86)\Dell\pegasus\bin".
- Create/Edit ArrayHosts.txt in the directory "C:\Program Files (x86)\Dell\pegasus\providers\array". Add the management IP addresses of the storage array. Use a new line for each IP address.
- Restart cimserver service using "services.msc". Check TCP 5988 is running using "netstat -ano"
- Enable host firewall rule to permit TCP 5988
- Create a RunAs account using the same credential that you created earlier using cimuser.
- Go to "Fabric". Right click on "Providers" to add storage devices. Choose the one with "SMI-S" option.
- On next page, choose "SMI-S CIMXML" protocol. Specify the proxy server on the Provider IP address and select the RunAs account.


Complete the remaining wizard step and the MD storage can now be managed as part of SCVMM 2012 Storage Fabric. You can create new LUN and assign them to the VMs directly under the same console seamlessly.
Thursday, March 28, 2013
Cisco Flexible Packet Matching (FPM) in 15.x
Cisco FPM on ISR router is about detecting a certain pattern (e.g. regular expression) in the payload packets before deciding whether to forward or drop it. One good example is to drop malicious packets and even Skype login that attempt to change its communicating methods over time. Your IPS signatures may not even be updated quick enough.
There is an easy-to-follow FPM guide on Getting Started with Cisco IOS Flexible Packet Matching. It even stated that almost all Cisco ISR platforms support this feature. I've learnt that only certain trains and versions can support FPM commands and they may not even be the latest versions. Use "Cisco Software Advisor" on "Feature/Software" tab to determine which IOS trains and versions support FPM. Of course, you'll need a CCO account to login.
In 15.x, there is also a change in loading FPM PHDF files. Not only you don't have to download the phdf files, there is a slight change in loading FPM PHDF files:
Router(config)#load protocol system:fpm
%Complete file name to be loaded is required
Instead, you'll have to do this
Router(config)# load fpm
Try to load bundle PHDF files ...
Then do a "show protocols phdf all" to see loaded phdf files. It should include all standard PHDFs: ether.phdf, ip.phdf, tcp.phdf, and udp.phdf. These PHDFs provide Layer 2-4 protocol definition according to Flexible Packet Matching Deployment Guide.
Nested Access Control
Cisco FPM supports nested access control policy i.e. enforce a child policy on parent policy. You can define a "class-map type stack" to check on the protocol fields and use another "class-map type access-control" to check on the payload contents. For example, you want to check for a password on the payload on protocol number 17 (UDP) on port 1234. The example config would be:
!--- Define the values to be checked on UDP header port 1234
class-map type stack match-all UDP-CHECK
match field IP protocol eq 0x11 next UDP
match field UDP dest-port eq 1234 next UDP
!---- Ensure the payload to contain the password string. You can also use regular expression
class-map type access-control match-all PASSWORD-CHECK
match start UDP payload-start offset 0 size 100 string "password"
!---- Define the child policy and just log the packets if payload contains the password
policy-map type access-control CHILD-POLICY
class PASSWORD-CHECK
log
!---- Nested policy on Parent. Check on UDP header then the payload. Otherwise, drop the packet.
policy-map type access-control PARENT-POLICY
class UDP-CHECK
service-policy CHILD-POLICY
class class-default
log
drop
!--- Enforce the FPM policy on the router interface
interface GigabitEthernet0/0
service-policy type access-control output PARENT-POLICY
Nested Access Control
Cisco FPM supports nested access control policy i.e. enforce a child policy on parent policy. You can define a "class-map type stack" to check on the protocol fields and use another "class-map type access-control" to check on the payload contents. For example, you want to check for a password on the payload on protocol number 17 (UDP) on port 1234. The example config would be:
!--- Define the values to be checked on UDP header port 1234
class-map type stack match-all UDP-CHECK
match field IP protocol eq 0x11 next UDP
match field UDP dest-port eq 1234 next UDP
!---- Ensure the payload to contain the password string. You can also use regular expression
class-map type access-control match-all PASSWORD-CHECK
match start UDP payload-start offset 0 size 100 string "password"
!---- Define the child policy and just log the packets if payload contains the password
policy-map type access-control CHILD-POLICY
class PASSWORD-CHECK
log
!---- Nested policy on Parent. Check on UDP header then the payload. Otherwise, drop the packet.
policy-map type access-control PARENT-POLICY
class UDP-CHECK
service-policy CHILD-POLICY
class class-default
log
drop
!--- Enforce the FPM policy on the router interface
interface GigabitEthernet0/0
service-policy type access-control output PARENT-POLICY
Subscribe to:
Posts (Atom)