Showing posts with label public key infrastructure. Show all posts

Thursday, May 8, 2014

Verify Domain Controller Certificate for Smartcard Logon

To enable user smartcard logon, all domain controllers must be enrolled with KDC enabled certificates. The correct cert template to deploy is Domain Controller Authentication. If you enrolled the domain controllers with wrong certs, you might encounter this error event on the domain controllers:
This event indicates an attempt was made to use smartcard logon, but the KDC is unable to use the PKINIT protocol because it is missing a suitable certificate.
To resolve, you'll have to delete the invalid cert and request for a new valid cert. To verify after enrolling domain controller certificates, run this command:
certutil -dcinfo verify
Reference: Event ID 19 — KDC Certificate Availability

Monday, September 16, 2013

Cert template of Issuing CA must be updated on Account Forest

Previously, we did a successful trial on cross-forest cert enrollment with 2-way forest trust enabled. The user objects are on Account Forest and the PKI / CA servers are on the Resource Forest. I created a new cert template, issued it on the enterprise CA and sync the new cert template to the account forest using PKIsync.ps1 script. But the users were unable to enroll the new cert even though I've ensured the necessary permissions have been granted. I tried a manual enrollment and saw the following error message:

A valid certification authority (CA) configured to issue certificates based on this template cannot be located...


The new cert template in this case would be "TestingDoNoEnroll". Look like the enrollment clients could not find the issuing CA. On a domain controller of account forest, I did a check on the "AD Sites and Services" console with "View / Show Services Node" enabled. Expand on "Services / Public Key Services / Enrollment Services" and I check on the object of issuing CA on resource forest.

Double click on the object and select "Attribute Editor / certificateTemplates". The new template was missing - no wonder that the CA for the new issuing cert template could not be found. I added the new cert template name and enrollment worked as expected!

Wednesday, July 24, 2013

Delegate Certificate Template Management

By default, only Domain Admins are able to create and manage Certificate Templates on the Active Directory. To delegate to other groups (e.g. CA admins), follow this guide on Allowing the Creation and Modification of any Certificate Template.

Thursday, July 18, 2013

Cert Template MMC Crashed on WS2012 whenever Key Archival was enabled

Cert Template MMC (CertTmpl.msc) on WS2012 crashed whenever the archive key check-box was enabled as shown in red box below.


A technical support was raised to Microsoft premium support with TTTrace.exe debugging tool. Eventually, the support team replied that the crash was due to a recently added CA server did not return any cert template information. Indeed, after I issued a cert template on that CA server, the crash issue was gone.

Workaround
No resolution or hotfix was given. Instead, the support team acknowledged that it was a bug that would be fixed in next Windows version. The decision was made due to the following considerations:
  • Low impact of this bug
  • Easy workaround by adding an unused cert template on the CA server
  • Any code change could potentially bring wider implication to world-wide customers
My guessing on the real reason: the hands of the development team are full....

Wednesday, July 18, 2012

How to share EFS encrypted file

It's pretty straightforward to encrypt a file on local drives. All you need to do is to right-click on the "Properties" -> "General" -> "Advanced" and check on "Encrypt contents to secure data". This is provided that you have enrolled with a EFS certificate in your user certificate store. Credential roaming works great if you are going to login to multiple machines. 

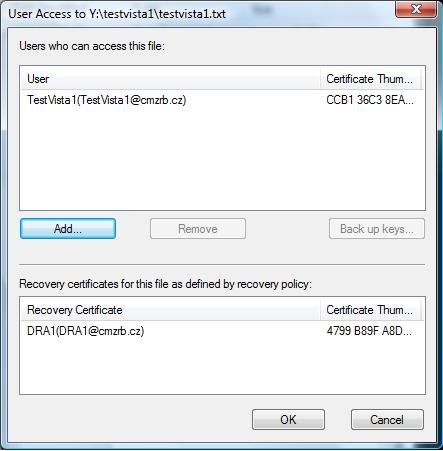
To share the encrypted file with other users, you've to add their EFS certs to the file before they can access it. On the file that you intend to share, right-click on "Properties" -> "General" -> "Advanced" -> "Detail" -> "Add".
Click on "Find User".
Even though you have selected the user, you won't be able to add them. You've to first install the EFS cert to the "Other People" store in your personal cert store. Click on "View Certificate" and install this cert to your "Other People Store". Click on the "Add" user button again and you'll be able to add the cert to the encrypted file now.

Wednesday, June 20, 2012

Implementing NAP with 802.1x enforcement

In my earlier post, I've configured 802.1x with EAP-TLS. Now, I'm expanding the effort to Network Access Protection (NAP) with 802.1x enforcement. Machines that are validated compliant to the policy are able to access authorized network or VLAN. Otherwise, it would go into Guest VLAN for further remediation action. In NAP with 802.1x enforcement, clients would send Statement of Health (SoH) to the Windows NPS server for System Health Validation against the Health Policies on top of 802.1x authentication. The SoH would contain information pertaining to the Security Center of the Windows clients.

In this example, I would just configure the Health Policies to check the status of Windows Firewall. The Windows 7 client and the NPS (Windows Server 2008 R2) have been setup in a full AD environment with AD Certificate Services. All certificates have been issued and the network switch is configured with 802.1x settings.

On the NPS server, click on the "Configure NAP" to start the wizard. Follow the wizard instructions carefully. Go to the "Connection Request Policies" after the completion of wizard. Right-click on the NAP policy and click "Properties". Click on the "Settings" tab and edit on the "Microsoft Protected EAP (PEAP)". Read the below underlined description that you must configure the PEAP properties here.

Choose the correct server cert that is generated based on the "RAS and IAS Server" template as mentioned in my previous post. In addition, ensure that the below highlighted items are added and enabled. Edit on the "Smart Card or other certificate" to choose the correct cert and CA if you're using cert authentication.

On the client configuration, it would be more efficient to use Group Policy to configure and enable the NAP setting. On the computer configuration, create the "Wired Network (IEEE802.3) Policies" as shown below:

Ensure that the clients' PEAP authentication settings match the NPS server's. In addition, under the "Security Settings", edit the Startup of "Wired AutoConfig" and "Network Access Protection Agent" to "Automatic".  Next, go to "Network Access Protection" to enable "EAP Quarantine Enforcement Client". You may also like to configure other optional settings like "User Interface Settings".

Once the GPO is created, link it to the client OUs and run "gpupdate" on the Windows 7 client. Check the status on the event viewer. If everything runs well, try disabling the Windows firewall and it will be enabled back automatically for compliant. For more details and troubleshooting, refer to this NAP with 802.1x enforcement step-by-step guide.

Tuesday, June 12, 2012

A certificate could not be found that can be use with this EAP when configuring 802.1x on NPS

I was running the default 802.1x wizard to configure a new RADIUS server on Windows Server 2008 R2. I had an error that prompt "A certificate could not be found that can be use with this Extensible Authentication Protocol" as shown below:

But when I run the cert manager, I saw a computer certificate! So what's wrong?! It's the template. Most of the time, we configure auto-enrollment for machines based on Computer template. This time, you'll need the "RAS and IAS Server" template. Rather than auto-enrollment, you may want to perform a manual cert enrollment for the NPS server. Hence, I duplicate a new NPS server template from the "RAS and IAS Server". And yes, you'll also need to register the NPS server on AD using "netsh ras add registeredserver" command. Ensure that the NPS server is a member of the "RAS and IAS Server" security group on the AD.

To further ensure that the NPS server is using the "correct" cert, click "edit" on the PEAP or EAP-TLS authentication method and verify the cert as follows:


In summary (click for detailed step-by-step guide):
  1. Register the NPS server 
  2. Enroll a new cert based on "RAS and IAS Server" template
  3. Excellent link for NAP with 802.1x troubleshooting
  4. Setting up & verifying NAP CA to issue health certificates

Wednesday, September 14, 2011

Enrolling SSL Cert for DELL iDRAC6

Dell's integrated light-out (ILO) management iDRAC6 allows administrators to manage servers remotely (using Java-based virtual console), as though they were in front of the console physically. Think of it like IP KVM. Managing iDRAC is performed over web console. Most likely, you would be greeted by SSL warnings, which is using a default self-signed cert. To do away with these prompts permanently, you would have to setup a PKI within your enterprise network, such as Active Directory Certificate Services (AD CS).

In AD CS, you should be using Web enrollment to generate certificate for entities outside of AD, such as iDRAC. Create a new web server based template and allows iDRAC users to enroll. Next, generate a cert request for iDRAC. To do so, login to manage iDRAC setting and click on Network/Security and SSL as shown below:


Click on "Generate Certificate Signing Request (CSR)" and download a text-based file. Open this file with a notepad or wordpad. Logon to the web enrollment service e.g. http://certservername/certsrv. Click on "Request a certificate" and "Submit a certificate request".


Focus back on the notepad, copy the contents of the csr and paste it on the certificate request. Select the appropriate cert template.


Click "Submit" and download the server cert. Upload this cert via the same SSL web console page on iDRAC setting earlier. And iDRAC will take a few minutes to reset itself. If you still see SSL errors, take a look and troubleshoot. Most likely, it's due to some typo errors that causes a mismatch between Common Name and the DNS name.

Sunday, June 26, 2011

Credential Roaming

Credential Roaming (CR) is especially useful in situations whereby the following 2 conditions exist: (1) user certificate auto-enrollment is enabled; (2) many user tends to logon more than 1 domain machine. You can imagine how many certificates for the same group of users are issued on your CA server if credential roaming were not enabled. No problem for domain logon, as UPN remains the same across multiple user certs. But for applications, such as S/MIME, encryption/decryption using the same cert key becomes a must for roaming users. Do note that only X.509 certificates and private keys are supported and they are stored on the Active Directory certificate store (so beware of potential NTDS bloat but that's another issue).

CR is a new alternative to Roaming User Profile (RUP) for storing user certificates and keys. According to Microsoft, CR is also supposed to be a more scalable and secure alternative than RUP. Whenever a user logon and logoff, the local user cert store would always sync with the AD cert store. Hence, the same user would always get the same cert and key regardless of what domain machines he log-on to.

Depending on your current AD level, you may or may not need to update the AD schema. For Windows 2003, refer to this guide. For Windows 2008, you can refer to this simpler guide instead.  

Thursday, June 16, 2011

Cert Enrollment Failed after CA Cert Renewal with Event ID 93

After I renewed my CA cert, all cert enrollment failed with error messages saying that the user does not have the permission to read the cert template. It is not true, as I have assigned sufficient security permission with Read and Enroll on the issued template. A further look into the Event Viewer shows this:

Event 93, Certificate Authority
The certificate (#%1) of certification authority %2 does not exist in the certificate store at CN=NTAuthCertificates,CN=Public Key Services,CN=Services in the Active Directory's configuration container. The directory replication may not be completed.

Performing the troubleshooting tasks on this Technet post did not help. The solution is to publish the new CRT manually to the NTAuthCA store.
  1. Login to CA using Domain Admin account.
  2. Go to the %systemroot%\System32\CertSrv\CertEnroll directory.
  3. Look for the latest *.crt file e.g. foo(2).crt
  4. Run "certutil -dspublish foo(2).crt NTAuthCA"
  5. Restart the CA service
Go to the event viewer again, you would see an informational event 26 saying that the CA has started and without the error event 93. The right cert templates appears when you perform manual enrollment.

Sunday, February 27, 2011

BitLocker with TPM and Cert - Brief Introduction

BitLocker is introduced on Windows Vista and Server 2008 to guard against theft of sensitive drives and cold boot attacks. In Windows 7 and Server 2008 R2, Bitlocker further introduces some enhancements, including eliminate the need of pre-creating 1.5GB partition and "BitLocker to Go" for removable media.

You can also use BitLocker with (1) Trusted Platform Module (TPM) and (2) smart card certificate for enhanced security. TPM is a microcontroller security chip embedded on motherboard to protect sensitive key materials from unauthorized tampering. TPM is used for system drive (e.g. C:\) where Windows is installed and the certificate is for data drives, including both fixed and removable media.

On the drive that Windows is installed on, BitLocker uses the Trusted Platform Module (TPM) to detect if the computer's critical startup process has been tampered with. Additionally, a PIN or startup key can be required for users to have access to the drive's data.

BitLocker uses the TPM to lock the encryption keys that protect the data. As a result, the keys cannot be accessed until the TPM has verified the state of the computer. Encrypting the entire volume protects all of the data, including the operating system itself, the Windows registry, temporary files, and the hibernation file. Because the keys needed to decrypt data remain locked by the TPM, an attacker cannot read the data just by removing your hard disk and installing it in another computer.

During the startup process, the TPM releases the key that unlocks the encrypted partition only after comparing a hash of important operating system configuration values with a snapshot taken earlier. This verifies the integrity of the Windows startup process. The key is not released if the TPM detects that your Windows installation has been tampered with.

On fixed and removable data drives, users can use smart card certificate or password to unlock BitLocker-protected drive. An administrator that has been designated a BitLocker data recovery agent is also able to use certificate to recover access to a BitLocker-protected drive.

BitLocker and TPM recovery information can also be backup to Active Directory. This ensures that encrypted data belonging to the enterprise can always be accessed by authorized users. Backing up the TPM owner information for a computer allows administrators to locally and remotely configure the TPM security hardware on that computer. As an example, an administrator might want to reset the TPM to factory defaults when decommissioning or repurposing computers.

More detailed technical documentation and guides can be obtained from this Microsoft Technet site.

More information on BitLocker & TPM Recovery.

Thursday, December 30, 2010

Publish Offline Certificates and CRLs to Active Directory

This is refering to step 2 and 3 of the earlier post. Before publishing the Root CA cert, check the extensions on the Root CA server, esp on the CRL Distrisbution Point (CDP) extensions.

To publish the offline Root CA cert and CRL to AD, set the "Include in all CRLs" flag in the Root CA extension properties and use the certutil -dspublish command. Do note that file share CDP (FILE://) is not supported - only LDAP:// and HTTP://. I have tried and it's not going to work. Similarly, you would need to specify where clients and servers can obtain the root cert (i.e. LDAP and/or HTTP) in the "Authority Information Access (AIA)" drop-down setting.


The "Include in all CRLs" flag specifies that the Active Directory publication location should be included in the CRL itself. It can be used by an offline CA to specify the LDAP URL for manually publishing CRLs on the Active Directory. The explicit configuration container must be explicitly set in the URL. Alternatively, the DSConfigDN value can be set in the registry by using "certutil –setreg ca\DSConfigDN CN=Configuration,DC=contoso,DC=com". Note that the last two DC values (DC=contoso,DC=com for "contoso.com") are to be replaced by your actual Domain Name.


Export out the Root CA cert and CRL files and import them into a domain member server.
To publish the Root Cert to the Root CA store on the Active Directory: certutil -f -dspublish RootCA.cer RootCA 

To publish the CRL to Active Directory: certutil -f -dspublish Root-Test-CA.crl "LoneSrv1" "Root-Test-CA". The last 2 parameters to specify the containers are optional but could be needed if the offline RootCA is non-Microsoft.

Setting up Two-Tier Enterprise PKI


We are setting up a 2-tier CA for our enterprise PKI. The first tier is a standalone CA that should be kept offline while the second tier is the domain CA server that is used for issuing certificates for AD users and computers alike. Basically, these are the steps:

Step 0: If AD levels are below Windows 2008, perform adprep on Schema OM first i.e. "adprep /forestprep" and "adprep /domainprep /gpprep" on \supports\adprep DVD folder.
Step 1: Create CAPolicy.inf and place it on the %systemroot% folder. Optional step for Windows Server 2008 CA.
Step 2: Install standalone offline Root CA (RCA) server.
Step 3: Determine AIA  and CDP locations to host CRL from RCA. Configure the necessary extensions.
Step 4: Export out RCA cert and CRL. Publish root CA cert and CRL to Active Directory
Step 5: Setup Subordinate Issuing CA (Sub ICA) server.
Step 6: Create manual ICA cert request to Root CA for issuance. Install ICA cert.
Step 7: Setup Online Responder (OR). Configure OCSP template on ICA. Permit OR to autoenroll. Assign "Full Control" rights to "Network Services" on "Manage Private Key".
Step 8: Configure OR to provide revocation info for CAs. Input sources for CRL info using setup wizard e.g. LDAP etc
Step 9: Create new Cert Template by duplicating sample template for client enrollment
Step 10: Configure Group Policy to facilitate cert enrollment
Step 11: Use PKIView.msc and "certutil -url" to verify and check the health of PKI.

As for creating CAPolicy.inf, there is a good TechNet blog on its syntax. For Windows 2003 Root CA, CAPolicy.inf is essential to eliminate AIA and CDP extensions, so that applications would not have to validate the CDP of the entire chain, including the Root CA. AIA and CDP are revocation mechanism to verify the legitimacy of the entity, which would be meaningless for Root CA (the Anchor of Trust). For Windows 2008 Root CA, AIA and CDP are omitted by default. Nevertheless, CAPolicy.inf is still useful if you wish to include some policy statements or restricting the CA for certain purposes only, such as Secure Email.

If AIA is specified, Online Responder (new CA role in Windows Server 2008) should be activated for certificate revocation check. More detailed step-by-step guide for Online Responder can be found on TechNet.

In the next post, I would mention about publishing offline cert and crl files on Active Directory.

Sunday, August 1, 2010

Part 2: How DNSSec works

This is the 2nd part of DNSSec. The 1st part introduce the prologue to DNSSec.

Overview
At the most basic level, DNSSEC provides the assurance for DNS servers and resolvers (a.k.a DNS clients) to trust DNS responses by using digital signatures for validation. Specifically, it provides origin authority, data integrity, and authenticated denial of existence of validated DNS responses.

When a DNS client issues a query for a name, the accompanying digital signature is returned in the response. Successful validation would show that the DNS response has not been modified or tampered with. Any subsequent modifications to the DNS zone (e.g. adding and deleting of records) would require the entire zone file to be re-signed.

Trust Anchor & PKI Concept
Before you can perform any digital signature validations, all involved parties must trust a common "authority" in higher level, in order to create a trust path beforehand. This "authority" is known as Trust Anchor, which is similar to the Certificate Authority (CA) in the PKI concept. Just like the PKI CA, it is also able to sign next-level child zones down under, such as child.abc.com if the trust anchor is on abc.com. Because everyone trust this common Anchor Point, the clients would also trust other "child zones" vouched by this "authority".
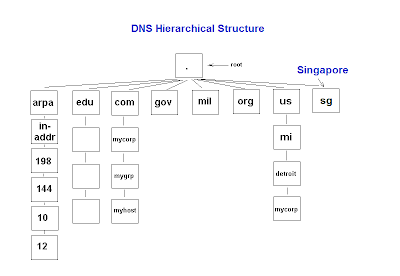
Do note that zone signing is only required for authoritative DNS servers. Remember that the DNS cache poisoning attacks are mostly targeted at the local DNS server caches of your ISPs. These recursive resolvers do not need to be signed by the root zone, as they are mostly non-authoritative (i.e. contain no zones on their owns) and simply perform recursive lookup on your behalf. The DNS resolvers belonging to the ISPs just need to be pre-configured to trust the public keys of the trust anchors - much like the Web browsers on your desktops that are pre-configured to trust the public certs of Verisign & Thawte.

New DNS Extension
To facilitate DNSSEC validations, four new resource records (DNSKEY, RRSIG, NSEC and DS) are introduced to existing DNS structure. DNSKEY (DNS public key) contains the zone public key. RRSIG (Resource Record Signature) contains the digital signature of the DNS response. NSEC (Next Secure) can inform about the denial-of-existence records. For example, if the zone only contains record A and D but you ask for B, it would return "A NSEC D" indicating the non-existence of records B and C. Lastly, DS (Delegation Signer) is used to validate between the parent and child zones, which are both DNSSec enabled.

IPSec
In most situations, the clients would simply ask the local DNS servers to perform DNSSec validation on their behalf. For maximum protection, you may also want to setup IPSec communications between the clients and the local servers. In corporate environments, these computers may use their domain certs for such domain IPSec setup. Note that IPSec is optional for DNSSec.

Name Resolution Policy Table (NRPT)
What if you wish to reject DNS response from non-DNSSec enabled DNS servers or making IPSec connection compulsory? You can influence such behaviours by the means of Name Resolution Policy Table (NRPT). Before issuing any queries, the DNS client will consult the NRPT to determine if any additional flags must be set in the query. Upon receiving the response, the client will again consult the NRPT to determine any special processing or policy requirements. In Windows Server 2008 R2 implementation, the following NRPT properties may be set using Group Policy:

1) Namespace: Used to indicate the namespace to which the policy applies. When a query is issued, the DNS client will compare the name in the query to all of the namespaces in this column to find a match.

2) DNSSEC: Used to indicate whether the DNS client should check for DNSSEC validation in the response. Selecting this option will not force the DNS server to perform DNSSEC validation. That validation is triggered by the presence of a trust anchor for the zone the DNS server is querying. Setting this value to true prompts the DNS client to check for the presence of the Authenticated Data bit in the response from the DNS server if the response has been validated, If not, the DNS client will ignore the response.

3) DNS Over IPsec: Used to indicate whether IPsec must be used to protect DNS traffic for queries belonging to the namespace. Setting this value to true will cause the DNS client to set up an IPsec connection to the DNS server before issuing the DNS query.

4) IPsec Encryption Level: Used to indicate whether DNS connections over IPsec will use encryption. If DNSOverIPsec is off, this value is ignored.

5) IPsec CA: Refers to the CA (or list of CAs) that issued the DNS server certificates for DNSSec over IPsec connections. The DNS client checks for the server authorization based on the server certificates issued by this CA. If left un-configured, all root CAs in the client computer’s stores are checked. If DNSOverIPsec is off, this value is ignored.

Monday, January 4, 2010

Enrollment Agent

To be able to request a certificate on behalf of other users and computers, you need an enrollment agent certificate. In Windows 2008, you can further restrict the enrollment agents for certain operations.

Step 1: Publish the enrollment certificate template.
Login with Enterprise Admin or CA admin. Open "mmc" and add the certificate template snap-in. Duplicate the enrollment agent template, and set its security properties (i.e. permit your enrollment security group). Open up CA console, right click on sub-folder "Certificate Template" -> New -> Certificate Template to Issue.

Step 2: Enroll the enrollment agent
Login with your enrollment agent account, open "mmc", add Certificate snap-in and select "My user account". Right click on personal folder -> Request new certificate to request for an enrollment agent certificate. Optionally, you may wish to restrict the enrollment agents to under certain constraints (e.g. only enroll certain user groups etc) on the CA properties.

Step 3: Set Issuance Requirements on the Target Cert Template
On the target cert template (whose certs are to be enrolled by enrollment agents), set the "This number of authorized signature" to "1". Otherwise, the certs won't be able to be enrolled by the agents.

Step 4: Enroll on behalf of ..
On the enrollment machine, login with your enrollment agent account and open the Certificate template. Right click on personal folder -> All tasks -> Advanced Operations -> Enroll on behalf of.. And just follow the wizard instruction. Ensure that the enrollment agent certificate is also present on the machine (e.g. smart cards or cert store).

For more detailed step-by-step, check out this blog.