Showing posts with label windows server 2012. Show all posts

Wednesday, February 3, 2016

Connect to WS2012 WSUS Internal Database

To connect to the Windows Internal Database (WID) WSUS, install SQL Management Studio and connect to the server using:


\\.\pipe\MICROSOFT##WID\tsql\query

You may confirm the SQL instance name in red against the startup service description using services.msc.

As there is a constant error of "WSUS server is still processing a previous configuration change", this is what I need to execute on the database instance:

USE SUSDB; 
UPDATE tbSingletonData SET ResetStateMachineNeeded = 0

Wednesday, September 3, 2014

Active directory or sysvol is not accessible on this domain controller or an object is missing

I saw this error message on Group Policy Management when I did a status check on the AD replication. All domain controllers were stuck with replication in progress with their respective Sysvol "inaccessible" against the PDC emulator. I couldn't find any error events on "DFS Replication" at all - the replication just got stuck in progress.

When this happens, follow the steps on How to perform an authoritative synchronization of DFSR-replicated SYSVOL.

Monday, May 12, 2014

WS2012 Domain Controllers stop replication after Power Outage

We had some power outage and noticed newer Group Policy Objects (GPOs) weren't replicated across the AD. After running dcdiag /a diagnostic command, we noticed DRS-R event errors on some WS2012 Domain Controllers. After doing some research, we realised that WS2012 stopped auto-replication by default.

To enable it back, configure this setting on the registry and restart the affected DCs.

  1. Set HKLM\System\CurrentControlSet\Services\DFSR\Parameters\StopReplicationOnAutoRecovery registry key to a DWORD value of 0.
  2. On evelvated command prompt, run wmic /namespace:\\root\microsoftdfs path dfsrmachineconfig set StopReplicationOnAutoRecovery = FALSE

Wednesday, April 9, 2014

Rebuilding WID Database for WSUS in Windows Server 2012

If you're using Windows Internal Database (WID) for WSUS in WS2012 and you think you've screwed the configuration, you can force the WSUS to rebuild its contents and database.

Steps:
  1. Remove WSUS and WID roles from server manager. Reboot server.
  2. Go to C:\Windows\WID\Data
  3. Move both "SUSDB.mdf" and "SUSDB_log.ldf" to another temp folder
  4. Re-install WSUS server role again
Found a comprehensive guide on http://prajwaldesai.com/troubleshooting-wsus-3-0-sp2-on-windows-server/

Tuesday, December 3, 2013

Direct RDP login into Virtual Desktop Pool with Smart Card (Windows Server 2012)

In my earlier post, I've explored about Single Sign On for WS2012 Virtual Desktop. Normally, we have to login through the Remote Connection Web server. Can we do direct RDP with smartcard logon i.e. bypass RDWeb server? Yes, it's possible.

Open up MSTSC, key in the FQDN of your RD Connection Broker, configure whatever RDP settings and save it into a .rdp file. Open the .rdp file with notepad.
Modify this line (change from 0 to 1): use redirection server name:i:1
Add this line: loadbalanceinfo:s:tsv://[TSV URL]
Substitute the [TSV URL] path with your RD collection name. To find out the exact name, go to Event Viewer of your connection broker server. Look for event under TerminalServices-SessionBroker. Do a normal login via the usual RDWeb console. Refresh and look out for event 800. You'll find the TSV URL information.

Test this by double clicking on the new RDP file.

Wednesday, November 27, 2013

Remove active filter drivers that could interfere with CSV operations

One of my cluster nodes had DPM previously installed on it. As a result, I would get re-directed Cluster Shared Volume (CSV) whenever it is moved to this node. In the cluster warning, I saw:
Cluster Shared Volume 'Volume1' ('CSV Volume name') has identified one or more active filter drivers on this device stack that could interfere with CSV operations. I/O access will be redirected to the storage device over the network through another Cluster node. This may result in degraded performance. Please contact the filter driver vendor to verify interoperability with Cluster Shared Volumes. 
Active filter drivers found: SIS (HSM) 
 I search through the Technet on DPM 2012 on how to remove its SIS filter. Unfortunately, this page isn't updated for WS2012 that has no ocsetup.exe anymore. Hence, the replacement for ocsetup.exe is DISM /Online. To remove SIS filter:
Dism /online /Disable-Feature /FeatureName:SIS-Limited
Reboot the system after removal and the CSV is no longer re-directed.

Tuesday, November 26, 2013

Moving Roaming User Profiles files to another Server using WSMT

I have tried using "robocopy" and even Windows backup to transfer roaming user profiles (RUP). There would be surely files that I couldn't move due to file permission and ownership preservation. In WS2012, there is a built-in Windows Server Migration Tool (WSMT) to facilitate the file transfer (including server roles).

Here are the steps in summary (click this link for full Technet guide):

Step 1: Install WSMT
Install WSMT feature using server manager on the target WS2012 server.  
Step 2: Register and deploy WSMT
Start an elevated cmd prompt from the WSMT tool. Create a deployment folder that is accessible to the source server. Depending on the OS of the source server, an example of the command for WS2012 (default on "C:\Windows\System32\ServerMigrationTools\") would be: 
SmigDeploy.exe /package /architecture amd64 /os WS12 /path [deployment folder path]
Copy the deployment folder to the source computer. Register and deploy the source computer by running .\Smigdeploy.exe
Step 3: Move local users and groups
To preserve local permissions, you may need to move the local users and group first. To export from the source computer: 
Export-SmigServerSetting -User All -Group -Path [storepath\UsersGroups] -Verbose
To import into the target server:
 Import-SmigServerSetting -User All -Group -Path -Verbose
Step 4: Start file moving
Before moving, permit both UDP 7000 and TCP 7000 on the windows firewall. On the target computer, start the reciever:
Receive-SmigServerData 
To begin file transferring, run the following WSMT cmdlet on the source computer 
Send-SmigServerData -ComputerName [DestinationServer] -SourcePath d:\users -DestinationPath d:\shares\users -Recurse -Include All -Force 
You may want to observe any errors at the progression update on the command prompt.

Monday, September 2, 2013

How to enable Remote Desktop remotely using Powershell

In Windows Server 2012, remote management is enabled by default but not Remote Desktop. To enable RDP on the server, add the target server to the Server Manager and run remote Powershell console.

On the remote Powershell console, enable remote desktop and firewall using the following cmdlets:
1) Enable Remote Desktop
set-ItemProperty -Path 'HKLM:\System\CurrentControlSet\Control\Terminal Server'-name "fDenyTSConnections" -Value 0

2) Allow incoming RDP on firewall
Enable-NetFirewallRule -DisplayGroup "Remote Desktop"

3) Enable secure RDP authentication
set-ItemProperty -Path 'HKLM:\System\CurrentControlSet\Control\Terminal Server\WinStations\RDP-Tcp' -name "UserAuthentication" -Value 1   

Refer to "Windows 2012 Core Survival Guide – Remote Desktop" for more information.

Thursday, July 18, 2013

Cert Template MMC Crashed on WS2012 whenever Key Archival was enabled

Cert Template MMC (CertTmpl.msc) on WS2012 crashed whenever the archive key check-box was enabled as shown in red box below.


A technical support was raised to Microsoft premium support with TTTrace.exe debugging tool. Eventually, the support team replied that the crash was due to a recently added CA server did not return any cert template information. Indeed, after I issued a cert template on that CA server, the crash issue was gone.

Workaround
No resolution or hotfix was given. Instead, the support team acknowledged that it was a bug that would be fixed in next Windows version. The decision was made due to the following considerations:
  • Low impact of this bug
  • Easy workaround by adding an unused cert template on the CA server
  • Any code change could potentially bring wider implication to world-wide customers
My guessing on the real reason: the hands of the development team are full....

Saturday, May 25, 2013

Hyper-V (WS2012) Backup on Guest VM (WS2008)

If you're running backup jobs (e.g. DPM2012) on WS2012 Hyper-V with older guest VMs (e.g. WS2008), you might encounter this error:

The replica of Microsoft Hyper-V \Backup Using Child Partition Snapshot\[VM] on [Host] is inconsistent with the protected data source. All protection activities for data source will fail until the replica is synchronized with consistency check. You can recover data from existing recovery points, but new recovery points cannot be created until the replica is consistent. 

For SharePoint farm, recovery points will continue getting created with the databases that are consistent. To backup inconsistent databases, run a consistency check on the farm. (ID 3106) 

To resolve it,
1) ensure that the host contains this update KB2770917 (available in Windows update)
2) Update the Integration services on the older guest VMs e.g. WS2008R2 etc

Thursday, May 16, 2013

Failover Cluster Manager Console keeps crashing on WS2012

If your new Failover Cluster Manager console keep crashing on WS2012 and the error message is something like:

"A weak event was created and it lives on the wrong object, there is a high chance this will fail, please review and make changes on your code to prevent the issue.",

apply this hotfix (KB 2803748) on all your cluster nodes and/or the RSAT machines immediately.

Tuesday, May 7, 2013

Windows Server 2012 Consistent Device Naming (CDN)

The new SCVMM 2012 SP1 supports bare-metal host deployment. I was wondering if the host has multiple network connections, how would the right address be assigned from the right IP pools? Even if you've pre-patched the cables, the NIC order would change randomly once you've sysprepped or installed a new OS on the server. It had been a pain for server administrators to identify which NICs are connected to which network segments or VLANs.

While I was creating my host profile on SCVMM 2012 console, I came across this page:

Look like if you know the CDN of each NIC, you can now pre-allocate the static IP address from the IP pool! CDN ensures that the NIC name and the printed name on the server chassis remain consistent. It's good news for every system administrator. Bad news is that CDN is only supported on WS2012 and you'll need the newest server hardware e.g. Dell's 12th generation hardware.

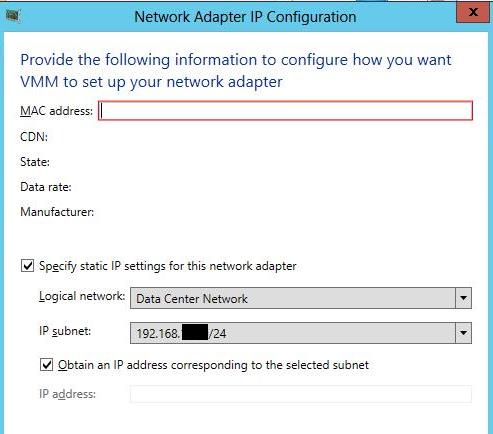
Without CDN, you would have to supply the individual MAC addresses of each interface and match them to the defined IP subnets as shown below.

The MAC address can be easily identified using "show mac address-table interface" command on the data center switches. Once the job started running, you should see the following screen on the bare-metal host:

Additional Resources:
  1. SCVMM 2012 - Bare-metal deployment
  2. BMC - Out-of-Band Host Management on SCVMM 2012

Thursday, February 28, 2013

Cloning Virtual Domain Controllers

A new feature of Windows Server 2012 is the cloning of Domain Controllers. This is a rapid way to deploy new Domain Controllers in virtual machine forms. The detailed step-by-step is outlined in Virtual Domain Controller Cloning in Windows Server 2012. I won't attempt to repeat all the details. Hence, I would summarize the steps for easy reference later.

Prerequisite Check:
  1. The hypervisor must support VM-GenerationID. Hyper-V running on Windows Server 2012/Windows 8 supports this feature and so do VMWare vSphere 5.x.  
  2. The source virtual DC must be running Windows Server 2012. 
  3. The PDC emulator role holder must be online and available to the cloned DC and must be running Windows Server 2012.
Step 1: Add source DC VM into "Clonable Domain Controllers" Security Group

Step 2: Check for applications and determine whether they should be cloned by running "Get-ADDCCloningExcludedApplicationList" cmdlet. If application is not supported for cloning, uninstall it. Otherwise, add the application to the inclusion list (CustomDCCloneAllowList.xml). The list can be generated with the same cmdlet with "-GenerateXML" option.

Step 3: Run "New-ADDCCloneConfigFile" cmdlet on source VM to run a list of prerequisite checks as mentioned above. It would also generate "DCCloneConfig.xml" file that contains a list of settings to be applied to the cloned DC, including network settings, DNS, WINS, AD site name, new DC name etc. The xml file is contained at the "%Systemroot%\NTDS" folder. These new settings can be specified with the same cmdlet input with the necessary options. For example:
New-ADDCCloneConfigFile -IPv4Address 10.2.1.10 -IPv4DefaultGateway 10.2.1.1 -IPv4SubnetMask 255.255.255.0 -IPv4DNSResolver 10.1.1.10,10.1.1.11 -Static -SiteName CORPDR

Step 4: Shut down the source VM and export it out using "Export-VM" cmdlet e.g. Export-VM -name sourceDC -Path D:\ClonedDC.

Step 5: Import the VM by running "Import-VM" cmdlet e.g. Import-VM –Path {VM XML Path} –Copy –GenerateNewId –VhdDestinationPath D:\ClonedDC. You can also rename the new VM using Hyper-V manager. Start the newly cloned VM.

Tuesday, February 12, 2013

New MS2012 Dynamic Access Control (DAC) for BYOD?

One major new feature in Windows Server 2012 is the introduction of Dynamic Access Control (DAC). At the first glance, it seems to be replacing or enhancing the traditional NTFS ACL. In fact, it's neither. In traditional file shares, the access control is typically controlled by both share permissions and NTFS ACL. DAC is an add-on feature on top of these existing access control mechanisms. For example, you may allow a group of finance executives to access a sensitive finance file share from their managed workstations. But what if the corporate policy forbid them for doing so when they are accessing from mobile or personal devices? This is where DAC comes in.

In DAC, you can create access rule that is expressed in "if-then" statement. Using the same example, you may express the policy as "If the user clearance is high and the user department is finance; and accessed from a managed finance device, then the user can access finance files and folders classified as having high business impact". See below illustration:


I won't attempt to go through the detailed step-by-step in implementing DAC, as there is already a dedicated blog for DAC at http://www.dynamic-access-control.com/. I would just summarise the steps as follows:

On a Windows Server 2012 domain controller:
  1. First, ensure that the domain functional level is Windows Server 2012, as expanded Kerberos with claim-based information is required. Enable "KDC support for claims, compound authentication and Kerberos armoring" using Group Policy on Domain Controllers OU.
  2. Define the user and device claims types using the new "Active Directory Administrative Center (ADAC)" under "DAC - New Claim Types". For example, you may like to define the new User.Department and Device.Managed attributes. You may even provide a list of values such as "Engineering", "Finance", "IT" for User.Department. 
  3. Define the new Resource Properties for the files and folders using the same ADAC console. In this case, you may want to define Resource.Department and Resource.Impact. Add the resource properties to the pre-defined "Global Resource Property List".
  4. Create a new central access rule e.g. using earlier expression as example.
  5. Create a new central access policy and add the central access rule into it. This new central access policy has to be enforced by the file servers mentioned later.
  6. Tag the user account objects using attribute editor in "AD Computers and Users" console e.g. department etc.
  7. You may also want to tag the computer attributes. Do note that Windows 8 is required for claim-based devices.

On a file server running Windows Server 2012:
  • The earlier steps have created Central Access Policy on AD. However, the enforcement has to be performed on individual file server.
  • Add new Windows Feature "File Share Resource Manager" using Server Manager or Powershell
  • Run PS cmdlet "Update-FSRMClassificationPropertyDefinition" to  synchronizes the classification property definitions on the file server with the Resource property definitions on AD
  • You may perform Manual Classification by setting the resource property (Classification tab) on the file and folder properties directly.

  • Alternatively, you may perform "Automatic Classification" by creating Classification Rules on "File Server Resource Manager". You may set the rules to be run at fixed interval.
  • After file tagging and classification, deploy and enforce the earlier created central access policy on the file server. You can find a new "Central Policy" tab on the "Advanced Security Settings" of the share folder
  • You may also test-run the deployment using the "Effective Access" tab (left of Central Policy tab as above)
As for rolling out DAC incrementally, this is what Microsoft would recommend in summary:

Monday, February 4, 2013

Moving WSUS Content Store

The content of WSUS is growing exponentially and the storage is nearly full. To move the existing content to a bigger LUN, Wsusutil.exe is the program. To execute the move, prepare the new destination folder and use this command:
Wsusutil.exe movecontent {new location} {log file}  [-skipcopy]

Use the -skipcopy option, if you do not wish to copy existing content over. For example, if the new location is at D:\content, the command should be:
Wsusutil.exe movecontent D:\Content D:\move.log

For Windows Server 2008, the location of Wsusutil should be at "C:\Program Files\Microsoft Windows Server Update Services\Tools". For Windows Server 2012, you should be able to find the executable at "C:\Program Files\Update Services\Tools".

Tuesday, January 29, 2013

SQL 2012 Installation: Missing NetFx3

When I installed MS SQL Server 2012, there was an error "Error while enabling Windows feature: NetFx3". NetFx3 refers to the .NET framework 3.5. 

However, .NET framework 3.5 is no longer installed as part of the new WS2012. To install this older feature, you would have to perform side-by-side (SxS) installation. Mount the WS2012 DVD or the ISO image on the same host. Do note that you can now mount ISO image directly without third-party software by right-clicking the image and choose "Mount". 

Open an elevated Powershell console. To install the Windows feature:
Add-WindowsFeature NET-Framework-Core -source D:\sources\sxs

Once .NET 3.5 is installed, re-run the MS SQL installation. If you are also looking for the missing "Start" button to search for the SQL Server Management Studio, install the "Desktop Experience" feature as well:
Add-WindowsFeature Desktop-Experience

Monday, January 7, 2013

Powershell: Quickly view installed Windows feature

To quickly view a list of installed Windows feature using Poweshell on Windows Server:

PS > Get-WindowsFeature | Where-Object {$_.Installed -eq $true}

To filter only feature name

PS > Get-WindowsFeature | Where-Object {$_.Installed -eq $true} | Select-Object -Property Name

Wednesday, December 26, 2012

Hyper-V Network Virtualization Test

To extend further on my earlier basic testing on Hyper-V network virtualization, I have included cross-sites connection with physical network that is not on Hyper-V. This is my test setup:

Both HQ-HyperV-N1 and HQ-HyperV-N2 Hyper-V hosts are sitted on HQ site and DR-HyperV-N3 is on DR site. The necessary static routes (e.g. route add) should be configured on each host to access different IP subnets. All the VMs are pre-fixed with "Test*". TestVM01-3 VMs are hosted across IP subnets but they can reach each other on same L2 virtual subnet of 10.0.0.0/24 (denoted by blue VSID: 5001). Each VM is assigned with a pair of virtual IP/MAC that is mapped to a physical host address. Test-VM is the virtual gateway (red VSID: 5002) hosted on HQ-HyperV-N1 that routes traffic on virtual network to the physical network (vice-versa). Hereby, you may download my test powershell script and reference to the above network diagram.

Besides static routes, do take note that forwarding must be enabled on the network adapters of the Gateway (e.g. Test-GW) for routing. The forwarding can be enabled using the cmdlet "Set-NetIPInterface -InterfaceIndex [int-index] -AddressFamily IPv4 -Forwarding Enabled" for each adapter. However, the forwarding would still remain disabled upon host reboot. To make things easier, I added a feature "Remote Access" and enabled routing, so that the network adapters would always be in forwarding mode.

Friday, December 14, 2012

Enabling Hyper-V Network Virtualization to route across IP subnets in Provider Address Space

I've just tested out the new Microsoft SDN (a.k.a network virtualization) in Hyper-V 3.0. In summary, Hyper-V network virtualization enabled different VMs to be connected on the same L2 virtual subnet, even though the underlying Hyper-V hosts are running across various IP typologies  If you're looking for GUI to enable this new feature, you'll be in for disappointment, as SCVMM 2012 has yet to incorporate it at this point (except SCVMM SP1 Beta). Only PowerShell cmdlets can be used at the moment. To make things easier, there is a demo script available for you to download and modify. The script can be used without modification provided you've setup the Hyper-V infrastructure according to the given instructions. The demo setup should look like this:
According to above diagram, the blue VMs belong to blue tenant and the red VMs belong to the red tenant. Each respective color VM can only connect to same color VM residing on another host on the same virtual subnet of "10.0.0.0/24". Despite the overlapping IP address range, both color networks are virtually segregated by different VSIDs. Each pair of virtual IP and MAC address has to be "registered" with the underlying host IP address (i.e. Provider address) using New-NetVirtualizationLookupRecord cmdlet.

Notably, both Hyper-V hosts are connected on the same L2 subnets i.e. 192.168.4.0/24 (known as Provider Address" in the demo, which is so "unreal". In the real world, it's far more likely for providers hosts to be connected across different IP topology and subnets. Let's assume Host 2 be placed on "192.168.6.0/24". Using the same script won't suffice, you'll have to use the "New-NetVirtualizationProviderRoute" cmdlet to inform the underlying hosts how to reach the cross subnet.  After changing Host 2 provider address and adding a gateway router in-between both hosts, the new network setup should look like this:
Let's modify the original script (replace with actual Host and Gateway addresses accordingly):

1) On line 287, from:  New-NetVirtualizationProviderAddress -ProviderAddress "192.168.4.22" change to New-NetVirtualizationProviderAddress -ProviderAddress "192.168.6.22" to reflect the change in Host-2 physical IP address.

2) After line 274, add this for Host 1:
New-NetVirtualizationProviderRoute -InterfaceIndex $iface.InterfaceIndex -DestinationPrefix "192.168.6.0/24" -NextHop "192.168.4.1" -CimSession $Hosts[0]

3) After line 287, add this for Host 2:
New-NetVirtualizationProviderRoute -InterfaceIndex $iface.InterfaceIndex -DestinationPrefix "192.168.4.0/24" -NextHop "192.168.6.1" -CimSession $Hosts[1]

4) Clear the existing records by running "Remove-NetVirtualizationLookupRecord" on both hosts, re-run the script and both VMs should be able to ping each other again.

Tuesday, December 11, 2012

Basic Networking of SCVMM 2012 SP1 Beta

The new Windows Server 2012 has a new feature that supports NIC teaming natively. After configuring Hyper-V NIC teaming on two hosts, I clustered them up. Everything was working well and fine. SCVMM 2012 SP1 beta is required to manage the newly minted Hyper-V cluster.

After setting up the new SCVMM server successfully, adding an existing cluster is easy. I also noticed more networking profiles have to be created before I can roll a new VM.
See the differences? It does look confusing. Fortunately, the System Center team has updated this blog to explain the relationship between various physical and virtual components: Networking in VMM 2012 SP1 – Logical Networks.

Overall SCVMM 2012 SP1 Network Architecture

From Hyper-V Host Perspective
In essence, the steps to create networking in SCVMM 2012 SP1:
  1. Start from creating new Logical Networks. Each Logical Network may contain multiple Network Sites. Each site may contain multiple VLANs and IP Subnets.
  2. On each Hyper-V host, associate the Virtual Switches (each virtual switch represents a physical NIC on the host) to the respective Logical Networks. 
  3. Create VM Network and associate it to a Logical Network.
  4. Under the hardware profile of a new VM, connect the new virtual NIC to a VM network. Select the appropriate Virtual Switch available to the parent host.

Example 1: Datacenter network contains 2 VLANs - VLAN 10 and VLAN 20 on Site A and VLAN 30 and VLAN 40 on Site B using VLAN trunking on the underlying physical switches. Create a new logical network named "Data Center Network". In it, add a network site A, then both VLAN 10 and 20. Assign the IP subnet to each VLAN. Add another network site B and add both VLAN 30 and 40 on this network site.

Example 2: Storage network contains 2 physical storage switches without VLAN trunking in both sites. Create a new logical network named "iSCSI Storage Network". In it, add both network site A and network site B. Assign VLAN tag 0 to each network site and assign the relevant IP subnet.

Logical switch and port profile, on the other hand, act as container to consistently configure identical capabilities (e.g. SR-IOV, VMQ, DHCP guards etc) for network adapters across multiple hosts. Instead of configuring individual ports on each host, you can specify the capabilities in port profiles and logical switches and apply them to the appropriate adapters.