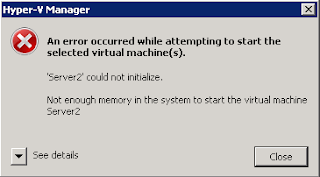
Sometimes, using SCVMM on a new Hyper-V cluster to deploy a new VM may result in an operational timeout. This is an example:
Although the error message did not state "timeout" directly, you would see the following exact error when you execute "winrm helpmsg" on the error code given (in this example 0x80338029):
C:\> winrm helpmsg 0x80338029
The WS-Management service cannot complete the operation within the time specified in OperationTimeout.
The Hyper-V hosts may need longer time to respond to the VMM server using Windows Remote-Management (winrm). To increase the time-out period and to increase more concurrent operations that can be performed by the VMM server, execute the following commands on the affected Hyper-V hosts:
winrm set winrm/config @{MaxTimeoutms = "1800000"}
winrm set winrm/config/Service @{MaxConcurrentOperationsPerUser="400"}
net stop winrm
net start winrm
net start vmmagent
For other "Not Responding" host status issues on SCVMM 2008 R2, refer to this useful guide on Microsoft official site.
I have a wide scope of interests in IT, which includes hyper-v private cloud, remote desktop services, server clustering, PKI, network security, routing & switching, enterprise network management, MPLS VPN on enterprise network etc. Started this blog for my quick reference and to share technical knowledge with our team members.
Monday, December 19, 2011
Thursday, December 8, 2011
New Cisco L2 Catalyst 2960S supports static routes
It's long overdue! Finally, we can now configure static route on our newly shipped Cisco Catalyst 2960S L2 stackable switches. By default, you can't configure any routes on it besides the "ip default-gateway". Hence, you have to switch the sdm template from the default desktop to lanbase-routing as follows:
Switch# config t
Switch(config)# sdm prefer lanbase-routing
Switch(config)# reload
Do note that the lanbase-routing template is only supported on C2960S LAN-based image and not on LAN-lite image. For more information, refer to this Cisco documentation.
Switch# config t
Switch(config)# sdm prefer lanbase-routing
Switch(config)# reload
Do note that the lanbase-routing template is only supported on C2960S LAN-based image and not on LAN-lite image. For more information, refer to this Cisco documentation.
Labels:
cisco networking
Thursday, November 17, 2011
How to rebuild AD-integrated DNS servers
What if a joker wipe out your AD integrated DNS zones accidentally? And there's no backup? You'll find out soon enough that AD operations are heavily dependent on the DNS services.
You'll then have to rebuild the DNS manually by re-creating 2 DNS zone files namely: yourdomain.dns and _msdcs.yourdomain.dns. When non-AD integrated, both zone files should be stored on the system dns folder on %Systemdrive%\System32\dns\ e.g. C:\Windows\System32\dns
You'll then have to rebuild the DNS manually by re-creating 2 DNS zone files namely: yourdomain
- On all of your AD-integrated DNS servers, change both forward primary and _msdcs zones to Standard Primary zones by unchecking the "Store the zone in Active Directory" box. Backup both existing dns files on the system dns folder. Delete both primary and _msdcs zones using the DNS manager.
- Next, you'll need to know the DNS zone file syntax. There are sample files available under the \dns\sample. Another easier way is to go to another DNS server belonging to another intact domain. Change both primary and _msdcs zones to Secondary Zone temporarily and you'll find the 2 files located on the system dns folder for your reference. Copy out the files and remember to change them back to AD-integrated.
- Re-create both zone files using notepad/wordpad and store them on the system dns folder. Pay special attention on SRV records like _ldap, _kerberos, _dc._tcp.domain etc for "referring" your clients to the domain controllers for authentication. Remember to keep a backup copy for both files.
- On your DNS manager, create new standard primary zone (do not integrate with AD yet!) under the forward zones and named it after your domain. On the "Zone File" page of the setup wizard, choose to "Use this existing files". Repeat the same step for _msdcs zones.
- Restart DNS and netlogon services by using "net stop/start dns/netlogon" respectively.
- Test and check all entries. Rectify any errors found.
- Once you're happy with the DNS settings, integrate the DNS server into Active Directory by checking the same box earlier in step 1.
- If you have dynamic DNS records, execute "ipconfig /registerdns" on each dynamic DNS client. Otherwise, just wait for the clients to get back online.
- On each subsequent DNS server, check that the DNS zone is back. Otherwise, create a new secondary zone and a new _msdcs zone. Reference them to the DNS server that you first re-created. Make sure the entries are replicated correctly. If replication fails, check the "Zone Transfer" setting on the first DNS server.
- Once replication is successful, change both secondary zones to primary zones. Integrate both zones into AD. Reboot the DNS server.
Labels:
active directory,
windows 2008
Monday, September 19, 2011
Useful References for Intel NIC Teaming on Windows Server Core 2008
1) Enable Remote MMC
To remote MMC console to a standalone (non-domain) computer, add a temporarily administrator account on the target server core that share identical account name and password on another full GUI computer (e.g. Win7, Full Win2K8R2 etc).
Use "sconfig" on the server core to add a local admin account (option 3) and to enable remote administration (option 4).
To perform remote execution,
"winrs -r:%servername% remote command" and press on "Enter" button.
Example: To review remote file system, write the following command:
"winrs -r:DC1 dir"
2) Intel NIC teaming on Server Core
http://www.intel.com/support/network/sb/CS-029966.htm
To extract all Intel NIC inf driver files, use PROWinx64.exe /e /f [destination path]
To extract all Intel NIC inf driver files, use PROWinx64.exe /e /f [destination path]
3) Enable remote device driver management for Server Core
http://www.petri.co.il/remotely-manage-devices-windows-server-2008-core.htm
4) Configuring system variable environment on Server Core
4) Configuring system variable environment on Server Core
WMIC Environment where name='Path' SET VariableValue='%ProgramFiles%\Apps;%PATH%'
5) Using PowerShell to manage Windows Features and Server Roles
http://blogs.msdn.com/b/powershell/archive/2009/01/27/managing-server-features-with-powershell-cmdlets-on-windows-2008-server-r2-beta.aspx
6) Enable Jumbo Frames
http://blog.allanglesit.com/2010/03/enabling-jumbo-frames-on-hyper-v-2008-r2-virtual-switches/
7) Enable VMDq on Intel Team for VLANs in Hyper-V
http://www.intel.com/support/network/sb/CS-030993.htm
8) Disable Dynamic DNS update of Hyper-V cluster name
If you have configure static DNS record for the cluster name, you have to disable DNS dynamic update. However, disabling on DNS client update on GPO won't work for cluster name. You have to disable it on the updating interface. Since ncpa.cpl is not supported on server core, use "netsh interface" command and set dnsserver register to none. Example:
To turn off DNS register:
netsh interface ipv4 set dnsserver name="Local Area Connection" source=static address="10.10.10.1" register=none
To add another DNS server
netsh interface ipv4 add dnsserver name="Local Area Connection" address="10.10.10.2"
Labels:
Server Core,
windows 2008
Friday, September 16, 2011
Part 5: Sysprep and Capture Server Image using MDT2010
In the part 4, I mentioned about using MDT2010 to perform Windows installation over the network share. After you have installed, configured and patched this reference computer, you may like to "clone" this image for subsequent server deployment.
You may use MDT2010 to sysprep and capture this reference image. Initially, I thought of doing a PXE boot and capture the image after creating a new task sequence for sysprep and capture. But I was half-right. Instead, after creating the new task sequence, you have to login to your reference computer, map to the MDT network share and execute the sysprep and capturing LTI scripts as follows:
cscript \\mdtserver\DeploymentShare$\Scripts\LiteTouch.WSF
cscript \\mdtserver\DeploymentShare$\Scripts\LiteTouch.WSF
For step-by-step details, please click on "How to run a Sysprep and Capture Task Sequence from MDT2010".
Labels:
windows deployment,
windows imaging
Thursday, September 15, 2011
AD authentication for Dell iDRAC6
The well-known default login name and password for iDRAC6 are "root" and "calvin" respectively. You should change it immediately, which may probably turn into accountability issues of having shared password among various administrators. A better way is to configure it to permit AD authentication that allows individual login accounts and ensures consistent password policies.
Step 0: Configure IP and DNS settings on iDRAC
Step 1:Enable Microsoft Active Directory on "Directory Service" under "Network/Security"
Step 2: Enable cert validation and upload the Enterprise CA cert.
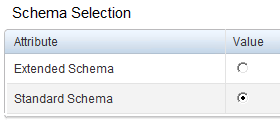
Step 3: Choose Standard Schema
Step 4: Enter the fqdn of domain controllers e.g. dc1.domain.com. Define the user groups on AD and authorize appropriate rights accordingly.
Step 5: Lastly, test the settings. Supply the test account name using "user@domain.com" format instead of "domain\user" format that won't work.
Labels:
active directory,
DELL iDRAC
Wednesday, September 14, 2011
Enrolling SSL Cert for DELL iDRAC6
Dell's integrated light-out (ILO) management iDRAC6 allows administrators to manage servers remotely (using Java-based virtual console), as though they were in front of the console physically. Think of it like IP KVM. Managing iDRAC is performed over web console. Most likely, you would be greeted by SSL warnings, which is using a default self-signed cert. To do away with these prompts permanently, you would have to setup a PKI within your enterprise network, such as Active Directory Certificate Services (AD CS).
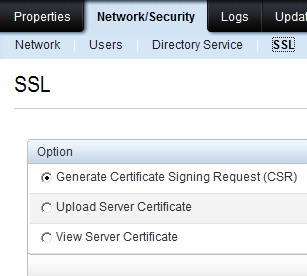
In AD CS, you should be using Web enrollment to generate certificate for entities outside of AD, such as iDRAC. Create a new web server based template and allows iDRAC users to enroll. Next, generate a cert request for iDRAC. To do so, login to manage iDRAC setting and click on Network/Security and SSL as shown below:
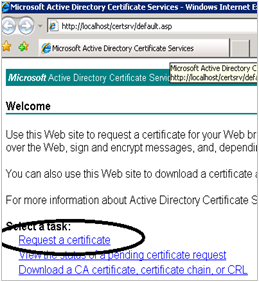
Click on "Generate Certificate Signing Request (CSR)" and download a text-based file. Open this file with a notepad or wordpad. Logon to the web enrollment service e.g. http://certservername/certsrv. Click on "Request a certificate" and "Submit a certificate request".
Focus back on the notepad, copy the contents of the csr and paste it on the certificate request. Select the appropriate cert template.
Click "Submit" and download the server cert. Upload this cert via the same SSL web console page on iDRAC setting earlier. And iDRAC will take a few minutes to reset itself. If you still see SSL errors, take a look and troubleshoot. Most likely, it's due to some typo errors that causes a mismatch between Common Name and the DNS name.
In AD CS, you should be using Web enrollment to generate certificate for entities outside of AD, such as iDRAC. Create a new web server based template and allows iDRAC users to enroll. Next, generate a cert request for iDRAC. To do so, login to manage iDRAC setting and click on Network/Security and SSL as shown below:
Click on "Generate Certificate Signing Request (CSR)" and download a text-based file. Open this file with a notepad or wordpad. Logon to the web enrollment service e.g. http://certservername
Focus back on the notepad, copy the contents of the csr and paste it on the certificate request. Select the appropriate cert template.
Click "Submit" and download the server cert. Upload this cert via the same SSL web console page on iDRAC setting earlier. And iDRAC will take a few minutes to reset itself. If you still see SSL errors, take a look and troubleshoot. Most likely, it's due to some typo errors that causes a mismatch between Common Name and the DNS name.
Labels:
DELL iDRAC,
public key infrastructure
Friday, September 2, 2011
Debugging JUNOS for Cisco dude
In Cisco IOS, you would use debug statement for troubleshooting. How would you do it in JUNOS?
For example, if you were troubleshooting SNMP in Cisco IOS, you would do this:
#debug snmp detail
#term mon
As for JUNOS,
> edit
# edit snmp
# set traceoptions flag all
# set traceoptions file debug-snmp
[Unlike Cisco IOS, you need to commit the changes first]
# top
# commit
[It will start the debugging in next statement]
# run monitor start debug-snmp
[Lots of debugging messages and when you're done, stop it]
# run monitor stop
# delete snmp traceoptions
# commit
Labels:
JUNOS
Tuesday, August 23, 2011
Use BGP maximum-paths eibgp with Caution
Under the BGP command process, "maximum-paths" enables BGP to perform load-sharing among multiple paths. There are 3 options:
- maximum-paths: only allow equal-cost path load-sharing
- maximum-paths ibgp: enable both equal-cost and unequal-cost path load-sharing for internal BGP
- maximum-paths eibgp: enable both equal-cost and unequal-cost path load-sharing for both internal and external BGP
Labels:
BGP,
ip routing
Monday, August 8, 2011
Part 4: Lite-Touch Installation using MDT 2010 and WDS
Earlier in Windows Deployment Part 1, I mentioned about using WinPE and ImageX (with a network share) to build, capture and deploy OS images. Using the Windows DISM tool, you can also service the OS images whenever you need to update any application patches or drivers. This is a heavy imaging method and is tedious to manage in a long run. In part 2, I mentioned about using Windows Deployment Services to automate the OS image deployment. However, this method alone does not allow you to service your images or install applications automatically. Nevertheless, Microsoft calls both methods as "Heavy-Touch" installation.
Microsoft Deployment Toolkit (MDT) 2010 allows you to combine both methods (WinPE/ImageX and WDS) for Lite-Touch Installation (LTI). This toolkit automates the manual tasks for WinPE and ImageX processes. It also facilitates the new "thin image" deployment concept. "Thin image" deployment does not include all applications and drivers on the base OS image, as constrasted to the traditional "heavy image" approach. Instead, new applications, patches and drivers are installed dynamically when you perform OS deployment.
There are several good blog posts that show you the step-by-step. I found these series of blog posts particularly helpful. In summary, I would just mention the typical overall steps:
- Prepare the necessary infrastructure, including AD, DNS, DHCP, WDS and file servers.
- Download Windows AIK and MDT2010. Install them on a technician computer.
- Open up the Deployment Workbench. Create a deployment share.
- Import Operating System. Try not to use WDS images option. See this forum.
- Create a task sequence and follow the wizard. Typically, it's "Standard Client Task Sequence" for new deployment.
- Add the necessary applications and third-party device drivers.
- Update Deployment Share by right-clicking on the "MDT Deployment Share"
- Several files will be created on the network share. Add the newly created boot image to your WDS server.
- PXE boot your target computer (can be a VM for initial testing). Select the Lite Touch boot option.
- Resolve all installation errors (if needed). Thoroughly test the target computer.
- Upon successful deployment, you can choose to create another Task Sequence to sysprep and capture the image, which is completely optional (good for hybrid Thin-Thick imaging). You can use this new capture image for subsequent WDS deployment.
Labels:
windows deployment,
windows imaging
Thursday, August 4, 2011
Display currently logon terminal services users
To display the currently logon users on a terminal server or session host on Windows Server 2008, use this command:
query session /counter [ /server:servername ]
For example, to count the number of active users:
query session /counter | find /c " Active "
find filters the output that contains "Active" and count them with the "/c" option.
query session /counter [ /server:servername ]
For example, to count the number of active users:
query session /counter | find /c " Active "
find filters the output that contains "Active" and count them with the "/c" option.
Labels:
Remote Desktop Services,
Terminal Services
Tuesday, July 19, 2011
Misconfigured Interfaces on NLB cluster of Hyper-V VMs
If you ever attempt to form a Network Load Balancing (NLB) cluster with 2 or more Hyper-V VMs, you would be likely to see errors saying that the interfaces are misconfigured and both cluster and dedicated IP addressess are unable to be added to TCP/IP.
To workaround this issue, shut down the VMs. Open up Hyper-V manager and enable MAC spoofing on the interfaces that you want to load-balance as follows:
To workaround this issue, shut down the VMs. Open up Hyper-V manager and enable MAC spoofing on the interfaces that you want to load-balance as follows:
Start the VMs. Remove the old cluster and form a new one.
Labels:
clustering,
hyper-v,
server setup
Wednesday, July 6, 2011
Windows Date for Backup Batch Jobs
When you perform "echo %date%" on your Windows command prompt, you would see a date format unsuitable for backup batch job. Try this instead:
echo %date:~-4,4%%date:~4,2%%date:~7,2%
You may want to manipulate the numeric positions (negative sign "-" means reverse position starting from right-end) according to your needs.
echo %date:~-4,4%%date:~4,2%%date:~7,2%
You may want to manipulate the numeric positions (negative sign "-" means reverse position starting from right-end) according to your needs.
Labels:
data backup,
windows 2008
Sunday, June 26, 2011
Credential Roaming
Credential Roaming (CR) is especially useful in situations whereby the following 2 conditions exist: (1) user certificate auto-enrollment is enabled; (2) many user tends to logon more than 1 domain machine. You can imagine how many certificates for the same group of users are issued on your CA server if credential roaming were not enabled. No problem for domain logon, as UPN remains the same across multiple user certs. But for applications, such as S/MIME, encryption/decryption using the same cert key becomes a must for roaming users. Do note that only X.509 certificates and private keys are supported and they are stored on the Active Directory certificate store (so beware of potential NTDS bloat but that's another issue).
CR is a new alternative to Roaming User Profile (RUP) for storing user certificates and keys. According to Microsoft, CR is also supposed to be a more scalable and secure alternative than RUP. Whenever a user logon and logoff, the local user cert store would always sync with the AD cert store. Hence, the same user would always get the same cert and key regardless of what domain machines he log-on to.
CR is a new alternative to Roaming User Profile (RUP) for storing user certificates and keys. According to Microsoft, CR is also supposed to be a more scalable and secure alternative than RUP. Whenever a user logon and logoff, the local user cert store would always sync with the AD cert store. Hence, the same user would always get the same cert and key regardless of what domain machines he log-on to.
Depending on your current AD level, you may or may not need to update the AD schema. For Windows 2003, refer to this guide. For Windows 2008, you can refer to this simpler guide instead.
Thursday, June 23, 2011
SDM Mismatch on Cisco Catalyst 3750 switches
Cisco stackable switch - Catalyst 3750 - allows you to stack different models together. For example, you can stack a 12-port SFP fiber switch (Cisco 3750G-12SD) with a 48-port 1000BaseT (Cisco 3750G-48T) switch. However, if you configure the fiber switch as master, you would see the SDM Mismatch error when you perform a "show switch" command. This is described in this Cisco article.
An extract:
The Catalyst 3750-12S switch supports desktop and aggregator Switch Database Management (SDM)templates. All other Catalyst 3750 switches support only the desktop SDM templates. All stack members use the SDM template configured on the stack master. If the stack master is using an aggregator template, only Catalyst 3750-12S switches can be stack members. All other switches attempting to join this switch stack enter SDM-mismatch mode. These switches can join the stack only when the stack master is running a desktop SDM template. We recommend that your stack master use an aggregator template only if you plan to create a switch stack of Catalyst 3750-12S switches. If you plan to have a switch stack with different Catalyst 3750 switch models, configure the stack master to use one of the desktop templates.
To use the desktop template, perform the following commands on the stack master:
- For L2 configuration: sdm prefer vlan desktop
- For L3 configuration (enabled with ip routing): sdm prefer routing desktop
- Do a "show sdm prefer" to verify and reload.
Labels:
cisco networking
Saturday, June 18, 2011
Server NIC Teaming with Cisco Nexus
In my earlier post, a Cisco Nexus 5000 with multiple Nexus 2000 extenders can be managed as one network switch system, which simplify the management of data center network. In another post, network high availability for Windows Servers can be achieved by using NIC teaming. Linking both together, you could achieve total high availability with streamlined management for the entire data center network. Consider the setup below, the server is dual-homed to 2 different switch systems:
Using NIC Teaming with Link Aggregation mode (such as Intel ANS or Broadcom BACS), a virtual network adapter could be created by joining up the physical dual server NICs and is assigned with a single IP address. Not only the virtual adapter is bundled with double bandwidth (e.g. 2 x 1Gbps), network redundancy can also be achieved as the server is connected to 2 different switch systems. Even if any single switch component were to fail, the server would still remain connected to the corporate network.
On the other side of Cisco networking, Link Aggregation is known as EtherChannel. Traditionally, multiple switch ports on a EtherChannel can only be formed on a single switch system. It could also mean single point of failure for servers that are NIC-teamed in this manner. With Cisco Nexus, EtherChannel can be created across different switch systems on a same Virtual Port Channel (vPC) domain. A quick Cisco Nexus vPC configuration guide can be found here, which is relatively easy to follow. (Do pay particular attention to the example of figure 4, which is the closest to this setup.)
In summary, these are the overall steps:
Step 1 to 4 is usually performed only once during the initial vPC setup. For subsequent server setup, just repeat step 5. The configuration example for step 5 is as follows:In summary, these are the overall steps:
- Enable the vPC and LACP features.
- Create a vPC domain and enter vpc-domain mode.
- Configure the vPC peer keepalive link across the out-of-band management interfaces.
- Create the vPC peer link across both Nexus 5000 switch systems through the EtherChannel link.
- Create new EtherChannel for the server ports and assign it with the same vPC number on both switch systems.
N5k(config-if)# int ethernet 100/1/1 (switch port of fex extender 100 on N2K)
N5k(config-if)# channel-group 10
N5k(config-if)# int po10
N5k(config-if)# vpc 10 (ensure this number must be the same on the other switch system)
N5k(config-if)# switchport access vlan 101
Commands to verify vPC configuration
Note on BACS Link AggregationN5k(config-if)# channel-group 10
N5k(config-if)# int po10
N5k(config-if)# vpc 10 (ensure this number must be the same on the other switch system)
N5k(config-if)# switchport access vlan 101
Commands to verify vPC configuration
If you were using Broadcom BACS, choose "Generic Trunking (FEC/GEC)/802.3ad-Draft Static" mode instead of "Link Aggregation". The former works well with Cisco LACP while the latter may give unpredictable results.
Labels:
cisco networking,
cisco nexus,
windows networking
Thursday, June 16, 2011
Cert Enrollment Failed after CA Cert Renewal with Event ID 93
After I renewed my CA cert, all cert enrollment failed with error messages saying that the user does not have the permission to read the cert template. It is not true, as I have assigned sufficient security permission with Read and Enroll on the issued template. A further look into the Event Viewer shows this:
Event 93, Certificate Authority
The certificate (#%1) of certification authority %2 does not exist in the certificate store at CN=NTAuthCertificates,CN=Public Key Services,CN=Services in the Active Directory's configuration container. The directory replication may not be completed.
Performing the troubleshooting tasks on this Technet post did not help. The solution is to publish the new CRT manually to the NTAuthCA store.
- Login to CA using Domain Admin account.
- Go to the %systemroot%\System32\CertSrv\CertEnroll directory.
- Look for the latest *.crt file e.g. foo(2).crt
- Run "certutil -dspublish foo(2).crt NTAuthCA"
- Restart the CA service
Labels:
public key infrastructure,
windows 2008
Sunday, June 5, 2011
Migration from FRS to DFRS with RODC
Traditionally, File Replication Service (FRS) is used for replicating the contents of the SYSVOL share between Windows domain controllers (a.ka. AD replication). A new AD DS feature in Windows Server 2008 can use the DFS Replication (DFSR) service for replicating the contents of the SYSVOL share. DFSR offers several advantages over FRS, including
The RODC will never move to the next step beyond 'Start'. To resolve it, perform the following command on the PDC emulator:
- Efficient, scalable and reliable file replication protocol which has been tested extensively to ensure data consistency in multi-master replication scenarios.
- Differential replication of changes to files using the Remote Differential Compression (RDC) algorithm, which enhances efficiency in branch office scenarios.
- Flexible scheduling and bandwidth throttling mechanisms.
- Self-heals from USN journal wraps and database corruptions – end user intervention and monitoring requirement is minimal.
- Provides built in health monitoring tools for ease of monitoring deployments.
- Improved support for Read Only Domain Controllers.
The RODC will never move to the next step beyond 'Start'. To resolve it, perform the following command on the PDC emulator:
- dfsrmig /DeleteRoNtfrsMember: Since Read Only Domain Controllers cannot delete the FRS related global settings from their own Active Directory, this operation needs to be performed by the Primary Domain Controller in its Active Directory. When these changes eventually replicate in to the Read Only Domain Controller (after applicable AD Replication latencies), the DFS Replication service on the RODC is able to proceed with the process of migration.
Labels:
active directory,
windows 2008
Friday, June 3, 2011
Multicast for MPLS VPN Extranet
In my earlier blog post, I've mentioned briefly about Multicast VPN across MPLS VPN. In this setup, the VRF must share the same default Multicast Distribution Tree (MDT), 239.1.1.1 in this example, for the multicast VPN to form dynamically. Consider the following setup:
The source server (on PE1) is streaming on multicast mode. The VRF-Green, on the other side of PE2, would be able to join to the same multicast distribution tree (239.1.1.1) and recieve the multicast stream. For this Intranet Multicast VPN to work, the VRF-Green on both PE routers should share the basic common configuration as follows:
Router PE1 and PE2
ip vrf VRF-Green
mdt default 239.1.1.1
route-target export 65001:100
route-target import 65001:100
!
ip multicast-routing
ip multicast-routing vrf VRF-Green
ip pim rp-address 1.1.1.1
ip pim vrf VRF-Green rp-address 10.1.1.1
!
router bgp 55
address-family ipv4 mdt
neighbor x.x.x.x activate
neighbor x.x.x.x send-community extended
!
address-family vpnv4
neighbor x.x.x.x activate
neighbor x.x.x.x send-community extended
!
However, the VRF-Blue (on PE2) won't be able to join the same MDT, as Cisco routers do not support multiple duplicate default MDT across VRFs. However, there is a workaround for this Extranet setup. Do note that data flow in MPLS VPN happens in label-exchange. Create another VRF-Green on the source PE1 and import the multicast traffic over to VRF-Blue on PE2. There are 2 options of importing, either import it on the source PE or on the reciever PE. I observed that the latter reciever PE option is more reliable if there are more than 1 reciever PE routers.
Configuring the Receiver MVRF on the Source PE (Option 1)
On PE1, add "route-target import 65001:100" on VRF-Blue, enable multicast routing "ip multicast-routing vrf VRF-Blue", and specify the same Rendezvous Point (RP) as VRF-Green for VRF-Blue using "ip pim vrf VRF-Blue rp-address 10.1.1.1".
Configuring the Receiver MVRF on the Source PE (Option 1)
On PE1, add "route-target import 65001:100" on VRF-Blue, enable multicast routing "ip multicast-routing vrf VRF-Blue", and specify the same Rendezvous Point (RP) as VRF-Green for VRF-Blue using "ip pim vrf VRF-Blue rp-address 10.1.1.1".
For this setup, assign a new default MDT group for VRF-Blue on both PE routers (239.2.2.2 in this example). Import the label on VRF-Green over (route-target import 65001:100) as shown in above diagram. In this way, two multicast distribution trees (MDTs) can be created from the same source server. When you perform a "show ip mroute vrf VRF-Green" on PE1, you'll see Extranet receivers in VRF-Blue.
Configuring the Source MVRF on the Receiver PE (Option 2)
Another option is to do the import on the reciever PE (PE 2 in this example). As mentioned earlier, I observed that the stream is slightly more stable if there is more than 1 reciever PE. You'll need to do the import on every reciever PE.
Troubleshooting
Ensure RPF and multicast routing is sound for GRT level on all PE and P routers, as well as VRF level for all PE. In this example (some outputs truncated):
GRT level
#sh ip mroute
(10.10.10.1, 239.1.1.1), 00:54:29/00:02:12, flags: TA
Incoming interface: Port-channel1, RPF nbr 10.10.0.1
Outgoing interface list:
Port-channel2, Forward/Sparse, 00:54:29/00:03:15
VRF level
#sh ip mroute vrf VRF-Green
(192.168.1.1, 239.23.25.1), 00:54:29/00:02:12, flags: TA
Incoming interface: Tunnel1, RPF nbr 192.168.0.1
Outgoing interface list:
VLAN123, Forward/Sparse, 00:54:29/00:03:15
For further details, refer to the Cisco Multicast VPN Extranet support.
Multipath with Redundant Routers
If you have redundant paths with some load splitting or sharing, you may have to consider enabling multipath options using following steps on every router:
Configuring the Source MVRF on the Receiver PE (Option 2)
Another option is to do the import on the reciever PE (PE 2 in this example). As mentioned earlier, I observed that the stream is slightly more stable if there is more than 1 reciever PE. You'll need to do the import on every reciever PE.
Troubleshooting
Ensure RPF and multicast routing is sound for GRT level on all PE and P routers, as well as VRF level for all PE. In this example (some outputs truncated):
GRT level
#sh ip mroute
(10.10.10.1, 239.1.1.1), 00:54:29/00:02:12, flags: TA
Incoming interface: Port-channel1, RPF nbr 10.10.0.1
Outgoing interface list:
Port-channel2, Forward/Sparse, 00:54:29/00:03:15
#sh ip mroute vrf VRF-Green
(192.168.1.1, 239.23.25.1), 00:54:29/00:02:12, flags: TA
Incoming interface: Tunnel1, RPF nbr 192.168.0.1
Outgoing interface list:
VLAN123, Forward/Sparse, 00:54:29/00:03:15
For further details, refer to the Cisco Multicast VPN Extranet support.
Multipath with Redundant Routers
If you have redundant paths with some load splitting or sharing, you may have to consider enabling multipath options using following steps on every router:
- enable
- configure terminal
- ip multicast multipath s-g-hash next-hop-based
- ip multicast vrf vrf-Name multipath s-g-hash next-hop-based
- end
- show ip rpf source-address group-address
- show ip route ip-address
Labels:
cisco networking,
IP multicast,
MPLS
Tuesday, May 31, 2011
Installation of SCOM 2007 R2
System Center Operations Manager (SCOM) 2007 R2 is the latest monitoring platform from Microsoft that manage hetergenous systems and applications, including both Microsoft and non-Microsoft. SCOM relies on Management Pack (MP) created by its developers and partners to monitor specific systems and applications.
The components of SCOM 2007 R2 should be installed in the following orders:
- Operations Database Server - MS SQL server for data storage
- Root Management Server (RMS) and console - First monitoring server
- Management Servers - Subsequent monitoring servers
- Reporting Server and Data Warehouse Server - Generate reports
- ACS Database Server and ACS Collection Server - Audit Collection Services for storing security events and logs
- Gateway Server - Collect data from multiple agents residing outside of trusted internal domain.
- Agentless Exception Monitoring - Collecting crash information from computers without SCOM agents
- Operations Manager Agents - Agents residing on managed systems. Collect system information and send to management server
- ACS Forwarders
For a quick-start, this technet blog depicted step-by-step SCOM installation guide with pictures. Nevertheless, MS SQL Server 2008 must first be installed (MS SQL 2008 step-by-step).
Labels:
network management,
scom
Friday, May 27, 2011
Updating of SCVMM Template in Offline mode
The new Virtual Machine Servicing Tool (VMST) 3.0 helps to service and patch Hyper-V VMs in offline mode. The new v3.0 introduces the following new features:
- Offline virtual machines in a SCVMM library.
- Stopped and saved state virtual machines on a host.
- Updating of Virtual machine templates.
- Offline virtual hard disks in a SCVMM library by injecting update packages.
The new feature that I’m waiting for is the ‘offline’ patching of VM templates. In SCVMM, template is an efficient way to deploy pre-configured VMs quickly over and over again. However, the newly created VMs out of a particular template will be ‘out-of-patch’ soon. Imagine you can’t enjoy the new features offered in Windows 2008 R2 SP1 immediately, as the VM template was created quite sometime ago.
For downloading of this tool, click here. I won’t go into details, as a “Getting Started” guide is included in the toolkit. Hence, I would just summarize the procedure of servicing VM template (the feature that I’m most interested on):
- Prepare the infrastructure for servicing, including AD, DHCP, SCVMM, and updating services (WSUS/SCCM). I believe most of us should already have this infrastructure in place if you’re using Hyper-V and SCVMM seriously.
- The Virtual Machine Servicing Tool must be installed on the same server as the VMM Administrator Console (the Administrator Console provides Windows PowerShell support). The VMM server and library components can reside on the same server or on one or more additional servers.
- From the target template that you want to update offline, use SCVMM to create a Gold VM out of it. VMST will deploy the Gold VM on a maintenance Hyper-V host with WSUS/SCVMM patches and replace it with an updated VM template eventually. The Gold VM must be stored in the same VMM library.
- Perform initial setup on VMST to reference the VMM server, Maintenance Host, update server (WSUS and/or SCCM server).
- Create a Template Group. Associate the Gold VM to this template.
- Create scheduled servicing jobs. Start the job.
During the servicing job, the following tasks will occur:
- Mounts the gold virtual machine associated with the virtual machine template on the maintenance host.
- Starts the gold virtual machine on the maintenance host, and then invokes either Configuration Manager or WSUS to update it.
- Clones the updated gold virtual machine, creates a template from the cloned virtual machine, and then uses Sysprep to generalize the cloned gold virtual machine to remove hardware ID information.
- Shuts down the updated gold virtual machine, and returns it to the offline VMM Library.
- Associates the .vhd file of the cloned virtual machine template with the original template, and then deletes the cloned virtual machine template.
Labels:
hyper-v,
scvmm 2008 r2
Resetting Computer Account
A domain computer account synchronizes with the Domain Controller (DC) on a regular basis. This means that the computer checks with the DC or the DC checks for the computer on the network at a set interval. If for some reason synchronization does not take place, then the computer account can become invalid due to failed authentication. Group policy may also fail to take effect.
Each domain computer maintains a machine account password history containing the current and previous passwords used for the account. When the computer attempt to authenticate with DC and a change to the current password is not yet received, Windows then relies on the previous password. If this authentication fails (due to the failed sync of password), both computers may not communicate. Hence, you have to reset the computer password. You can't set the password directly but you can perform a computer account reset on the "Active Directory User and Computer" console or "netdom reset" on a DC.
After you have reset the computer account, you won't be able to login to the affected computer using domain-based accounts. You have to re-join the computer to domain, so that the AD re-sync can take place. Login to the affected computer on local administrator account. At the elevated command prompt,
- Force leave the domain: netdom remove %computername% /domain:{domain-name} /force
- Re-join the domain: netdom join %computername% /domain:{domain-name} /UserD:{domain user} /PasswordD:{domain password}
- Reboot the computer
Labels:
active directory,
windows 2008
Thursday, May 26, 2011
Part 3: Network installation using WDS
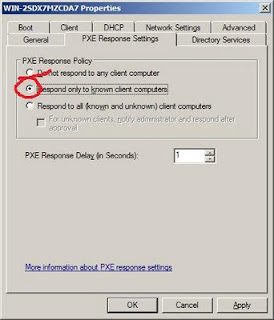
On part 2, we have captured the new install image for new computer deployment. We're ready to perform PXE boot for new computer deployment. For better security, we should configure the PXE response to known computer only. Otherwise, any machines can be installed and joined to your domain without you knowing. If unused, the WDS server should be shut off.
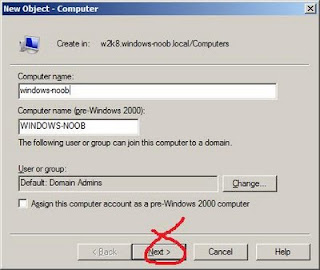
To identify "known" PXE clients, you would have to pre-stage or pre-create the new computer accounts using the RSAT AD tools on the WDS computer. Install the AD tools using "Add Feature" of the Server Manager. If you pre-create from a Domain Controller, the "Next" button and "Managed Computer" page would be missing and you can't enter the GUID or MAC addresses (prefixed with 20 zeroes) of the new machine.
There is this nice blog post that outlined the detailed step-by-step.
Labels:
windows 2008,
windows deployment
Wednesday, May 25, 2011
Part 2: Forefront TMG URL Filtering
Following up on part 1 regarding Forefront TMG user authentication on AD mode, this part would look into URL content filtering feature. By default when URL filter is enabled during the startup wizard, TMG will block access to certain undesirable sites, including porno, gambling, malware etc.
Quite often, when you visit free news sites, you would be greeted with anonying Web Advertisements (Web Ads). And you wish to block them. Let's take a popular free news site at http://www.channelnewsasia.com/. Immediately, you will be seeing Web Ads on its top banner:
You can configure TMG to add Web Ads URL category into the block list. On the TMG console, right click on the "Web Access Policy" and choose "Configure Web Access Policy" on the context menu.
When the wizard starts, choose "No, do not create the rule for me" on the first page. On the next page (Blocked Web Destinations), click "Add", expand the "URL categories". Add "Web Ads" item.
Complete the rest of the wizard as in default options. Apply the new changes. When you restart the client Web browser and visit the same Web site again, you'll notice that most (if not all) of the Web ads are gone.
New Site Categories Reporting in Service Pack 1
Among the new features in Service Pack 1, the new User Activity report displays the sites and site categories accessed by any user. All Forefront TMG reports also have a new look and feel. Reports can be generated one-time or recurrently. For example, you can see a sample one-time generated report for top visited URL categories as follows:
Rooms for Improvement in Reporting
Nevertheless, I still find the reporting features quite basic and lacking, as I couldn't find any filtering and search options in the report generation.
Rooms for Improvement in Reporting
Nevertheless, I still find the reporting features quite basic and lacking, as I couldn't find any filtering and search options in the report generation.
Labels:
Forefront TMG 2010,
network security
Tuesday, May 24, 2011
Part 1: User Authentication for Forefront Threat Management Gateway (TMG) 2010
Traditional hardware-based network firewalls have one serious limitation - you can't control and track user access unless you are forcing them to perform another layer of firewall login on top of domain desktop login. If you really do, it certainly would cause much unhappiness among your users. On the other hand, if you can't control user access and track them directly from your firewall logs, you won't impress your auditors either. Hence, a simple solution to please both groups is to implement an Active Directory (AD) aware firewall solution.
One such firewall product to be seriously considered is from the maker of AD - Microsoft Forefront Threat Management Gateway (TMG) 2010 with latest Service Pack 1 (SP1). Besides being an AD-integrated firewall, it is also featuring Intrusion Prevention System (IPS), URL content filter, Web content cache and forward/reverse application proxies - all rolled into one system.
Prior to deployment, various types of user authentication and application supports should be considered. There are 3 types of client setup to be considered:
- SecureNAT clients that "hide" behind some IP address. Mainly used only for anonymous Internet access. However, it does not support user authentication.
- Firewall clients (a.k.a TMG clients) that provide proxied winsock connections between the user applications and TMG. It automatically send client credentials with requests, which include Integrated AD authentication, LDAP authentication, or RSA authentication (OTP).
- Web Proxy clients supports above authentication mechanisms. However, the only application supported is the Web browser itself. No credentials are supplied if anonymous access is enabled.
From above, you can see that the strongest & most powerful client protection is provided by the TMG clients.
Forefront TMG Installation
The initial TMG setup can be pretty straightforward, as you will be guided by a step-by-step GUI wizard (click here for details). I have configured a test setup using Hyper-V as follows:
To simulate mass deployment on an AD domain, I have assigned the TMG clients (a.ka. software pushdown) to all computers (or users) using Group Policy - Software Installation. For mass deployment, it is also more efficient to use client auto-detection and auto-configuration using information stored in Active Directory or DNS/DHCP (click here for details). AD detection would be preferred. In the absence of AD, DNS/DHCP discovery will be used.
To publish TMG information on AD, you would also need the ADconfig Pack, which can be downloded. To store information on Active Directory, at the command prompt, type: TmgAdConfig.exe add -default -type winsock -url [-f] where the service-url entry should be in the format http://{TMGServer}:8080/wspad.dat
TMG Client Default Automatic Detection
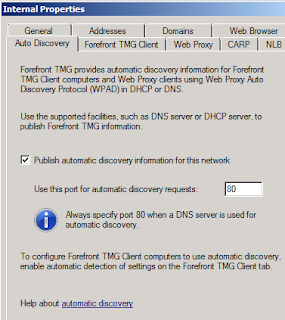
Enable AutoDiscovery on TMG Management Console
(Networking -> Edit Internal Network -> AutoDiscovery Tab)
DNS Setup
Another important setup to note is the DNS configuration. Just as in normal AD environment, you should configure the TMG server and the clients to reference AD-integrated DNS servers (typically Domain Controllers). Both DC1 and client1 should set TMG server as default gateway. TMG server should have a default route set directly to the Internet.
For testing purposes, you may configure the default forwaders of DNS servers to your ISP name servers.
Firewall Policy
For user authentication testing for Internet access, I have configured the following firewall rules:
There are only 3 rules configured. The first rule is system default generated rule that block users from accessing potentially harmful sites. The second rule is to permit DC1 to forward client DNS requests to ISP name servers. The third rule is to limit HTTP/HTTPS access just to AD users authorised to access the Internet.
Client Testing
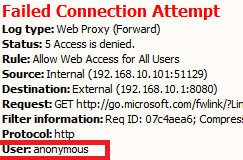
To simulate an unauthenticated user trying to access Internet, I login to Win7 client1 using local computer account. As expected, the Internet access is denied for anonymous access as shown under the "Logs and Reports" section of the TMG management console.
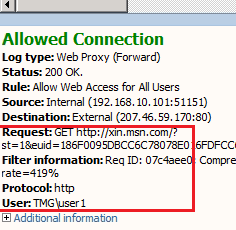
Subsequently, I login using a domain user account. Internet access to xin.msn.com succeeded.
Security Considerations for Active Directory Forest
As you can see from above, Forefront TMG succeeded in controlling user access based on Active Directory information. The logs also reveal User Identity and destination URLs instead of merely just client and desintation IP addresses as in most network firewall logs. As the firewall is relying on AD for user authentication and authorization, Microsoft advises further protection using forest segregation and one-way trust in Technet. Below is an extract:
In a domain environment, if Active Directory Domain Services (AD DS) is compromised for example by an internal attack, the firewall could also be compromised because a user with Domain Administrator rights can administer every domain member, including the server running Forefront TMG. Similarly, if the firewall is compromised, the domain in which Forefront TMG is located is also at risk. By default, the Domain Admins group is in the Administrators group on the Forefront TMG server.
At the edge, you can install Forefront TMG as a domain member or in workgroup mode. As a domain member, it is recommended that you install Forefront TMG in a separate forest (rather than in the internal forest of your corporate network), with a one-way trust to the corporate forest. This may prevent the internal forest from being compromised, even if an attack is mounted on the forest of the Forefront TMG computer. However, there are some limitations with this deployment; for example, you can configure client certificate authentication only for users defined in the Forefront TMG domain, and not for users in the corporate internal domain or forest.
Labels:
Forefront TMG 2010,
network security
Thursday, May 19, 2011
Part 2: Image capturing & deployment using WDS
In earlier part 1, I mentioned using WinPE to capture Windows image files for further deployment. Another more scalable way is to use Windows Deployment Services (WDS) to do the same job. Instead of using CD boot, you can do network PXE boot with DHCP. There are several good resources online that outlined the step-by-step, so I won't re-invent the wheels. I would just summarize the steps and the url links to find them. Before that, it is assumed that you have already "sysprep-ed" the Windows host to be captured and put it to shut-off mode.
- Setup WDS infrastructure by installing WDS server role. Other prerequisites include Active Directory infrastructure and DHCP.
- Add Boot Image (boot.wim) to WDS server. Create and add a capture image by right-clicking on the selected boot image.
- PXE boot the target system. From the start-up menu, choose to boot from the capture image.
- Capture the target image on volume. Upload the new image to WDS.
- You may now add the newly captured image as install image for subsequent Windows deployment.
- For detailed steps from step 2 to 6, click here.
Labels:
windows deployment,
windows imaging
Thursday, May 5, 2011
Load Sharing in MPLS VPN with Route Reflector
No matter what I did according to this Cisco article, I simply can't do load-sharing among the PE routers within our enterprise MPLS VPN. The central Route Reflector (RR) simply refuses to send more than 1 identical route, even though I have multiple PE routers attached to that route.
Subsequently, I come across this excellent MPLS VPN blog. It explains that there is no way to change the route reflector behavior. The workaround is to simply assign different Route Distinguisher (RD) values for the same VRF on different routers. To enable route propagation, ensure that you export and import common Route Target (RT) across the PE routes. Finally, enable "maximum-paths eibgp
And it works magic!
Example configuration according to above diagram
On Router PE A
ip vrf VRF_A
rd 65001:101
route-target both 65001:100
.....
router bgp 65001
address-family ipv4 vrf VRF_A
maximum-paths eibgp 4
On Router PE B
ip vrf VRF_A
rd 65001:102
route-target both 65001:100
.....
router bgp 65001
address-family ipv4 vrf VRF_A
maximum-paths eibgp 4
On Router PE C
ip vrf VRF_A
rd 65001:101
route-target both 65001:100
.....
router bgp 65001
address-family ipv4 vrf VRF_A
maximum-paths eibgp 4
On Router PE D
ip vrf VRF_A
rd 65001:102
route-target both 65001:100
.....
router bgp 65001
address-family ipv4 vrf VRF_A
maximum-paths eibgp 4
Labels:
BGP,
cisco networking,
MPLS
Tuesday, May 3, 2011
New Dynamic Memory in Hyper-V
The latest Service Pack 1 of Windows 2008 R2 offers a new Hyper-V feature known as Dynamic Memory. Some bloggers treat it like the "Memory Overcommitment" of VMWare where one may allocate more memory to all guest VMs than the actual total physical memory of the underlying host. I don't quite agree with this view. Unlike VMWare where VMs can still start up even though the total assigned VM memory exceeds the physical memory, Hyper-V won't allow the VM to start when the allocated base or startup memory exceeds the available memory left in the host.
Instead, Hyper-V treats memory as a shared resource that can be reallocated automatically among running virtual machines. Dynamic Memory adjusts the amount of memory available to a virtual machine, based on changes in memory demand and values that you specify. In dynamic memory, you assign 4 memory values to each VM:
- Startup RAM: Specifies the required memory to start the VM.
- Maximum RAM: Limits the maximum amount memory that the VM can be allocated.
- Memory Buffer: Specifies how much memory Hyper-V would assign to the VM compared to the amount of memory actually needed. Memory buffer is specified as a percentage in relation to the actual needed memory. For example, if the memory committed is 1000 MB and the memory buffer is 20%, Hyper-V will attempt to allocate an additional 20% (200 MB) for a total of 1200 MB of physical memory allocated to the virtual machine. However, do note that this buffer is not maintained when there is not enough physical memory available in the host.
- Memory Weight: Determine the priority of individual VMs to be distributed with additional amount of memory when there are contention and insufficient memory available. This is the only memory value that can be adjusted dynamically when the VM is running.
Configuring Dynamic Memory
Step 1: First, you must upgrade the Hyper-V server to Windows Server 2008 R2 SP1.
Step 2: Either upgrade the guest VMs to the latest Service Pack e.g. Windows Server 2008 SP2 and Windows Server 2003 R2 SP2; OR install the SP2 version of Hyper-V integration services by clicking Insert Integration Services Setup Disk from the Action menu of Virtual Machine Connection. The former approach is recommended by Microsoft.
Step 3: Enable dynamic memory by going to the Memory Setting of the VM. Configure the startup memory and maximum memory. To do so, the VM must be in Off state.
Step 4a: Observe the memory in real time. When you start the VM, you would see the following VM status info on Hyper-V manager:
- Assigned Memory shows the amount of memory allocated to the VM at this time.
- Memory Demand shows how much memory the VM needs at this time, which is based on total committed memory obtained from the performance counter in the VM.
- Memory Status shows how much of the buffer amount specified for the virtual machine is available. OK indicates that there is enough physical memory available to give the virtual machine the full amount of memory buffer. Low indicates that Hyper-V does not have sufficient memory to meet the full memory buffer requirement. Warning indicates that no more memory buffer can be distributed to the virtual machine.
For further troubleshooting details, refer the the Microsoft Technet on Dynamic Memory.
Labels:
hyper-v,
windows 2008
Wednesday, April 27, 2011
Price "inflation" for Microsoft exams from July 2011
IT certification is not shielded from the current world-wide commodity price inflation. From July 2011, Microsoft will raise most of its certification exam fees (~10% depending on regions). For Singapore, the price will be increased from SGD 225 to 246 for the TS and PRO series exams. Meanwhile, there is also an ongoing promotion (15-20% discount + free 2nd shot) till 30 Jun 2011.
So, hurry and sign up for the current promotion. Even if you're not ready, just book your first exam before 30 Jun and you still can have the free re-take until end of this year.
Labels:
microsoft exams
Tuesday, April 26, 2011
Part 3: Configuring RIP routing on Windows Server 2008
This is following up on part 2 that described the concept of network high availability for single non-clustered Windows server using dynamic IP routing. This final part is to outline implementation steps. On the Cisco routers, ensure that auto-summarization of RIP routing is disabled, as we are using /32 host addresses on the server loopback adapters.
Step 1: Install Windows loopback adapter
Add microsoft loopback adaptor using hardware wizard (hdwwiz.exe) with elevated admin rights. Assign a host IP address on it using /32 or 255.255.255.255 subnet mask. Add a host record statically on the DNS server using this IP address.
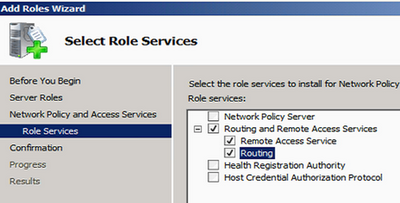
Step 2: Install “Routing and Remote Access Services” Server Role
Open up Server Manager and add a server role named "Routing and Remote Access". Check on the following items:
Step 3: Add new routing protocol “RIP”
On the Server Manager console, right click on “Routing & Remote Access”, choose “Enable and Configure Routing ….” Click “Next”, select “Custom Configuration”. Select “LAN routing” and complete the wizard. Under “Routing and Remote Access > IPv4”, right click on “General” and choose “New Routing Protocol”. Select “RIPv2 for Internet Protocol”.
Step 4: Enable RIP on Network Adapter
Click on RIP and add new adapters (only public interfaces and loopback that you want users to access – never put in your management interface!). By default, Cisco routers would perform RIPv2 routing on multicast protocol, so select this option on the General tab.
For route optimization, it may be a good idea that your network routers to simply inject default routes into your server routing table. Click on "Advanced" tab and enable to following options:
You would also want to allow the server to advertise the host address (remember the loopback interface in step 1), which can be statically map to a host record on the DNS server.
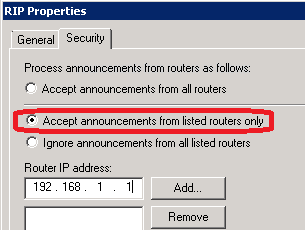
Step 5: Securing RIP routing (Optional) (Important for better stability & security)
To prevent your server from listening to "rogue" RIP router/server that give bad routes, specify your trusted RIP neighbors on the Security tab (Right-click on RIP and choose Properties).
Furthermore, you probably won’t want your servers to become routers and carry network traffics unknowingly. You can further secure it by limiting it to advertise its own addresses only. For each interface added to RIP routing, choose “Properties”. Permit only the NIC address and the loopback address for outgoing routes.
Furthermore, you probably won’t want your servers to become routers and carry network traffics unknowingly. You can further secure it by limiting it to advertise its own addresses only. For each interface added to RIP routing, choose “Properties”. Permit only the NIC address and the loopback address for outgoing routes.
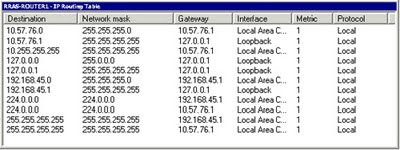
Step 6: Verify IP routing
There are two ways to verify the IP routing table on your server, which should be populated by the network routers. You can view the IP routing table through the Routing And Remote Access console or through a command prompt. In the Routing And Remote Access console, expand the IP Routing node, right-click the Static Routes node, and then click Show IP Routing.
Labels:
ip routing,
windows 2008,
windows networking
Monday, April 25, 2011
Using Anycast RP for Video Multicasting
In my earlier post on Bridging Dense-Mode to Sparse-Mode PIM, I mentioned about using Sparse-Mode Anycast Rendezvous Point (RP). But what is it about?
First of all, let's understand what Sparse-Mode Rendezvous Point is. For all multicast PIM, there is always at least one source (which is typically a video streaming server like the Microsoft Windows Media Services) and many client receivers. Instead of sourcing from the streaming server directly (as in the case of Source-Specific Multicast), multicast sources and receivers must register with their local rendezvous point (RP). So think of RP like a common meeting point for all sources and receivers. It is also known as a Shared Tree multicast model. In Cisco, there are a few configuration models for RP, including Manual RP (i.e. "hard-coding" of RP in every router), Auto-RP (i.e. elect one of many RP candidates), bootstrap RP (similar to Auto-RP) and Anycast RP.
Most RP models support only a single active RP at any one time. Only the Anycast RP model provides load sharing and redundancy in the multicast network. Anycast RP allows two or more rendezvous points (RPs) to share the load for source registration and the ability to act as hot backup routers for each other. Two or more RPs are configured with a common IP address on loopback interfaces with a 32-bit mask, making it a host address. All other routers are statically configured to map the RP to this common address and are likely to be linked up to the nearest RP. The protocol that links up multiple RPs is known as the Multicast Source Discovery Protocol (MSDP).
Static Anycast RP is also relatively easy to configure and troubleshoot. Consider the following example from Cisco.com:
As you can see from above example, both RP1 and RP2 share the common IP address of 10.0.0.1 on loopback 0 interface. MSDP is enabled to peer both RPs on the respective loopback 1 interfaces using the ip msdp commands. All other routers (the 2 routers at the bottom) just statically map the RP to this common IP address using the ip pim rp-address 10.0.0.1 command. Of course, you have to ensure that the loopback addresses are routable within your domain, which can be easily achieved in any dynamic IGP, such as OSPF.
Troubleshooting Summary
For troubleshooting, the most common failure is the breaking of Reverse Path Forwarding (RPF), which is a mechanism for the receiving routers to determine the best path to the source or the RP in this case. The most common omission is the missing ip pim sparse-mode or ip pim sparse-dense-mode on all router interfaces.
After which still fail, have a client join to the multicast address. Alternatively, you may simulate the joining by having the client's next-hop L3 access switch or router to join the multicast group using ip igmp join-group 239.1.1.1 (replace this address with the actual multicast address configured on your streaming server) on the receiver's interface level. Trace on every router from the receiver to the source using show ip mroute command (with vrf option in MPLS VPN or VRF-lite situation). Check for broken reverse path (.e.g. take note of missing RPF neighbor with Null incoming interface).
#show ip mroute 239.1.1.1
.....
(10.1.12.4, 239.1.1.1), 00:00:01/00:02:58, flags:
Incoming interface: Null, RPF nbr 0.0.0.0
Outgoing interface list:
Ethernet0/0, Forward/Dense, 00:00:02/00:00:00
Vlan111, Forward/Dense, 00:00:02/00:00:00
Take note of above output, if you see that the incoming interface is null and the neigbour is empty on a router (bold red), it usually means a missing "ip pim" on some interfaces or an issue on the underlying unicast routing issue. If it's latter, perform standard routing troubleshooting on the underlying IGP or static routes.
There is this good blog post that further elaborates the detailed steps on RPF troubleshooting.
Labels:
cisco networking,
IP multicast
Sunday, April 17, 2011
Part 2: Network Redundancy for Windows Server: Dynamic IP Routing
Besides NIC teaming in earlier part 1, another way to achieve network redundancy for Windows Server is to employ dynamic IP routing. Windows Servers support both static and dynamic IP routing. In dynamic routing, new routes are learned dynamically from the route peers (typically routers and L3 switches). Any changes in network topology (including failure of server NICs or switches) would trigger a routing update for all participating routing nodes. In other words, if there were any failure in any switches or NICs, traffic would have avoided the broken path and continue to route on unbroken links.
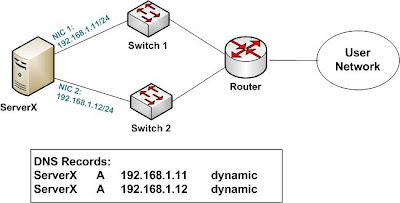
Dual-homed ServerX is connected to 2 different switches on different subnets. RIPv2 routing is enabled on both NICs. By default, ServerX would dynamically register both DNS records with AD-integrated DNS servers. With DNS round-robin, network load-balancing can even be achieved among multiple clients. However, in the event of either NIC or switch failure, half of the clients would lose connection with ServerX, which is usually not desirable. Consider the next example:
MS Loopback adapter is installed. RIPv2 routing is enabled on two physical NICs, as well as the loopback adapter. Dynamic DNS update is also disabled. Single static A record is created with loopback IP address. As dynamic routing supports equal-cost multi-path load-balancing, multiple clients reach ServerX loopback via both NICs. If either NIC or switch fails, dynamic routing would have to re-converge. After a short converging time, clients can regain access to ServerX on its loopback address via the sole remaining NIC.
In conclusion, with both dynamic routing and static DNS record on loopback adapter, both network load-balancing and network redundancy can be achieved. In my next post, I would summarize the steps to achieve this in part 3.
Labels:
ip routing,
windows networking
Subscribe to:
Posts (Atom)


