Thursday, December 30, 2010

Publish Offline Certificates and CRLs to Active Directory

This is refering to step 2 and 3 of the earlier post. Before publishing the Root CA cert, check the extensions on the Root CA server, esp on the CRL Distrisbution Point (CDP) extensions.

To publish the offline Root CA cert and CRL to AD, set the "Include in all CRLs" flag in the Root CA extension properties and use the certutil -dspublish command. Do note that file share CDP (FILE://) is not supported - only LDAP:// and HTTP://. I have tried and it's not going to work. Similarly, you would need to specify where clients and servers can obtain the root cert (i.e. LDAP and/or HTTP) in the "Authority Information Access (AIA)" drop-down setting.


The "Include in all CRLs" flag specifies that the Active Directory publication location should be included in the CRL itself. It can be used by an offline CA to specify the LDAP URL for manually publishing CRLs on the Active Directory. The explicit configuration container must be explicitly set in the URL. Alternatively, the DSConfigDN value can be set in the registry by using "certutil –setreg ca\DSConfigDN CN=Configuration,DC=contoso,DC=com". Note that the last two DC values (DC=contoso,DC=com for "contoso.com") are to be replaced by your actual Domain Name.


Export out the Root CA cert and CRL files and import them into a domain member server.
To publish the Root Cert to the Root CA store on the Active Directory: certutil -f -dspublish RootCA.cer RootCA 

To publish the CRL to Active Directory: certutil -f -dspublish Root-Test-CA.crl "LoneSrv1" "Root-Test-CA". The last 2 parameters to specify the containers are optional but could be needed if the offline RootCA is non-Microsoft.

Setting up Two-Tier Enterprise PKI


We are setting up a 2-tier CA for our enterprise PKI. The first tier is a standalone CA that should be kept offline while the second tier is the domain CA server that is used for issuing certificates for AD users and computers alike. Basically, these are the steps:

Step 0: If AD levels are below Windows 2008, perform adprep on Schema OM first i.e. "adprep /forestprep" and "adprep /domainprep /gpprep" on \supports\adprep DVD folder.
Step 1: Create CAPolicy.inf and place it on the %systemroot% folder. Optional step for Windows Server 2008 CA.
Step 2: Install standalone offline Root CA (RCA) server.
Step 3: Determine AIA  and CDP locations to host CRL from RCA. Configure the necessary extensions.
Step 4: Export out RCA cert and CRL. Publish root CA cert and CRL to Active Directory
Step 5: Setup Subordinate Issuing CA (Sub ICA) server.
Step 6: Create manual ICA cert request to Root CA for issuance. Install ICA cert.
Step 7: Setup Online Responder (OR). Configure OCSP template on ICA. Permit OR to autoenroll. Assign "Full Control" rights to "Network Services" on "Manage Private Key".
Step 8: Configure OR to provide revocation info for CAs. Input sources for CRL info using setup wizard e.g. LDAP etc
Step 9: Create new Cert Template by duplicating sample template for client enrollment
Step 10: Configure Group Policy to facilitate cert enrollment
Step 11: Use PKIView.msc and "certutil -url" to verify and check the health of PKI.

As for creating CAPolicy.inf, there is a good TechNet blog on its syntax. For Windows 2003 Root CA, CAPolicy.inf is essential to eliminate AIA and CDP extensions, so that applications would not have to validate the CDP of the entire chain, including the Root CA. AIA and CDP are revocation mechanism to verify the legitimacy of the entity, which would be meaningless for Root CA (the Anchor of Trust). For Windows 2008 Root CA, AIA and CDP are omitted by default. Nevertheless, CAPolicy.inf is still useful if you wish to include some policy statements or restricting the CA for certain purposes only, such as Secure Email.

If AIA is specified, Online Responder (new CA role in Windows Server 2008) should be activated for certificate revocation check. More detailed step-by-step guide for Online Responder can be found on TechNet.

In the next post, I would mention about publishing offline cert and crl files on Active Directory.

Wednesday, December 15, 2010

Bring Disk Storage back Online in Failover Clustering

After "accidentally" bringing a disk storage offline by clicking on the "Take this resource offline", the action items under the action panel for this disk resource just went disappear.

To bring the disk resource for the Hyper-V fail-over clustering back online, you have to use the "Cluster" command line:

1) To view current status and to capture the "disk-resource-name":
CLUSTER [cluster-name] RESOURCE /STATUS

2) To bring the disk resource back online:
CLUSTER [cluster-name] RESOURCE "disk-resource-name" /ONLINE

Saturday, December 11, 2010

Access-based Enumeration

How do you stop users from listing files on the network folders that they have no access rights? You have created network shared folders with the default rights of read access for "Everyone". Individual users could "see" the file & folder listing of their co-workers, even though they may not read the file contents.

Microsoft has this Access-based enumeration (ABE) feature that displays only the files and folders that a user has permissions to access. If a user does not have Read (or equivalent) permissions for a folder, Windows hides the folder from the user’s view.

Access-based enumeration can be manually enabled or disabled on individual shared folders and volumes by using Share and Storage Management. This snap-in is available after a folder or volume has been shared. You can access Share and Storage Management in the File Services server role in Server Manager, and in Administrative Tools. You can also install it manually in Server Manager by adding the File Server role service to File Services.

There are two ways to enable and disable access-based enumeration by using Share and Storage Management:
  1. Share a folder or volume by using the Provision a Shared Folder Wizard. If you select the SMB protocol on the Share Protocols page of the Provision a Shared Folder Wizard, the advanced settings options on the SMB Settings page includes the option to enable access-based enumeration on the shared folder or volume. (To see the advanced settings options, on the SMB Settings page of the wizard, click Advanced).
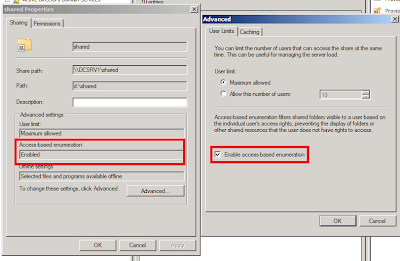
  2. Change the properties of an existing shared folder or volume. To change the properties of an existing shared folder or volume, on the Shares tab of Share and Storage Management, click the shared folder or volume, and then click Properties in the Action pane. The information under Advanced settings displays whether access-based enumeration is enabled. Click Advanced and then select or clear the Enable access-based enumeration check box.


Access-based Enumeration Reference

Wednesday, December 8, 2010

Bridging Dense-Mode PIM to Sparse-Mode PIM

For IP PIM multicast, Cisco recommends Sparse-Mode over Dense-Mode. In the midst of our network migration, we have a new network operating in Sparse-Mode with Anycast rendezvous point (RP) but our existing network is still operating in Dense-Mode. To bridge two different modes across both PIM domains, we should use the ip pim dense-mode proxy-register command on the interface leading toward the bordering dense mode region. This configuration will enable the border router to register traffic from the dense mode region (which has no concept of registration) with the RP in the sparse mode domain.

Click on below image for configuration example (extracted from this Cisco site).


Monday, December 6, 2010

Configuring Nexus 5000 with Nexus 2000 Fabric Extenders

Top-of-rack switching is commonly deployed for high port-density data centers. Switches are mounted at the top of each rack that makes cabling looks neat and tidy. However, it leads to switch managability issues dealing with multiple spanning-trees when you have hundreds of layer 2 switches - not to mention firmware upgrading. To resolve these issues, we are using Nexus 5000 with multiple fabric extenders (Nexus 2000). The N2K are just like the line cards to a chassis switch e.g. Catalyst 6500, except that N5K doesn't peform L3 functions like IP routing. This setup allows you to manage the whole bunch of switches as a single switch distributed all over the data center as shown below.


Between N5K and N2K, you may connect upto 4 x fiber links . That is giving you up to 40Gbps uplink per extender. As the Nexus are running on Cisco NX-OS, most switching commands are similar to the tradition Cisco IOS. However, the setup configuration is different. You need to perform the following steps:

1) Create a virtual fex chassis
switch(config)# fex 117
! set the number of links from N5K to N2K
switch(config-fex)# pinning max-links 1 (you may set up to 4 links)
2) Associate the N2K extenders to the fex chassis
switch(config)# interface e1/17
switch(config-if)# switchport mode fex-fabric
switch(config-if)# fex associate 117
3) To verify
switch# sh int e1/17 fex-intf

You may now configure the individual switch ports on the N2K extenders like normal Cisco switch ports. Unlike other Cisco switches, most switching features are not enabled by default. You'll have to turn them on manually using the "feature" command. For example, if you wish to configure EtherChannel, you have to enable LACP using "feature lacp" command.