Tuesday, December 3, 2013

Direct RDP login into Virtual Desktop Pool with Smart Card (Windows Server 2012)

In my earlier post, I've explored about Single Sign On for WS2012 Virtual Desktop. Normally, we have to login through the Remote Connection Web server. Can we do direct RDP with smartcard logon i.e. bypass RDWeb server? Yes, it's possible.

Open up MSTSC, key in the FQDN of your RD Connection Broker, configure whatever RDP settings and save it into a .rdp file. Open the .rdp file with notepad.
Modify this line (change from 0 to 1): use redirection server name:i:1
Add this line: loadbalanceinfo:s:tsv://[TSV URL]
Substitute the [TSV URL] path with your RD collection name. To find out the exact name, go to Event Viewer of your connection broker server. Look for event under TerminalServices-SessionBroker. Do a normal login via the usual RDWeb console. Refresh and look out for event 800. You'll find the TSV URL information.

Test this by double clicking on the new RDP file.

Wednesday, November 27, 2013

Remove active filter drivers that could interfere with CSV operations

One of my cluster nodes had DPM previously installed on it. As a result, I would get re-directed Cluster Shared Volume (CSV) whenever it is moved to this node. In the cluster warning, I saw:
Cluster Shared Volume 'Volume1' ('CSV Volume name') has identified one or more active filter drivers on this device stack that could interfere with CSV operations. I/O access will be redirected to the storage device over the network through another Cluster node. This may result in degraded performance. Please contact the filter driver vendor to verify interoperability with Cluster Shared Volumes. 
Active filter drivers found: SIS (HSM) 
 I search through the Technet on DPM 2012 on how to remove its SIS filter. Unfortunately, this page isn't updated for WS2012 that has no ocsetup.exe anymore. Hence, the replacement for ocsetup.exe is DISM /Online. To remove SIS filter:
Dism /online /Disable-Feature /FeatureName:SIS-Limited
Reboot the system after removal and the CSV is no longer re-directed.

Tuesday, November 26, 2013

Moving Roaming User Profiles files to another Server using WSMT

I have tried using "robocopy" and even Windows backup to transfer roaming user profiles (RUP). There would be surely files that I couldn't move due to file permission and ownership preservation. In WS2012, there is a built-in Windows Server Migration Tool (WSMT) to facilitate the file transfer (including server roles).

Here are the steps in summary (click this link for full Technet guide):

Step 1: Install WSMT
Install WSMT feature using server manager on the target WS2012 server.  
Step 2: Register and deploy WSMT
Start an elevated cmd prompt from the WSMT tool. Create a deployment folder that is accessible to the source server. Depending on the OS of the source server, an example of the command for WS2012 (default on "C:\Windows\System32\ServerMigrationTools\") would be: 
SmigDeploy.exe /package /architecture amd64 /os WS12 /path [deployment folder path]
Copy the deployment folder to the source computer. Register and deploy the source computer by running .\Smigdeploy.exe
Step 3: Move local users and groups
To preserve local permissions, you may need to move the local users and group first. To export from the source computer: 
Export-SmigServerSetting -User All -Group -Path [storepath\UsersGroups] -Verbose
To import into the target server:
 Import-SmigServerSetting -User All -Group -Path -Verbose
Step 4: Start file moving
Before moving, permit both UDP 7000 and TCP 7000 on the windows firewall. On the target computer, start the reciever:
Receive-SmigServerData 
To begin file transferring, run the following WSMT cmdlet on the source computer 
Send-SmigServerData -ComputerName [DestinationServer] -SourcePath d:\users -DestinationPath d:\shares\users -Recurse -Include All -Force 
You may want to observe any errors at the progression update on the command prompt.

Tuesday, November 12, 2013

802.1x with MAC based authentication

For end devices that are 802.1x compliant, RADIUS authentication on them would be performed using either username/password or certificate. What about devices that aren't 802.1x compliant, such as network printers? The next best authentication on them would be MAC based.

MAC based authentication aren't as secure, as MAC addresses can be easily spoofed. Cisco called this "MAC Authentication Bypass" (MAB) while Microsoft called this "MAC Address Authorization".

How can we make Cisco MAB works with Microsoft NPS server?

Step 1: Enable "mab" on every switch port
On Cisco switches, assuming that the usual dot1x configuration are already in-place, you'll just need to add the command "mab" on every 802.1x enabled switch port connecting to end-devices.

Step 2: Add new MAC-based connection request policy
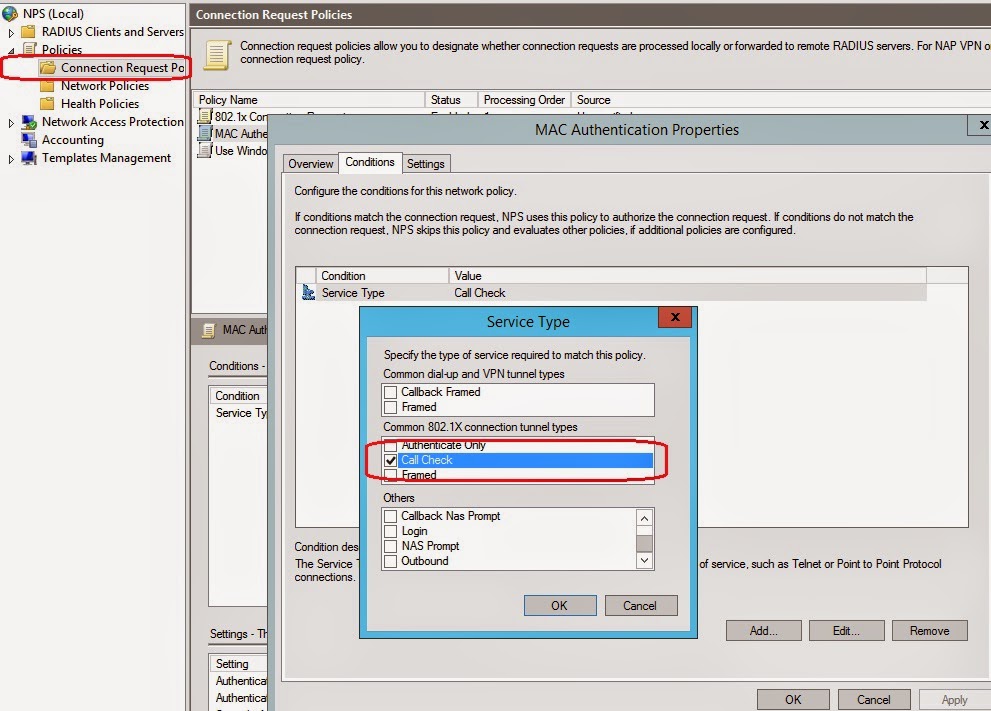
On Microsoft NAP server, add another new connection request policy and enable PAP authentication. This new PAP policy should be placed after the main 802.1x policy, so that the 802.1x compliant devices can get authenticated in a more secure way first. As Cisco switches uniquely identify MAB requests by setting Attribute 6 (Service-Type) to 10 (Call-Check) in a MAB Access-Request message, add this condition to the MAC connection request policy.

Step 3: Tell the authenticating server to use Calling-Station-ID as MAC-based user name
Set the User Identity Attribute registry value to 31 on the NPS server. This registry value location is: HKLM\SYSTEM\CurrentControlSet\Services\RemoteAccess\Policy. If it doesn't exist, create a new DWORD value.

Step 4: Add a new AD user account for each MAC device
The new user account must be named (all lower case with no space or dash) exactly as the connecting MAC address for each non-802.1x device e.g. aa00bb11ccddeeff format. Its password must also be set as the same as MAC address. Hence, creating such accounts might fail due to domain-based complex password policy. The good news is we can use Fine-grained Password Policy to overcome it.

Step 5: Test it
Connect a non-802.1x device and test. Observe the outcome on the event viewer of the NPS server. Take note of any errors and troubleshoot accordingly.

Wednesday, November 6, 2013

Setting up SQL AlwaysOn cluster for SCVMM 2012

SQL AlwaysOn is a new feature in MS SQL 2012 that supports SQL cluster without the need of a shared storage. The primary node will host the database file in its local storage and sync with the other standby copy in the secondary node. Since SCVMM 2012 supports this feature for HA, I followed this Technet blog for guidance.

I installed SQL server as standalone on each node using default values. The objective is to create an Availability Listener object for VMM to connect to the new database. I managed to follow through until the last step to replicate the test database failed.

After searching through the Internet, I realized that it's not correct to use default mode for SQL HA.

1) Always use domain-based managed service account for SQL instance (don't leave it to Network service).

2) Ensure the service account has access right to the end-point listener.

  • On SQL mgmt console, find out the name of mirroring endpoints
  • SELECT name, role_desc, state_desc FROM sys.database_mirroring_endpoints
  • Grant the service account access right to this endpoint 
  • GRANT CONNECT on ENDPOINT::{Mirroring_Endpoint} TO [Adomain\Otheruser]

3) After creating the new availability group successfully, check that the TestDB synchronization state on both nodes are "synchronized" (not "synchronizing" or "not synchronized"). Right click on the AG and click "Show Dashboard".

4) If they are not synchronized, click on "Properties" of the AG. Change all availability mode to "Synchronous Commit". Test the failover manually.

Thursday, October 31, 2013

Single Sign On for RD Web Access (WS2012)

By default, form-based authentication is enabled on Web access portal for VDI. I was googling around on how to do SSO authentication. Most sites would advise the editing of the Web.config file of the RD web host that couldn't work well. Finally, I found one post that works. Here's the extract:

OK, here are my results so far.
1) You should not edit web.config file manually. Using comment symbols corrupts this file, so IIS cannot interpret it properly (this is the cause of 'HTTP 500 Internal server error' message). Instead, you should use IIS Management Console to do the task.
Start this console and go to Sites -> Default Web Site -> RDWeb -> Pages (left-click on 'Pages' in the left column). In the right part of the console under 'IIS' section double-click 'Authentication' icon. Disable both the Anonymous and Forms authentication methods. Enable 'Windows Authentication'.
If you try to access the web interface now, you'll get popup window which asks for your login and password. This is expected behavior.
2) On the endpoint (user PC) set Internet Explorer options to allow pass-through authentication. It could be done via IE settings for each user personally, but if you have many users you should use group policy:
* Add your Desktop Broker server to Trusted Sites zone: go to User/Computer Configuration -> Administrative Tools -> Windows Components -> Internet Explorer -> Internet Control Panel -> Security. Open 'Site to Zone assignment list' setting, enable it and map Broker server FQDN to zone 2.
* Enable automatic logon: go to User/Computer Configuration -> Administrative Tools -> Windows Components -> Internet Explorer -> Internet Control Panel -> Security -> Trusted Sites Zone. Open 'Logon options' setting, enable it, and make sure that the following option is selected in the drop-down list: 'Automatic logon with current username and password'.
3) In addition, the actions mentioned above should be executed (I repeat the description here for readers of the thread to have the full list):
* Enable SSO on the RDS clients.
 ---- In the group policy applied to RDS client, edit Administrative Templates -> System -> Credentials Delegation -> Enable the policies "Allow Delegating Default Credentials" and “Allow Delegating Default Credentials with NTLM-only Server Authentication”
--- Set both with value to "termsrv/*" allows the delegation for all terminal servers, you may also specify the server FQDN.
* Open the RDWeb page. Before clicking a pool name make sure the below check box is checked: 'I am using a private computer that complies with my organization's security policy.'
After that single sign-on works nice if I access client PC by entering my login and password manually. However, if I login to the workstation using smart card, I still can access web interface seamlessly. However, after I click on a pool name, RDP client asks for login and password (or smart card PIN). I tried to enable Kerberos authentication provider in Windows Authentication in IIS, but it did not change the situation.
I begin to wonder whether the task has a solution at all. I've found the following article:http://blogs.msdn.com/b/rds/archive/2007/04/19/how-to-enable-single-sign-on-for-my-terminal-server-connections.aspx It's said there that 'Single Sign-on only works with Passwords. Does not work with Smartcards'. The article was last modified four years ago. Is this statement still valid?

Thursday, October 17, 2013

3rd Party Software Patching with Solarwinds Patch Manager

Microsoft did an excellent job by providing highly scalable and relatively simple software patch management system called "Windows Server Update Services" or WSUS in short. However, only Microsoft updates are supported. Well, 3rd party software patching for Windows OS have always proved to be challenging. You need another product called Microsoft product called System Center Updates Publisher (SCUP). However, it has to be deployed in conjunction with another System Center Configurations Manager (SCCM) - another complex product. You probably just need something simpler to add on to your existing WSUS infrastructure for patching the outdated Sun Java or Adobe Flash in your environment.

I came across this Solarwinds Patch Manager that claims to support 3rd party patching with just WSUS server - no SCUP or SCCM needed. Hence, I decided to give its free 30-day eval a try. Since it claims to be so easy, I just tried to install without reading the manual. Soon after, I realized it's a bait to get you started and I've to go start reading the admin guide from scratch.

I won't repeat the entire setup procedure. I would just summarize the steps:

  1. Install the Patch Manager and follow the wizard.
  2. Add some service accounts that have admin rights over your WSUS servers to the credential ring
  3. Add the existing WSUS servers and other AD information into the Patch Manager using "Managed Resource Enterprise Configuration Wizard"
  4. This is for signing 3rd party patches. Generate WSUS self-signed publishing certificate using Server Publishing Setup Wizard. The security folks may not like it  - I tried using a code signing pfx from the enterprise PKI but it just simply refused to accept.
  5. Since the digital signature certificate is self-signed, it has to be distributed to the "Trusted Root CA" store for all update clients. You can distribute the self-signed cert using either the "Client Publishing Wizard" in Solarwinds or the Group Policy. 
  6. Remember to enable "Allow signed updates from an intranet Microsoft update service location" on the "Windows Components/Windows Update" of the GPO settings. Otherwise, the update clients would only accept Microsoft signed updates by default.

For 3rd party software patching, here are the high level steps (all within the Solarwinds Patch Manager console):

  1. Download the 3rd party patches - usually in exe format
  2. Convert and transform the file into *.cab file, which would be signed with the WSUS self-signed cert.
  3. Publish the updates to WSUS server

There is also a demo video guide on it.

Now, I tried updating the outdated Java on my first update client. Excitedly, I saw this when I clicked on the "Check for updates" on the security control panel. I thought it was going to succeed.

Alas, there was error 0x800b0004 in installing. Going to the "WindowsUpdate.log" on the "C:\Windows" folder. I saw the following logs:
Validating signature for C:\Windows\SoftwareDistribution\Download\898736be7c675a750734920f38c55636\66b811b903ecd87fef17e4dc58d2aaa52688917b:
Misc Microsoft signed: No
Trusted Publisher: No
WARNING: Digital Signatures on file C:\Windows\SoftwareDistribution\Download\898736be7c675a750734920f38c55636\66b811b903ecd87fef17e4dc58d2aaa52688917b are not trusted: Error 0x800b0004

Using the certificate mmc, the self-signed WSUS certificate is on the trusted Root CA store. But why Windows refused to trust the digital signature? I looked at the error again and noticed that the digital signature was not from a Trusted Publisher.

I manually added the self-signed cert to the "Trusted Publisher" store to the update client. After retrying to install the update, the success message appeared:

Wednesday, September 18, 2013

Monday, September 16, 2013

Cert template of Issuing CA must be updated on Account Forest

Previously, we did a successful trial on cross-forest cert enrollment with 2-way forest trust enabled. The user objects are on Account Forest and the PKI / CA servers are on the Resource Forest. I created a new cert template, issued it on the enterprise CA and sync the new cert template to the account forest using PKIsync.ps1 script. But the users were unable to enroll the new cert even though I've ensured the necessary permissions have been granted. I tried a manual enrollment and saw the following error message:

A valid certification authority (CA) configured to issue certificates based on this template cannot be located...


The new cert template in this case would be "TestingDoNoEnroll". Look like the enrollment clients could not find the issuing CA. On a domain controller of account forest, I did a check on the "AD Sites and Services" console with "View / Show Services Node" enabled. Expand on "Services / Public Key Services / Enrollment Services" and I check on the object of issuing CA on resource forest.

Double click on the object and select "Attribute Editor / certificateTemplates". The new template was missing - no wonder that the CA for the new issuing cert template could not be found. I added the new cert template name and enrollment worked as expected!

Monday, September 2, 2013

How to enable Remote Desktop remotely using Powershell

In Windows Server 2012, remote management is enabled by default but not Remote Desktop. To enable RDP on the server, add the target server to the Server Manager and run remote Powershell console.

On the remote Powershell console, enable remote desktop and firewall using the following cmdlets:
1) Enable Remote Desktop
set-ItemProperty -Path 'HKLM:\System\CurrentControlSet\Control\Terminal Server'-name "fDenyTSConnections" -Value 0

2) Allow incoming RDP on firewall
Enable-NetFirewallRule -DisplayGroup "Remote Desktop"

3) Enable secure RDP authentication
set-ItemProperty -Path 'HKLM:\System\CurrentControlSet\Control\Terminal Server\WinStations\RDP-Tcp' -name "UserAuthentication" -Value 1   

Refer to "Windows 2012 Core Survival Guide – Remote Desktop" for more information.

Monday, July 29, 2013

You have been logged on with a temporary profile

This is annoying. My domain-joined Windows 7 machine kept showing this error upon login and I couldn't save any new profile.
On the Event Viewer, I saw these 2 errors (Event 1511 and 1515)


Initially, I thought my roaming profile was corrupted. But re-building the profile did not solve the problem. The same error still appear until I saw this Microsoft KB post.

I enumerated through the registry records on
HKEY_LOCAL_MACHINE\SOFTWARE\Microsoft\Windows NT\CurrentVersion\ProfileList

Instead of just removing the sid.bak records, I removed all user registry records. In effect, it would force a rebuild of all local user profiles that would be synced from the central user profiles on the network share.

Wednesday, July 24, 2013

Delegate Certificate Template Management

By default, only Domain Admins are able to create and manage Certificate Templates on the Active Directory. To delegate to other groups (e.g. CA admins), follow this guide on Allowing the Creation and Modification of any Certificate Template.

Thursday, July 18, 2013

Cert Template MMC Crashed on WS2012 whenever Key Archival was enabled

Cert Template MMC (CertTmpl.msc) on WS2012 crashed whenever the archive key check-box was enabled as shown in red box below.


A technical support was raised to Microsoft premium support with TTTrace.exe debugging tool. Eventually, the support team replied that the crash was due to a recently added CA server did not return any cert template information. Indeed, after I issued a cert template on that CA server, the crash issue was gone.

Workaround
No resolution or hotfix was given. Instead, the support team acknowledged that it was a bug that would be fixed in next Windows version. The decision was made due to the following considerations:
  • Low impact of this bug
  • Easy workaround by adding an unused cert template on the CA server
  • Any code change could potentially bring wider implication to world-wide customers
My guessing on the real reason: the hands of the development team are full....

Tuesday, July 16, 2013

Nice Random Password Generator

Nice random password generator for AD user account creation or reset. It's a Powershell script (Get-RandomString.ps1) available on  Generating Random Passwords in PowerShell.

If you need to reset the password of an AD user account, there is another script (AD_Password_reset_v1.0.ps1) that uses this random password generator.

Friday, July 5, 2013

Unable to add Hyper-V host due to failed agent installation

I wasn't able to add a domain-based Hyper-V host using SCVMM 2012. The error was:

Error (415)
Agent installation failed copying C:\Program Files\Microsoft System Center 2012\Virtual Machine Manager\agents\Amd64\3.1.6011.0\vmmAgent.msi to \\HyperVHost\ADMIN$\vmmAgent.msi.
The network path was not found

Hence, I attempted to perform a manual installation. On the Hyper-V host, I copied the agent installation files from the VMM server "\\VMMServer\C$\Program Files\Microsoft System Center 2012\Virtual Machine Manager\agents\Amd64" to a temp folder.

Step 1: Install "vcredist_x64.exe"
Step 2: Install vmmAgent.msi by double-clicking on it. Installation ended prematurely due to an error.
Retry step 2: Install vmmAgent.msi using elevated command prompt: msiexec vmmAgent.msi. Installation completed successfully.
Step 3: Restart the Add Host job on VMM console

Thursday, July 4, 2013

SQL Server 2008R2 Reporting Service Failed to Start after Sysprep

I was attempting the step-by-step guide for sysprepping SQL Server 2008R2 in my gold VM image on SCVMM2012. After successfully created a VM template out of this image, the Complete SQL wizard couldn't get a service to start. I noticed the failure was due to the SQL Reporting Service.

Thankfully, there was a resolution mentioned in this blog post, which I've reproduced here:
  1. Open Regedit on the problematic SQL server
  2. Navigate to the HKEY_LOCAL_MACHINE\SYSTEM\CurrentControlSet\Control
  3. In the Right Pane create the following Key (If not already created)
    • Value: DWORD (32-bit)
    • Name: ServicesPipeTimeout
    • Value Data, Click Decimal and type 60000 (Not less than 60000)
Restart the server and the reporting service should be able to start up correctly. I went back to my gold VM and pre-created this registry setting.

Thursday, June 27, 2013

New Server Form Factor: Cluster-in-a-Box

Traditional server clustering has always been one of the main 'bottlenecks' and complaints for most IT project roll-outs. The most common excuses from server admins: too complex, too expensive, taking too much power, rack space, air-con and the list goes on. To address these issues, there is a new breed of servers - not 1U or 2U rack mountable server and monstrous server blade - it's "Cluster-in-a-Box" or CiB in short. 

Simply put, all server clustering components, including computing, storage, clustering software and network, are pre-fabricated and pre-installed in a single box when deliver to your data centers. You don't have to worry about what kind of detailed specifications that you should put in your procurement tenders. Most importantly, most products claim to save power, cooling, and rack space. Take Nutanix for example. It claims to do away with expensive SAN storage and simplify cluster setup in 30 min. Furthermore, a 4-node cluster in a 2U rack mountable chassis. Compare Nutanix 1450 against traditional server clustering, the Dell equivalent would look something like:
  1. 4 x Dell R610 servers
    • 2 x Intel 6-core Xeon E5-2620
    • 64GB RAM
    • 400GB SSD
    • 2 x GE and 2 x 10GE
    • 2 x HBA controllers
  2. 2 x FC SAN switches
  3. 1 x FC SAN storage 
    • 16 x 1 TB SATA HDD
Adding up all components would take up about 8U of rack spaces with 7 different boxes or about 400% in saving in rack spaces against a single 2U Nutanix box.

Of course, traditional server vendors are not sitting back. Now, we are seeing new server product offerings like:
Look like we are entering the next wave of data center revolution.

Saturday, June 1, 2013

Does DELL MD32xx support hardware VSS snapshot for DPM Backup?

Answer: Yes, but it's not official. It's best effort (due to its low cost as compared to its high cost Compellent counterpart).

Hardware VSS snapshot provides an efficient way for DPM to backup Cluster Shared Volumes (CSVs) on Hyper-V cluster. Without hardware assisted snapshot, the CSV access would be placed under Redirect I/O mode as long as the backup process is taking place (which can be a long process). This can significantly reduce the I/O performance for other VMs on the same LUN. That's why it's more efficient to keep as small number of VMs per CSV as possible for software VSS. With hardware assisted VSS, a temporary snapshot is instead created on the free space on the SAN volume. CSV would only be placed on Redirect mode for a couple of minutes.

Screenshot of VSS Hardware Snapshot (new virtual disk temporarily created denoted with a clock icon) on MD Storage Manager during DPM backup:

How do we configure VSS setting on Dell MD storage?

Step 1: Install the VSS provider given on the Dell MD Storage Manager DVD or ISO image.

Step 2: Confirm Dell hardware VSS provider is installed on the system
C:\> vssadmin list providers
vssadmin 1.1 - Volume Shadow Copy Service administrative command-line tool
(C) Copyright 2001-2012 Microsoft Corp.

Provider name: 'SmVssProvider'
   Provider type: Hardware
   Provider Id: {24e4e8a3-69cb-4370-8b7b-c5276cd49765}
   Version: 10.84.02

Step 3: Configure the default VSS behavior on the storage as shown below. Run "C:\Program Files (x86)\Dell\SMprovider\provider\SmRegTool.exe" on the console installed with Dell Storage Manager. Connect to the storage using OOB Management IP addresses.


Thursday, May 30, 2013

Insufficient counts after KMS host migration

For this new AD forest, I've been leveraging on someone else KMS service. As it grows bigger, time to setup its own KMS host. It's pretty straightforward to migrate KMS server. Plenty of step-by-step online like this. I have also manually updated the _vlmcs._tcp SRV record on DNS server.  And there is a problem. If you attempt to activate small number of new KMS clients after migration, it would report insufficient count. For KMS to work, you would need at least either 5 KMS servers or 25 KMS clients.  

So, I tried to re-activate existing machines by uninstalling existing KMS client key and re-installing it. The count level on the KMS host still won't jump and remain under 5. You can see the current count level by entering "slmgr -dlv" on the KMS host.

After going through all the slmgr options, I noticed an option to disable KMS host caching. Could it because the existing machines still activate on old KMS server? 

On a number of existing KMS client machines:
> slmgr -ckhc
> slmgr -ato

Hurry, the count is raised! New KMS clients are activated at once.

Monday, May 27, 2013

How to delete Virtual Disk in Dell MD during Operation?

How to delete Virtual Disk in Dell MD during operations? Answer is you can't, you've to wait for the operation to complete.

That sounds fair but not when you've waited several hours (if not days) for the operation to complete. Power cycle the MD storage still can't abort the operation. From the DellMD manager console, you've absolutely no idea to know when it would ever complete.

The next best news is that you can run a command utility "smcli.exe" to roughly gauge the progress. This is typically found under  "C:\Program Files (x86)\Dell\MD Storage Manager\client" folder.

> smcli -n ArrayName -c "show virtualdisk [\"VirtualDiskinOperation\"] actionprogress";

Performing syntax check...

Syntax check complete.

Executing script...

Virtual Disk xxx
Action: RAID Level Change
Percent Complete: 66%
Script execution complete.

SMcli completed successfully.

Sunday, May 26, 2013

Unable to refresh a stuck VM in SCVMM 2012 console

If you are unable to refresh a stuck VM on SCVMM 2012 and you see the following error:

"VMM cannot find the Virtual hard disk object' error 801"

You may need to run a SQL script to remove the orphaned objects from the database by following the steps below.

1. Stop the System Center Virtual Machine Manager service on the VMM 2012 server.
2. Back up the Virtual Manager database.
3. Open SQL Management Studio and run the following script on the VMM database:

BEGIN TRANSACTION T1

DECLARE custom_cursor CURSOR FOR
SELECT VHDId, VDriveId from
dbo.tbl_WLC_VDrive WHERE [VHDId] NOT IN
(SELECT VHDId from dbo.tbl_WLC_VHD WHERE VHDID IS NOT NULL)

DECLARE @VHDId uniqueidentifier
DECLARE @VDriveId uniqueidentifier

OPEN custom_cursor
FETCH NEXT FROM custom_cursor INTO @VHDId, @VDriveId

WHILE(@@fetch_status = 0)
BEGIN
if(@VHDId is NOT NULL)
DELETE FROM dbo.tbl_WLC_VDrive
WHERE VDriveId = @VDriveId
FETCH NEXT FROM custom_cursor INTO @VHDId, @VDriveId
END
CLOSE custom_cursor
DEALLOCATE custom_cursor

COMMIT TRANSACTION T1

4. Start the System Center Virtual Machine Manager service again and refresh problem VMs. The VMs should return to a proper reporting state.

The above resolution is extracted from this post: Performing an operation in Virtual Machine Manager fails with error 801

If you encounter Error (2606),
"Unable to perform the job because one or more of the selected objects are locked by another job."

Run this command on the affected host to resync the performance counter: winmgmt /resyncperf

Saturday, May 25, 2013

Hyper-V (WS2012) Backup on Guest VM (WS2008)

If you're running backup jobs (e.g. DPM2012) on WS2012 Hyper-V with older guest VMs (e.g. WS2008), you might encounter this error:

The replica of Microsoft Hyper-V \Backup Using Child Partition Snapshot\[VM] on [Host] is inconsistent with the protected data source. All protection activities for data source will fail until the replica is synchronized with consistency check. You can recover data from existing recovery points, but new recovery points cannot be created until the replica is consistent. 

For SharePoint farm, recovery points will continue getting created with the databases that are consistent. To backup inconsistent databases, run a consistency check on the farm. (ID 3106) 

To resolve it,
1) ensure that the host contains this update KB2770917 (available in Windows update)
2) Update the Integration services on the older guest VMs e.g. WS2008R2 etc

Friday, May 24, 2013

SQLPrepInstaller of DPM2012 installation using remote SQL server

This Technet link describes the setting up of remote SQL server of Microsoft's latest backup solution - System Center Data Protection Manager (DPM) 2012 SP1.

A missing step is not mentioned for using remote SQL instance (i.e. SQL not installed on same server as DPM). You'll have to run the "SQLPrepInstaller" on the SQL server. Insert the DVD, ISO or file share image of DPM installer on the SQL server. Click on the following menu on the launcher.


Tuesday, May 21, 2013

Managing Office 2010 Client Key

If you run into any difficulties in activating or uninstalling Office 2010 Key, run this command at "C:\Program Files\Microsoft Office\Office14"

cscript OSPP.VBS

A list of options would be displayed.

If you're planning the sysprep this image, rearm the Office 2010 first:
C:\Program Files\Common Files\Microsoft Shared\OfficeSoftwareProtectionPlatform>ospprearm.exe

After that, check its Client Machine ID is now cleared:
C:\Program Files\Microsoft Office\Office14>cscript ospp.vbs /dcmid

If mails are stuck in draft or Outbox, try restarting the Exchange Mail Submission service on the client access server.

Thursday, May 16, 2013

Failover Cluster Manager Console keeps crashing on WS2012

If your new Failover Cluster Manager console keep crashing on WS2012 and the error message is something like:

"A weak event was created and it lives on the wrong object, there is a high chance this will fail, please review and make changes on your code to prevent the issue.",

apply this hotfix (KB 2803748) on all your cluster nodes and/or the RSAT machines immediately.

Wednesday, May 8, 2013

How to add custom attributes to AD User Objects

We have an application that requires to store some custom user attributes on the Active Directory. Let's say we need to add a custom attribute "Gender". How should we go about it? We need to first extend the existing User Class in the AD Schema. Please refer to this detailed step-by-step guide.

Here, I would just summarize the overall steps.

Step 1: Register AD schema tool by running "regsvr32 schmmgmt.dll" on the Domain Controller with "Schema Master" role. Add the AD Schema tool on the mmc console.
Step 2: In the AD Schema Console, right-click the Attributes folder, then select Create Attribute.
Step 3: You may like to generate your own private enterprise OID (Unique X.500 Object ID) for this custom attribute on this link.
Step 4: From the Schema Console, click the Class folder. Scroll down to the User class, right-click it, and select Properties. On the user Properties dialog box, click the Attributes tab. Click Add, then choose the Gender attribute. Click OK twice, and you've successfully added the Gender attribute to the User class.

Now we have an extra gender attribute for every user object. How should we populate its values (i.e. Male or Female)? If you have an excel sheet, convert it to CSV and use Powershell script to populate it. Below is sample script.

$Users = import-csv users.csv
Foreach ($user in $Users)
{
  $sAMAccountName = $user.sAMAccountName
  $gender = $user.gender
  $Property = @{gender=$gender}
  Write-host "Setting the gender of $sAMAccountName"
  Get-ADObject -Filter 'sAMAccountName -eq $sAMAccountName' | Set-ADObject -add $Property
  Write-host "Done!"
}


Tuesday, May 7, 2013

Windows Server 2012 Consistent Device Naming (CDN)

The new SCVMM 2012 SP1 supports bare-metal host deployment. I was wondering if the host has multiple network connections, how would the right address be assigned from the right IP pools? Even if you've pre-patched the cables, the NIC order would change randomly once you've sysprepped or installed a new OS on the server. It had been a pain for server administrators to identify which NICs are connected to which network segments or VLANs.

While I was creating my host profile on SCVMM 2012 console, I came across this page:

Look like if you know the CDN of each NIC, you can now pre-allocate the static IP address from the IP pool! CDN ensures that the NIC name and the printed name on the server chassis remain consistent. It's good news for every system administrator. Bad news is that CDN is only supported on WS2012 and you'll need the newest server hardware e.g. Dell's 12th generation hardware.

Without CDN, you would have to supply the individual MAC addresses of each interface and match them to the defined IP subnets as shown below.

The MAC address can be easily identified using "show mac address-table interface" command on the data center switches. Once the job started running, you should see the following screen on the bare-metal host:

Additional Resources:
  1. SCVMM 2012 - Bare-metal deployment
  2. BMC - Out-of-Band Host Management on SCVMM 2012

Monday, April 29, 2013

BMC - Out-of-Band Host Management on SCVMM 2012

Server Light-Out Management (LOM) enables you to manage a physical host remotely, such as Power On and Power Off. Now, you can also do so under SCVMM 2012 when you have defined the Baseboard Management Controller (BMC) settings under the managed host hardware setting. BMC is also required if you intend to use the new automatic Power Management feature in VMM. If certain hosts fall below certain load threshold (e.g. weekends), you can even allow VMM to power-off the host and power-on back when the demand is back.

Before enabling BMC, when you right-click on a host, you can't do anything to the host (i.e. grey-out), except restarting.

Once the host BMC setting is defined, you can power on and off the physical host under the SCVMM console.

System Prerequisites
According to Microsoft Technet, the host must have a BMC installed that supports one of the following out-of-band management protocols:

  • Intelligent Platform Management Interface (IPMI) versions 1.5 or 2.0
  • Data Center Management Interface (DCMI) version 1.0
  • System Management Architecture for Server Hardware (SMASH) version 1.0 over WS-Management (WS-Man)

Example: Dell Remote Access Controller (DRAC)
Dell DRAC supports IPMI 2.0. By default, it's not enabled. Hence, you must first enable it and configure the appropriate OOB IP address on the BIOS setting by pressing during system start-up.

Once the VMM server has connectivity to the Dell DRAC, you can now proceed to configure BMC setting under the Hardware properties as shown below.


Try power off and power on the host!

Thursday, April 25, 2013

How to setup Windows iSCSI with MPIO on Dual Controller Storage Target

Let's say you've acquired an iSCSI storage target with dual controllers (e.g. Dell MD3xxx-i series). And you wish to configure Windows iSCSI initiator with MPIO to enable multi-path connection for High Availability and Load Balancing. How should you go about it?

iSCSI Port Configuration
Let's begin with the iSCSI storage controller setup. Typically, each controller should have four iSCSI ports. Hence, you should configure 4 different VLANs on your iSCSI switches. Each port on each controller should connect to a VLAN (also an IP subnet). Jumbo frame (e.g. MTU 9000) is also recommended. Assign a valid IP address to each port. The port configuration should look something like this:

Create new LUN and assign the preferred path to either Controller
Typically, each LUN can only be accessed via a target controller at any one time. The connections to the preferred controller should be active and the other controller should be standby. Assign the new LUN to either preferred controller and remember its iSCSI port addresses.

Enabling MPIO on Windows host
Similarly, configure the four or more iSCSI network connections (enable Jumbo Frame) on the Windows host. Install the necessary provider software given by the storage vendor. Add new Windows MPIO feature by executing "Install-WindowsFeature Multipath-IO -IncludeManagementTools" on Powershell. Activate MPIO and restart the host by clicking on the red boxes as follows:

Windows iSCSI Initiator 
Start the Windows initiator by executing the command "iscsicpl". On Discovery tab, configure the Target Portals connecting to the iSCSI target directly. Go back to the Targets tab and click the "Connect" button.

By default, only 1 session connection is made. Disconnect the session. We can add more iSCSI sessions on clicking on the Properties button as above. Always check the "Enable multi-path" box whenever you see it.

Each session identifier represent each session to each controller. As you can see, I've already added two sessions to both controllers. You may add more by clicking on the "Add session" button. Check the "Enable multi-path" box and "Advanced" button. Assign the "Target portal IP" to the preferred controller address.

Multiple Connected Session (MCS) Policy
If you have more than 1 iSCSI NIC on the server for each session, click on the "MCS" button to add additional connections to each session. To add more connections to each session, click on the "Add" button and select the appropriate iSCSI initiator and target addresses.

You can also choose a load-balancing algorithm. By default, simple "Round Robin" is used to distribute the loads evenly among the multi-paths.

Verify Multi-Path for each connected LUN
Click on "Device" and then "MPIO" button. Verify that each connected LUN can be accessed by more than 1 session.

Conclusion
In summary, there are two levels of path redundancy defined. Firstly, the session to each controller. Secondly, within a session, you can also have multiple connections defined under the MCS Policy. You may define different load-balancing algorithms for each level. In this setup, I clicked on the Device MPIO and defined "Failover-Only" for session level (remember the LUN can only be accessed via one controller at a time). Under each session, I defined "Round Robin" for multiple connections under MCS Policy for load-balancing.

Thursday, April 18, 2013

Managing Dell MD Storage with SCVMM 2012

In the new SCVMM 2012, you can now centrally manage storage devices using SMI-S providers from various vendors. Till now, only a small handful of storage devices are supported in SCVMM 2012. Among Dell storage portfolios, only the expensive Compellent series are officially supported. There is actually a SMI-S provider (MD Storage Array vCenter Plug-in) for the cheaper Dell MD storage but it is meant for VMWare vCenter. Fortunately being open standard, you can use the same provider even for SCVMM 2012. Download either the x86 or x64 program. As this provider is a proxy type, install it on a Windows Server 2003 or 2008 (WS2012 is not supported) that is reachable by the VMM server. Run the executable to install. Ignore any vCenter settings, since we are using SCVMM here.

Post Installation of Dell MD SMI-S on Proxy Server
  1. Create a local user account on the proxy server. Run "cimuser -a -u username -w password"  (where username is the same local user account) using local Administrator credential (not just elevated prompt) to add it as a CIM user account. The command can be found under "C:\Program Files (x86)\Dell\pegasus\bin".
  2. Create/Edit ArrayHosts.txt in the directory "C:\Program Files (x86)\Dell\pegasus\providers\array". Add the management IP addresses of the storage array. Use a new line for each IP address.
  3. Restart cimserver service using "services.msc". Check TCP 5988 is running using "netstat -ano"
  4. Enable host firewall rule to permit TCP 5988
Configuration of SCVMM 2012 SP1 on VMM Server
  1. Create a RunAs account using the same credential that you created earlier using cimuser.
  2. Go to "Fabric". Right click on "Providers" to add storage devices. Choose the one with "SMI-S" option.
  3. On next page, choose "SMI-S CIMXML" protocol. Specify the proxy server on the Provider IP address and select the RunAs account.


Complete the remaining wizard step and the MD storage can now be managed as part of SCVMM 2012 Storage Fabric. You can create new LUN and assign them to the VMs directly under the same console seamlessly.

Thursday, March 28, 2013

Cisco Flexible Packet Matching (FPM) in 15.x

Cisco FPM on ISR router is about detecting a certain pattern (e.g. regular expression) in the payload packets before deciding whether to forward or drop it. One good example is to drop malicious packets and even Skype login that attempt to change its communicating methods over time. Your IPS signatures may not even be updated quick enough.

There is an easy-to-follow FPM guide on Getting Started with Cisco IOS Flexible Packet Matching. It even stated that almost all Cisco ISR platforms support this feature. I've learnt that only certain trains and versions can support FPM commands and they may not even be the latest versions. Use "Cisco Software Advisor" on "Feature/Software" tab to determine which IOS trains and versions support FPM. Of course, you'll need a CCO account to login.

In 15.x, there is also a change in loading FPM PHDF files. Not only you don't have to download the phdf files, there is a slight change in loading FPM PHDF files:

Router(config)#load protocol system:fpm
%Complete file name to be loaded is required

Instead, you'll have to do this
Router(config)# load fpm
Try to load bundle PHDF files ...

Then do a "show protocols phdf all" to see loaded phdf files. It should include all standard PHDFs: ether.phdf, ip.phdf, tcp.phdf, and udp.phdf. These PHDFs provide Layer 2-4 protocol definition according to Flexible Packet Matching Deployment Guide.

Nested Access Control
Cisco FPM supports nested access control policy i.e. enforce a child policy on parent policy. You can define a "class-map type stack" to check on the protocol fields and use another "class-map type access-control" to check on the payload contents. For example, you want to check for a password on the payload on protocol number 17 (UDP) on port 1234. The example config would be:

!--- Define the values to be checked on UDP header port 1234
class-map type stack match-all UDP-CHECK
 match field IP protocol eq 0x11 next UDP
 match field UDP dest-port eq 1234 next UDP

!---- Ensure the payload to contain the password string. You can also use regular expression
class-map type access-control match-all PASSWORD-CHECK
 match start UDP payload-start offset 0 size 100 string "password"

!---- Define the child policy and just log the packets if payload contains the password
policy-map type access-control CHILD-POLICY
 class PASSWORD-CHECK
   log

!---- Nested policy on Parent. Check on UDP header then the payload. Otherwise, drop the packet.
policy-map type access-control PARENT-POLICY
 class UDP-CHECK
   service-policy CHILD-POLICY
 class class-default
   log
   drop

!--- Enforce the FPM policy on the router interface
interface GigabitEthernet0/0
  service-policy type access-control output PARENT-POLICY


Thursday, February 28, 2013

Cloning Virtual Domain Controllers

A new feature of Windows Server 2012 is the cloning of Domain Controllers. This is a rapid way to deploy new Domain Controllers in virtual machine forms. The detailed step-by-step is outlined in Virtual Domain Controller Cloning in Windows Server 2012. I won't attempt to repeat all the details. Hence, I would summarize the steps for easy reference later.

Prerequisite Check:
  1. The hypervisor must support VM-GenerationID. Hyper-V running on Windows Server 2012/Windows 8 supports this feature and so do VMWare vSphere 5.x.  
  2. The source virtual DC must be running Windows Server 2012. 
  3. The PDC emulator role holder must be online and available to the cloned DC and must be running Windows Server 2012.
Step 1: Add source DC VM into "Clonable Domain Controllers" Security Group

Step 2: Check for applications and determine whether they should be cloned by running "Get-ADDCCloningExcludedApplicationList" cmdlet. If application is not supported for cloning, uninstall it. Otherwise, add the application to the inclusion list (CustomDCCloneAllowList.xml). The list can be generated with the same cmdlet with "-GenerateXML" option.

Step 3: Run "New-ADDCCloneConfigFile" cmdlet on source VM to run a list of prerequisite checks as mentioned above. It would also generate "DCCloneConfig.xml" file that contains a list of settings to be applied to the cloned DC, including network settings, DNS, WINS, AD site name, new DC name etc. The xml file is contained at the "%Systemroot%\NTDS" folder. These new settings can be specified with the same cmdlet input with the necessary options. For example:
New-ADDCCloneConfigFile -IPv4Address 10.2.1.10 -IPv4DefaultGateway 10.2.1.1 -IPv4SubnetMask 255.255.255.0 -IPv4DNSResolver 10.1.1.10,10.1.1.11 -Static -SiteName CORPDR

Step 4: Shut down the source VM and export it out using "Export-VM" cmdlet e.g. Export-VM -name sourceDC -Path D:\ClonedDC.

Step 5: Import the VM by running "Import-VM" cmdlet e.g. Import-VM –Path {VM XML Path} –Copy –GenerateNewId –VhdDestinationPath D:\ClonedDC. You can also rename the new VM using Hyper-V manager. Start the newly cloned VM.

Tuesday, February 12, 2013

New MS2012 Dynamic Access Control (DAC) for BYOD?

One major new feature in Windows Server 2012 is the introduction of Dynamic Access Control (DAC). At the first glance, it seems to be replacing or enhancing the traditional NTFS ACL. In fact, it's neither. In traditional file shares, the access control is typically controlled by both share permissions and NTFS ACL. DAC is an add-on feature on top of these existing access control mechanisms. For example, you may allow a group of finance executives to access a sensitive finance file share from their managed workstations. But what if the corporate policy forbid them for doing so when they are accessing from mobile or personal devices? This is where DAC comes in.

In DAC, you can create access rule that is expressed in "if-then" statement. Using the same example, you may express the policy as "If the user clearance is high and the user department is finance; and accessed from a managed finance device, then the user can access finance files and folders classified as having high business impact". See below illustration:


I won't attempt to go through the detailed step-by-step in implementing DAC, as there is already a dedicated blog for DAC at http://www.dynamic-access-control.com/. I would just summarise the steps as follows:

On a Windows Server 2012 domain controller:
  1. First, ensure that the domain functional level is Windows Server 2012, as expanded Kerberos with claim-based information is required. Enable "KDC support for claims, compound authentication and Kerberos armoring" using Group Policy on Domain Controllers OU.
  2. Define the user and device claims types using the new "Active Directory Administrative Center (ADAC)" under "DAC - New Claim Types". For example, you may like to define the new User.Department and Device.Managed attributes. You may even provide a list of values such as "Engineering", "Finance", "IT" for User.Department. 
  3. Define the new Resource Properties for the files and folders using the same ADAC console. In this case, you may want to define Resource.Department and Resource.Impact. Add the resource properties to the pre-defined "Global Resource Property List".
  4. Create a new central access rule e.g. using earlier expression as example.
  5. Create a new central access policy and add the central access rule into it. This new central access policy has to be enforced by the file servers mentioned later.
  6. Tag the user account objects using attribute editor in "AD Computers and Users" console e.g. department etc.
  7. You may also want to tag the computer attributes. Do note that Windows 8 is required for claim-based devices.

On a file server running Windows Server 2012:
  • The earlier steps have created Central Access Policy on AD. However, the enforcement has to be performed on individual file server.
  • Add new Windows Feature "File Share Resource Manager" using Server Manager or Powershell
  • Run PS cmdlet "Update-FSRMClassificationPropertyDefinition" to  synchronizes the classification property definitions on the file server with the Resource property definitions on AD
  • You may perform Manual Classification by setting the resource property (Classification tab) on the file and folder properties directly.

  • Alternatively, you may perform "Automatic Classification" by creating Classification Rules on "File Server Resource Manager". You may set the rules to be run at fixed interval.
  • After file tagging and classification, deploy and enforce the earlier created central access policy on the file server. You can find a new "Central Policy" tab on the "Advanced Security Settings" of the share folder
  • You may also test-run the deployment using the "Effective Access" tab (left of Central Policy tab as above)
As for rolling out DAC incrementally, this is what Microsoft would recommend in summary:

Monday, February 4, 2013

Moving WSUS Content Store

The content of WSUS is growing exponentially and the storage is nearly full. To move the existing content to a bigger LUN, Wsusutil.exe is the program. To execute the move, prepare the new destination folder and use this command:
Wsusutil.exe movecontent {new location} {log file}  [-skipcopy]

Use the -skipcopy option, if you do not wish to copy existing content over. For example, if the new location is at D:\content, the command should be:
Wsusutil.exe movecontent D:\Content D:\move.log

For Windows Server 2008, the location of Wsusutil should be at "C:\Program Files\Microsoft Windows Server Update Services\Tools". For Windows Server 2012, you should be able to find the executable at "C:\Program Files\Update Services\Tools".

Tuesday, January 29, 2013

SQL 2012 Installation: Missing NetFx3

When I installed MS SQL Server 2012, there was an error "Error while enabling Windows feature: NetFx3". NetFx3 refers to the .NET framework 3.5. 

However, .NET framework 3.5 is no longer installed as part of the new WS2012. To install this older feature, you would have to perform side-by-side (SxS) installation. Mount the WS2012 DVD or the ISO image on the same host. Do note that you can now mount ISO image directly without third-party software by right-clicking the image and choose "Mount". 

Open an elevated Powershell console. To install the Windows feature:
Add-WindowsFeature NET-Framework-Core -source D:\sources\sxs

Once .NET 3.5 is installed, re-run the MS SQL installation. If you are also looking for the missing "Start" button to search for the SQL Server Management Studio, install the "Desktop Experience" feature as well:
Add-WindowsFeature Desktop-Experience

Wednesday, January 9, 2013

Prevent Users from joining Computers to AD

From a security standpoint, it would be pretty hard to control if normal domain users can join their machines to AD without authorization. By default, a user may join up-to 10 computers to AD.

Depending on your organizational security policy, users should only self-help themselves (or restricted to help-desk personnel) with proper authorization. To enforce such policy:

1) Limit the number of computers that a user can join domain from ten (10) to zero (0) by performing the following procedure. 
  • Run Adsiedit.msc on a domain controller as Domain Admin. Expand the Domain NC node. This node contains an object that begins with "DC=" and reflects the correct domain name. Right-click this object, and then click Properties.
  • In the Select which properties to view box, click Both. In the Select a property to view box, click ms-DS-MachineAccountQuota.
  • In the Edit Attribute box, change the number from 10 to 0.
  • Click Set, and then click OK.
2) Before joining any new computers to AD, enforce a pre-staging procedure. It means pre-creating the computer objects on AD before joining the computers to domain. Do note that the computer name of pre-created object should match the local computer name of the new machine.
  • To conduct pre-staging, fire-up "AD Users and Computers Console", go to the OU that the pre-staging computer objects should reside.
  • Click "New" and "Computer". Name the object. Click on the "Change" button as follows to the delegated AD group for help-desk personnel or to the individual self-help user account.

  • Inform the delegated users to join the new computer according to the object name. Upon successful joining, you should be able to view the computer properties, such as the Operating System versions.

Tuesday, January 8, 2013

Updating Powershell Help Files

When needing help in some Powershell cmdlets, the Get-Help cmdlet is the equivalent "man" command for *nix systems. The Powershell cmdlets are updated so frequently that it is worthwhile updating the help files as well. If the Windows host is connected directly to Internet, the help file would be updated automatically. What about for systems on closed network? There is a "Save-Help" cmdlet to download the help files and "Update-Help" cmdlet for systems not connected to Internet.

For example, run "Save-Help" from a Windows system with Internet connection to download help files for all modules to a file share.

PS > Save-Help -DestinationPath \\Fileserver\PSHelp

Run "Update-Help" on a Windows system without Internet connection.

PS > Update-Help -SourcePath \\Fileserver\PSHelp

Both cmdlets are available to Powershell 3.0. To verify the current version of Powershell of your system, run "$PSVersionTable" and look at the "PSVersion" property. For example:


Monday, January 7, 2013

Powershell: Quickly view installed Windows feature

To quickly view a list of installed Windows feature using Poweshell on Windows Server:

PS > Get-WindowsFeature | Where-Object {$_.Installed -eq $true}

To filter only feature name

PS > Get-WindowsFeature | Where-Object {$_.Installed -eq $true} | Select-Object -Property Name

Friday, January 4, 2013

Cisco Multicast Expansion Table (MET) is Full

Today, some users aren't able to join multicast groups to watch their favorite video. After pinpointing to the upstream Cisco 7600 router, I noticed the following error message in the log:

 %MCAST-SP-4-MET_THRESHOLD_EXCEEDED: Multicast Expansion table has exceeded 98% of its capacity and is reaching its maximum
%MMLS-SP-6-MET_LIMIT_EXCEEDED: Failed to allocate MET entry, exceeded system limit of (32744) entries. Number of times MET limit is exceeded in the last 1 min : 1
%CONST_MFIB_LC-SP-6-MET_MCAST_ALLOC_FAILURE: Failed to allocate MET entries for IP multicast entry (S:*.*.*.*, G:*.*.*.*)

The router is configured PIM in sparse mode and an RP manually set.

(hostname)#show platform hardware capacity multicast
L3 Multicast Resources
  Replication mode: egress
  Replication capability: Module                              Mode
                          2                                                 Egress    
                          3                                                 Egress    
                          4                                                 Egress    
                          5                                                 Egress    
  MET table Entries: Module                             Total    Used    %Used
                     3                                                65526       28        1%
                     4                                                65526       38        1%
                     5                                                32744   32744     100%

Look like the Multicast Expansion Table (MET) is fully utilized. In Cisco multicast architecture, MET is populated with Output Interface Lists (OILs e.g. VLAN, routed interfaces) that requires packets to be replicated over. For example: (S,G) with three OIFs, multicast replication creates three copies of every packet received from source (S) destined to group (G). When MET is full, new users won't be able to join the igmp group, as their (S,G) and connected interface won't be added in the table.

There doesn't seem to be a way to clear MET entries except to reload the router. Cisco has a pdf guide that is useful for better understanding and troubleshooting of multicast in Catalyst 6500. The guide did mention about monitoring of MET utilization but short on the resolution.

After-note: Packet replication can be performed either egress (default) or ingress. Strangely, after changing the direction (not rebooting), the clients are able to join the IGMP group. The direction can be changed using:
(config)# mls ip multicast replication-mode ingress or the newer command (IOS 15.x)
(config)# ip multicast hardware-switching replication-mode ingress

Update:
According to Cisco TAC, there was a known bug (CSCtg53299) whereby MET entries are not deleted properly, which in turn, led to the filling up of MET table. A solution is to upgrade the firmware to version 15.1(01)S1 and above.