Showing posts with label scvmm 2012. Show all posts

Wednesday, November 6, 2013

Setting up SQL AlwaysOn cluster for SCVMM 2012

SQL AlwaysOn is a new feature in MS SQL 2012 that supports SQL cluster without the need of a shared storage. The primary node will host the database file in its local storage and sync with the other standby copy in the secondary node. Since SCVMM 2012 supports this feature for HA, I followed this Technet blog for guidance.

I installed SQL server as standalone on each node using default values. The objective is to create an Availability Listener object for VMM to connect to the new database. I managed to follow through until the last step to replicate the test database failed.

After searching through the Internet, I realized that it's not correct to use default mode for SQL HA.

1) Always use domain-based managed service account for SQL instance (don't leave it to Network service).

2) Ensure the service account has access right to the end-point listener.

  • On SQL mgmt console, find out the name of mirroring endpoints
  • SELECT name, role_desc, state_desc FROM sys.database_mirroring_endpoints
  • Grant the service account access right to this endpoint 
  • GRANT CONNECT on ENDPOINT::{Mirroring_Endpoint} TO [Adomain\Otheruser]

3) After creating the new availability group successfully, check that the TestDB synchronization state on both nodes are "synchronized" (not "synchronizing" or "not synchronized"). Right click on the AG and click "Show Dashboard".

4) If they are not synchronized, click on "Properties" of the AG. Change all availability mode to "Synchronous Commit". Test the failover manually.

Friday, July 5, 2013

Unable to add Hyper-V host due to failed agent installation

I wasn't able to add a domain-based Hyper-V host using SCVMM 2012. The error was:

Error (415)
Agent installation failed copying C:\Program Files\Microsoft System Center 2012\Virtual Machine Manager\agents\Amd64\3.1.6011.0\vmmAgent.msi to \\HyperVHost\ADMIN$\vmmAgent.msi.
The network path was not found

Hence, I attempted to perform a manual installation. On the Hyper-V host, I copied the agent installation files from the VMM server "\\VMMServer\C$\Program Files\Microsoft System Center 2012\Virtual Machine Manager\agents\Amd64" to a temp folder.

Step 1: Install "vcredist_x64.exe"
Step 2: Install vmmAgent.msi by double-clicking on it. Installation ended prematurely due to an error.
Retry step 2: Install vmmAgent.msi using elevated command prompt: msiexec vmmAgent.msi. Installation completed successfully.
Step 3: Restart the Add Host job on VMM console

Thursday, July 4, 2013

SQL Server 2008R2 Reporting Service Failed to Start after Sysprep

I was attempting the step-by-step guide for sysprepping SQL Server 2008R2 in my gold VM image on SCVMM2012. After successfully created a VM template out of this image, the Complete SQL wizard couldn't get a service to start. I noticed the failure was due to the SQL Reporting Service.

Thankfully, there was a resolution mentioned in this blog post, which I've reproduced here:
  1. Open Regedit on the problematic SQL server
  2. Navigate to the HKEY_LOCAL_MACHINE\SYSTEM\CurrentControlSet\Control
  3. In the Right Pane create the following Key (If not already created)
    • Value: DWORD (32-bit)
    • Name: ServicesPipeTimeout
    • Value Data, Click Decimal and type 60000 (Not less than 60000)
Restart the server and the reporting service should be able to start up correctly. I went back to my gold VM and pre-created this registry setting.

Sunday, May 26, 2013

Unable to refresh a stuck VM in SCVMM 2012 console

If you are unable to refresh a stuck VM on SCVMM 2012 and you see the following error:

"VMM cannot find the Virtual hard disk object' error 801"

You may need to run a SQL script to remove the orphaned objects from the database by following the steps below.

1. Stop the System Center Virtual Machine Manager service on the VMM 2012 server.
2. Back up the Virtual Manager database.
3. Open SQL Management Studio and run the following script on the VMM database:

BEGIN TRANSACTION T1

DECLARE custom_cursor CURSOR FOR
SELECT VHDId, VDriveId from
dbo.tbl_WLC_VDrive WHERE [VHDId] NOT IN
(SELECT VHDId from dbo.tbl_WLC_VHD WHERE VHDID IS NOT NULL)

DECLARE @VHDId uniqueidentifier
DECLARE @VDriveId uniqueidentifier

OPEN custom_cursor
FETCH NEXT FROM custom_cursor INTO @VHDId, @VDriveId

WHILE(@@fetch_status = 0)
BEGIN
if(@VHDId is NOT NULL)
DELETE FROM dbo.tbl_WLC_VDrive
WHERE VDriveId = @VDriveId
FETCH NEXT FROM custom_cursor INTO @VHDId, @VDriveId
END
CLOSE custom_cursor
DEALLOCATE custom_cursor

COMMIT TRANSACTION T1

4. Start the System Center Virtual Machine Manager service again and refresh problem VMs. The VMs should return to a proper reporting state.

The above resolution is extracted from this post: Performing an operation in Virtual Machine Manager fails with error 801

If you encounter Error (2606),
"Unable to perform the job because one or more of the selected objects are locked by another job."

Run this command on the affected host to resync the performance counter: winmgmt /resyncperf

Tuesday, May 7, 2013

Windows Server 2012 Consistent Device Naming (CDN)

The new SCVMM 2012 SP1 supports bare-metal host deployment. I was wondering if the host has multiple network connections, how would the right address be assigned from the right IP pools? Even if you've pre-patched the cables, the NIC order would change randomly once you've sysprepped or installed a new OS on the server. It had been a pain for server administrators to identify which NICs are connected to which network segments or VLANs.

While I was creating my host profile on SCVMM 2012 console, I came across this page:

Look like if you know the CDN of each NIC, you can now pre-allocate the static IP address from the IP pool! CDN ensures that the NIC name and the printed name on the server chassis remain consistent. It's good news for every system administrator. Bad news is that CDN is only supported on WS2012 and you'll need the newest server hardware e.g. Dell's 12th generation hardware.

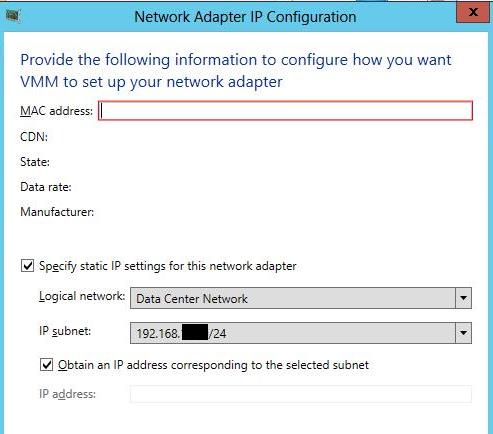
Without CDN, you would have to supply the individual MAC addresses of each interface and match them to the defined IP subnets as shown below.

The MAC address can be easily identified using "show mac address-table interface" command on the data center switches. Once the job started running, you should see the following screen on the bare-metal host:

Additional Resources:
  1. SCVMM 2012 - Bare-metal deployment
  2. BMC - Out-of-Band Host Management on SCVMM 2012

Monday, April 29, 2013

BMC - Out-of-Band Host Management on SCVMM 2012

Server Light-Out Management (LOM) enables you to manage a physical host remotely, such as Power On and Power Off. Now, you can also do so under SCVMM 2012 when you have defined the Baseboard Management Controller (BMC) settings under the managed host hardware setting. BMC is also required if you intend to use the new automatic Power Management feature in VMM. If certain hosts fall below certain load threshold (e.g. weekends), you can even allow VMM to power-off the host and power-on back when the demand is back.

Before enabling BMC, when you right-click on a host, you can't do anything to the host (i.e. grey-out), except restarting.

Once the host BMC setting is defined, you can power on and off the physical host under the SCVMM console.

System Prerequisites
According to Microsoft Technet, the host must have a BMC installed that supports one of the following out-of-band management protocols:

  • Intelligent Platform Management Interface (IPMI) versions 1.5 or 2.0
  • Data Center Management Interface (DCMI) version 1.0
  • System Management Architecture for Server Hardware (SMASH) version 1.0 over WS-Management (WS-Man)

Example: Dell Remote Access Controller (DRAC)
Dell DRAC supports IPMI 2.0. By default, it's not enabled. Hence, you must first enable it and configure the appropriate OOB IP address on the BIOS setting by pressing during system start-up.

Once the VMM server has connectivity to the Dell DRAC, you can now proceed to configure BMC setting under the Hardware properties as shown below.


Try power off and power on the host!

Thursday, April 18, 2013

Managing Dell MD Storage with SCVMM 2012

In the new SCVMM 2012, you can now centrally manage storage devices using SMI-S providers from various vendors. Till now, only a small handful of storage devices are supported in SCVMM 2012. Among Dell storage portfolios, only the expensive Compellent series are officially supported. There is actually a SMI-S provider (MD Storage Array vCenter Plug-in) for the cheaper Dell MD storage but it is meant for VMWare vCenter. Fortunately being open standard, you can use the same provider even for SCVMM 2012. Download either the x86 or x64 program. As this provider is a proxy type, install it on a Windows Server 2003 or 2008 (WS2012 is not supported) that is reachable by the VMM server. Run the executable to install. Ignore any vCenter settings, since we are using SCVMM here.

Post Installation of Dell MD SMI-S on Proxy Server
  1. Create a local user account on the proxy server. Run "cimuser -a -u username -w password"  (where username is the same local user account) using local Administrator credential (not just elevated prompt) to add it as a CIM user account. The command can be found under "C:\Program Files (x86)\Dell\pegasus\bin".
  2. Create/Edit ArrayHosts.txt in the directory "C:\Program Files (x86)\Dell\pegasus\providers\array". Add the management IP addresses of the storage array. Use a new line for each IP address.
  3. Restart cimserver service using "services.msc". Check TCP 5988 is running using "netstat -ano"
  4. Enable host firewall rule to permit TCP 5988
Configuration of SCVMM 2012 SP1 on VMM Server
  1. Create a RunAs account using the same credential that you created earlier using cimuser.
  2. Go to "Fabric". Right click on "Providers" to add storage devices. Choose the one with "SMI-S" option.
  3. On next page, choose "SMI-S CIMXML" protocol. Specify the proxy server on the Provider IP address and select the RunAs account.


Complete the remaining wizard step and the MD storage can now be managed as part of SCVMM 2012 Storage Fabric. You can create new LUN and assign them to the VMs directly under the same console seamlessly.

Tuesday, December 11, 2012

Basic Networking of SCVMM 2012 SP1 Beta

The new Windows Server 2012 has a new feature that supports NIC teaming natively. After configuring Hyper-V NIC teaming on two hosts, I clustered them up. Everything was working well and fine. SCVMM 2012 SP1 beta is required to manage the newly minted Hyper-V cluster.

After setting up the new SCVMM server successfully, adding an existing cluster is easy. I also noticed more networking profiles have to be created before I can roll a new VM.
See the differences? It does look confusing. Fortunately, the System Center team has updated this blog to explain the relationship between various physical and virtual components: Networking in VMM 2012 SP1 – Logical Networks.

Overall SCVMM 2012 SP1 Network Architecture

From Hyper-V Host Perspective
In essence, the steps to create networking in SCVMM 2012 SP1:
  1. Start from creating new Logical Networks. Each Logical Network may contain multiple Network Sites. Each site may contain multiple VLANs and IP Subnets.
  2. On each Hyper-V host, associate the Virtual Switches (each virtual switch represents a physical NIC on the host) to the respective Logical Networks. 
  3. Create VM Network and associate it to a Logical Network.
  4. Under the hardware profile of a new VM, connect the new virtual NIC to a VM network. Select the appropriate Virtual Switch available to the parent host.

Example 1: Datacenter network contains 2 VLANs - VLAN 10 and VLAN 20 on Site A and VLAN 30 and VLAN 40 on Site B using VLAN trunking on the underlying physical switches. Create a new logical network named "Data Center Network". In it, add a network site A, then both VLAN 10 and 20. Assign the IP subnet to each VLAN. Add another network site B and add both VLAN 30 and 40 on this network site.

Example 2: Storage network contains 2 physical storage switches without VLAN trunking in both sites. Create a new logical network named "iSCSI Storage Network". In it, add both network site A and network site B. Assign VLAN tag 0 to each network site and assign the relevant IP subnet.

Logical switch and port profile, on the other hand, act as container to consistently configure identical capabilities (e.g. SR-IOV, VMQ, DHCP guards etc) for network adapters across multiple hosts. Instead of configuring individual ports on each host, you can specify the capabilities in port profiles and logical switches and apply them to the appropriate adapters.

Monday, December 3, 2012

Host Cluster Over-committed with spare memory?

I've encountered an issue on SCVMM 2012. When I attempted to place a new VM on a Hyper-V cluster, there was an error "This configuration causes the host cluster to become overcommitted". I checked all the node properties and realized that there are still more than enough available RAM on each node. Why the overcommitted problem?

I came across the Technet forum page where Mike Briggs explained the memory calculation of SCVMM. First, SCVMM would sum up a new total memory requirement by adding up all memory used by all existing VMs and the new VM requirements to be deployed. It would then calculate whether the host cluster able to withstand the new requirement if the specified number of node failures are allowed to fail. The number of nodes allowed to fail is configured in the cluster reserve.

If you are confident of the overcommitted issue, simply adjust the cluster reserve number downward and the VM placement would continue successfully. The reserve number can be found on the the General tab of the host cluster properties of SCVMM console.

Saturday, January 7, 2012

VLAN settings on SCVMM 2012 RC

If you use VLAN in your network, you can simply add a VLAN id directly into the "Virtual Network" adapter using SCVMM 2008. The new 2012 RC introduces "Logical Networks" concept where you have to pre-define the VLAN id and network subnets before they can be rolled out. On the SCVMM 2012 RC management console, click on Fabric and Logical Networks as shown below:

On individual virtual networks, you have to define new network site and add the corresponding VLAN ids and IP address subnets as shown below:


When you return to the "Network Adapter" settings of your VMs, you can now assign the VLAN id accordingly.

Friday, January 6, 2012

First VM attempt on SCVMM 2012 RC

Happy new year to all! This is my first posting for the year. Microsoft has released SCVMM 2012 Release Candidate (RC) version and I rushed to the trial without much reading. To my surprise, the concept is now radically different from its previous 2008 R2 version. First of all, SCVMM 2012 now has a concept called "Cloud". Microsoft has been marketing SCVMM as the foundational tool for private cloud deployment. As multiple Hyper-V hosts form a "Cluster", multiple clusters (including VMWare ESX, Xen, Hyper-V) and hosts now form a "Cloud". Services and VMs may now reside in any clusters and hosts within a cloud.

As I added existing Hyper-V clusters, the next error that I encountered was existing 2008 VMM agents were not compatible with SCVMM 2012. Hence, I have to removed all existing agents. If you are like me who prefer bare-metal Server Core and rushed into the new SCVMM, you might have to remove the agents manually looking at the "Uninstall String" within the Windows registry and run the uninstall command (See this explanation post).

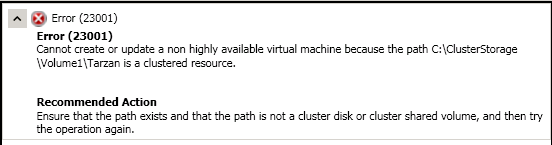
Hyper-V hosts were finally added. Happily, I created the hardware profile and VM templates just like what I did in the previous version. In my first attempt of making a new VM out of the new templates, I encountered this error saying that I simply can't place the new VM into the Clustered Shared Volume.

New in 2012 RC, SCVMM now ensures that only VMs marked as "Highly Available" (HA) can be placed in a CSV. 2012 RC introduces a new concept called "Capability Profiles" and the relevant resources (clouds and clusters) must be marked with the relevant "HA" capability. See this post for step-by-step guide.

Also, you have to mark the new VM as highly available in the "Advanced" section of the VM hardware profile setting as shown below:


Finally, my first VM for the year 2012 was successfully rolled into the "cloud".