Thursday, January 27, 2011

SolarWinds Orion Part 1 - Adding nodes to NPM

We have recently implemented SolarWinds Orion as part of our Network Management Systems (NMS), which is pretty essential if you're managing a large network. You would want to monitor and track the network device status, configuration changes, network traffic and bandwidth utilization within the network. SolarWinds Orion is made up of several sub-modules that handle different aspects of NMS. For example, SolarWinds Netflow module is necessary to track network application usage and the Network Configuration Manager (NCM) is needed to track configuration changes.

Above all, you would first need to have the Network Performance Monitor (NPM) installed as the base module before you can do anything more. NPM is simply used to monitor the network devices up/down status, as well as measuring basic bandwidth utilization rate at the interface level. Hence, adding new network nodes to the NPM is the first step.

To add new nodes, you can either manually add a single node or enable a network discovery sweep to add multiple nodes at one go. Either way, you must first supply the node IP addresses and SNMP credentials (SNMPv3 is recommended for security reasons). Hence, you must first enable SNMP on the network devices.

For Cisco IOS devices:

'define the snmp scope
(config)# snmp-server view SNMPVIEW dod included
'create a snmp group and permit the group read access to the above view
(config)# snmp-server group SNMPGROUP v3 auth read SNMPVIEW access SNMP_ACL
'create a snmp user and add it to the above group
(config)# snmp-server user SNMPUSER SNMPGROUP v3 auth sha **** access SNMP_ACL
'permit SNMP polling only from the NMS server
(config)# ip access-list standard SNMP_ACL
(config-std-nacl)# permit 1.1.1.1
(config-std-nacl)# deny any

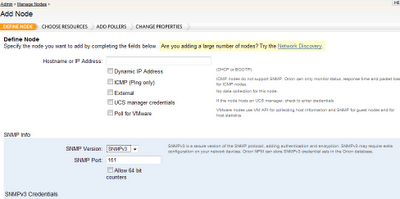
After that, login to SolarWinds Orion as administrator, click on "Manage Node" and then "Add Node". Uncheck the box beside ICMP (Ping only). Supply the node IP address and the SNMP credential that you created above. You can also save the SNMP credential as a template account for subsequent nodes.


Tuesday, January 4, 2011

Sharing ISO images among Hyper-V hosts

By default, when you want to mount an ISO image to a DVD drive on your Hyper-V VMs, SCVMM would copy the ISO image to the hosting parent partition. For better I/O performance & resiliency, this is desirable when you need to mount the image on a permanent basis. However, quite often, we only need to mount the image temporarily to install some applications.

SCVMM R2 (yes, only the latest version at this time of writing) allows you to share the image over CIFS (a.k.a file share). This saves storage space and time to transfer the image over.


If you read the in-built help, it only briefly mentioned about using "constrained delegation". Constrained delegation (1) allows a computer to impersonate a user account to gain access to resources that normally only available to that user; and (2) constraints the access only to specific services e.g. CIFS. How do configure that? Someone did the step-by-step explanation. Read this blog post.