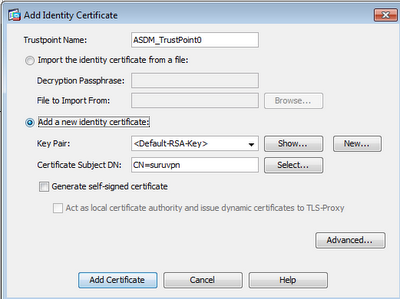
To import the CA certificate, click on "Configuration > Remote Access VPN > Certificate Management > CA certificates > Add". To generate the new key-pair for the ASA, click one tab below on Identity Certificates and a dialog box would appear:
 Click on "New..." button, give it a new name and generate the new key-pair. Click on "Add Certificate" button and generate a p10 certificate request. Copy out the cert request file and send it over to the CA for issuance. In any case that you have to modify the X.509 attributes (e.g. CN, email etc), you don't have to re-generate a new key. Just delete away the old cert and re-use the same key for another new cert request. Run the step-by-step Remote Access Wizard.
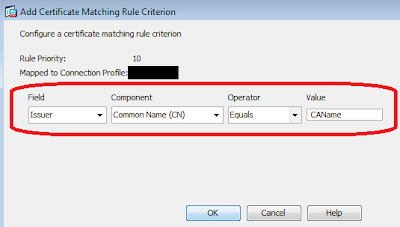
However, the wizard won't set the default IKE profile to cert authentication. On "Advanced > IPSec > IKE Policies", create a highest priority (i.e. smallest number) on the IKE policies with authentication to "rsa-sig" or "authentication rsa-sig" under "crypto isakmp policy 1" on global config to ensure certificate authentication during the IKE phase. By default, the authentication would also be mapped to the default "DefaultRAGroup" instead of the newly generated profile. Click on "Advanced > IPSec > Certificate to Connection Profile Maps". This is to map the certificates to the right IPSec profile during the initial IKE authentication. Click on the "Add" button, create a new connection and map to your earlier wizard generated IPSec profile. Then click on the "Add button" below the Mapping Criteria for cert attribute matching.
 As all certificates in the chain have the same issuer, my preference is to match the Common Name (CN) of the issuing CA.
On the front-end Cisco VPN client, you may choose any methods to enrol the client smart card or just by importing the p12 soft-tokens into the default Cisco store. Nothing much else is needed to configure on the front-end, except setting the destination host to the outside interface of your Cisco ASA VPN. Hopefully, there should be no errors. If there is, I find it easier to troubleshoot on the front-end client (rather than debugging on the back-end console) by enabling logging (Ctrl-E) and Ctrl-L to show the Log Window. Tweak the logging levels on the "Log Setting". The most common log sources would be the Certificates and IKE. If you wish, you may also turn on debugging on the backend using "debug crypto ca 127" and "debug crypto isakmp 127". Earlier, I saw a debug error on VPN client saying: Unable to establish Phase 1 SA with server because of "DEL_REASON_IKE_NEG_FAILED". Set the IKE authentication to auto by entering "isakmp identity auto" on the global config.
No comments:
Post a Comment